Quantcast
Channel: IKEA HACKS – IKEA Hackers
Viewing all 1516 articles
Browse latest View live

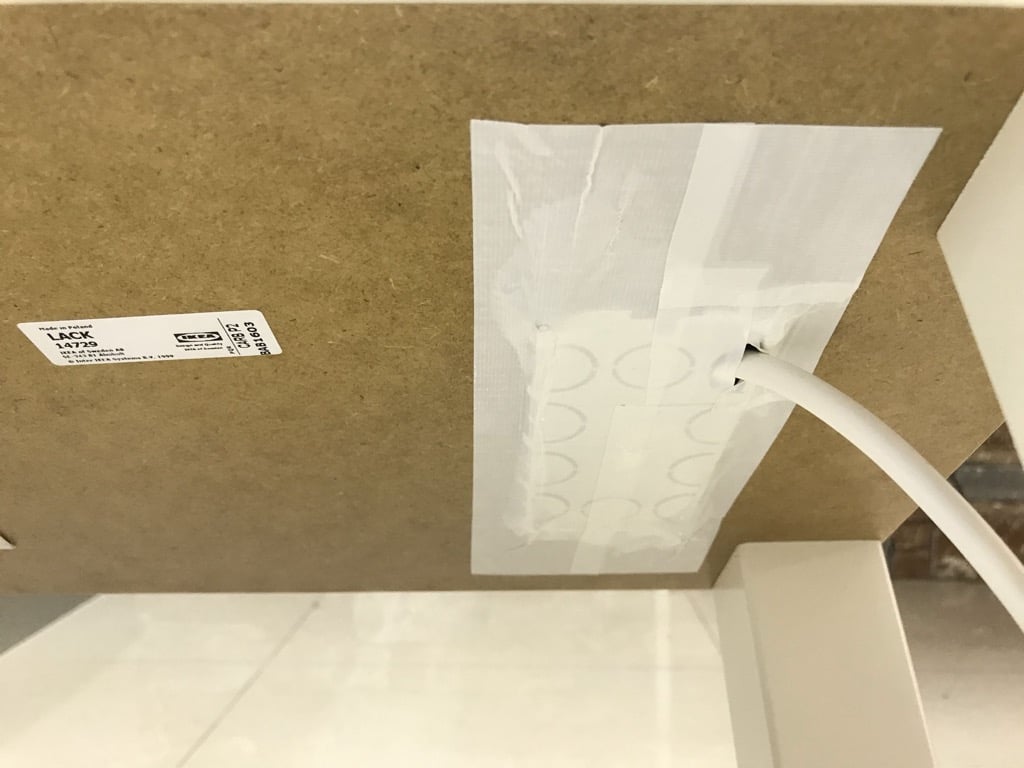
Multi-device charging station built into an IKEA bench

$
0
0

We made a multi-device charging station dock for our laptop and tablet.

For our project, we used the very inexpensive IKEA LACK TV bench, which costs only $15.99.

It was also our object of choice because:

You can cut holes into it.

Easily.

The docking station tucks neatly away beside our sofa and is easily accessible.

IKEA items used:
LACK TV bench

LACK TV bench | IKEA.com

Materials and tools:
  • Electrical socket outlet (I used the “Gewiss Chorus” Flush Socket Outlet)
  • Electrical cable
  • Drill
  • Electric saw
  • Plastic wall corner guards/protectors
  • Glue
  • Foam or another soft sheet material

Hack instructions for DIY multi-device charging station:

Outline the slots for the socket outlet, and for the electronic devices (Tablet/Laptop).

DIY multi-device charging station - IKEA hack

Drill a hole in each of the corners of the outlined slots (these holes will be used as an entry point for the electric saw).

DIY multi-device charging station - IKEA hack

Cut out the outlined slots using the electric saw.

Wire the electrical cable to the socket outlet.

DIY multi-device charging station - IKEA hack

DIY multi-device charging station - IKEA hack

Cover the rough sides of the cut-out slots using the plastic corner guards; Cut out a frame (similar to the shape of a picture frame) from the plastic corner guards; Use glue to attach them to the TV bench.

Measure the height of your electric devices, allow the shortest device to extend about 6-8cm (3 inches) from the top of the table.

Remove the bottom shelf of the TV bench; measure and mark the new height and reinstall the shelf.

DIY multi-device charging station - IKEA hack

Cover the shelf using the foam (the electric devices will rest on this foam).

Multi-device charging station done!

DIY multi-device charging station - IKEA hack

DIY multi-device charging station - IKEA hack

The station is not visible from the main areas of our living room.

DIY multi-device charging station - IKEA hack

Quietly filling up our devices with juice in the corner.

DIY multi-device charging station - IKEA hack

DIY multi-device charging station - IKEA hack

More info:

If you have access to a 3d printer – then you should print the cover frame for the slots – this will save you tons of time cutting them accurately from plastic corner guards.

DIY multi-device charging station - IKEA hack

Since this project involves electricity, please make sure you know what you are doing; if in doubt – use a professional to wire the outlet socket.

~ by Alon

The post Multi-device charging station built into an IKEA bench appeared first on IKEA Hackers.


Probably the most beautiful IKEA farmhouse kitchen

$
0
0

I did not find my dream kitchen so I need to DIY it. The result is a modern farmhouse kitchen that does not look like a regular IKEA kitchen with many features being installed.

The building process was very time-consuming and installing all of the items have taken some weeks.

Since IKEA Kitchens have fair pricing the cost for the kitchen is still reasonable. The most expensive additional things are the kitchen electricals including the LED-Lighting, the stucco mouldings and the solid worktop.

Click the arrows to view slideshow
IKEA items, material and tools:
  • IKEA METOD cabinets, drawers and doors
  • BODBYN fronts
  • Hob
  • Integrated fridge
  • Dish-washer and other smaller IKEA items.
  • 40 mm solid worktops
  • LED Strips and LED Drivers
  • Tons of stuff for the kitchen electricals
  • Stucco mouldings
  • Putty and more
  • You need proper tools like an electric drill (or two), laser, spirit level, jigsaw, soldering iron, spacers and others.

The hack is too enormous to list all steps. So, I created a website where the steps are shown in detail. You can follow the building process from the beginning to the end.

The IKEA farmhouse sink Domsjö. Installation is quite simple.

The IKEA farmhouse sink Domsjö. Installation is quite simple.

Installing an IKEA farmhouse kitchen

Basically, the steps are as follows. Click on the links to read more:

I like the tiled splashback the most, especially when it is set in the scene with the right lighting.

Beautiful IKEA farmhouse kitchen

Besides that, I love the lighting of the base of the kitchen cabinets. The base lighting makes the kitchen look like it’s floating.

Beautiful IKEA farmhouse kitchen

Beautiful IKEA farmhouse kitchen

Full details of the kitchen project are here.

Watch a video of the IKEA Farmhouse Kitchen build process.

~ by Benjamin

While you’re here, check out my other hack (pic below): A BILLY Library like no other.

Billy library

The post Probably the most beautiful IKEA farmhouse kitchen appeared first on IKEA Hackers.

5 most popular IKEA hacks of 2018 and Merry Christmas

$
0
0

Hey there!

I’m taking a short hiatus from posting this holiday season to be with family and friends. It’ll do my soul good to hit pause on the daily schedule of posts, social media and all the “connectedness” required to keep IKEAhackers going.

So I’ll be absent for a few days. But before I take off, let me thank you for continuing to visit IKEAhackers, though I know there are so many new channels for IKEA hacks.

Your every visit, submission and comment, counts.

I appreciate all of it.

During this intermission, let’s revisit some of the most popular IKEA hacks of 2018. These are the most social-ed posts — most pins, most comments, most shared. Hope you like these fan favorites.

5 most popular IKEA hacks of 2018

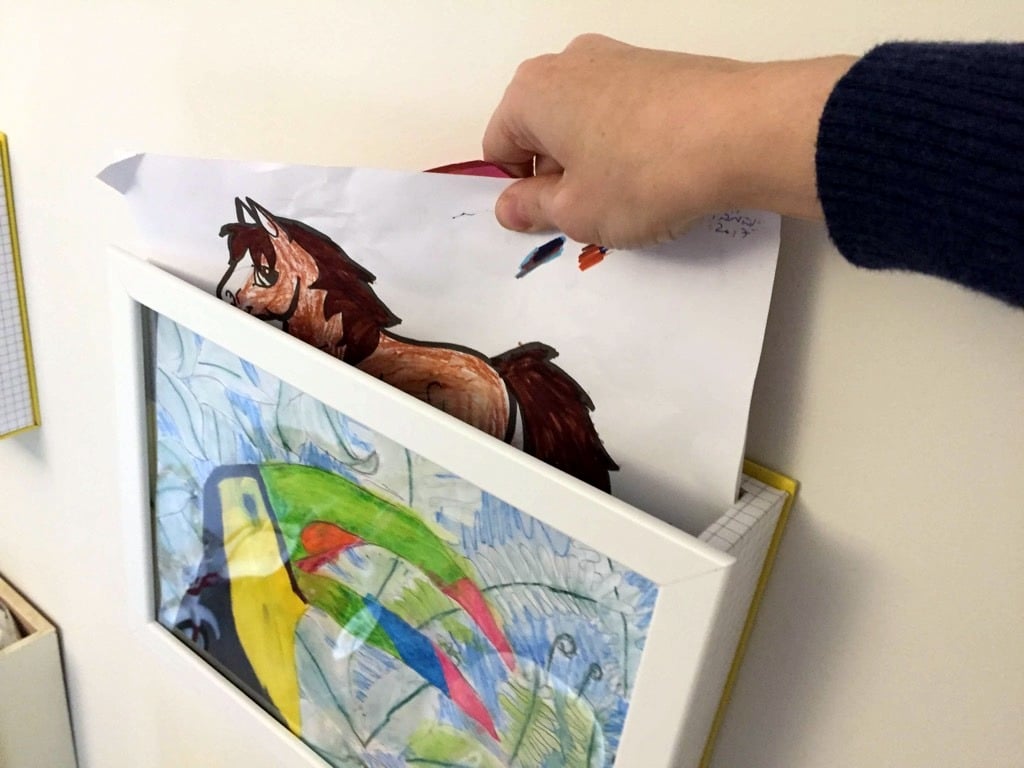
#1 Kid’s art display box

kids art display box

This kids art display box allows Merav to save her kids’ paintings, show them, easily change the piece on display and, in general, give them the right attention. See the kids’ art display box.

#2 Bridal bathroom helper in an IKEA blue bagikea blue bag bathroom helper

Tina was getting married and was really worried about going to the bathroom and not being able to handle herself. Someone helping or watching her using the bathroom on her wedding day? Not being able to have free hands to use the toilet paper? Or even worse if her period decides to show? NO WAY! Some stuff like a bridal bathroom helper exists but are expensive just because it is wedding related. So she decides to hack a bridal bathroom helper. It costs about 0.80 euro and she did it the day before the wedding. What she likes best is it’s almost free and make her life easier on her wedding day. So here’s the bridal bathroom helper hack.

#3 The FADO Moon lamp

moon lamp

This was really an unexpected one. I didn’t realize so many people loved having a moon lamp. When it was posted, it quickly rose to become one of the most pinned images on our IKEA hacks board. This one is made out of the IKEA FADO lamp, which sells for $24.99. After a lot of delicate painting, voilà, I give you the moon. See the moon lamp hack.

#4 TROFAST children’s storage and seat

Jennifer needed storage for their new family room which serves as both playroom and home office. But she didn’t want to go down the bright IKEA colors route which really wouldn’t go with her current color scheme! So she made the TROFAST storage units and seat to match her color scheme. See the tutorial.

#5 Smart sewing table with sliding tray for sewing machine

sewing table with sliding tray

This is Cristina’s sewing table project. It’s smart because it has a sliding tray that makes it easy to store the sewing machine when she doesn’t need it. Makes it super easy to store and access the sewing machine. See the hack.

These are the 5 most popular IKEA hacks of 2018. Which is your favorite? Let us know in the comments below.

And before I sign off, here’s wishing you a very Merry Christmas and a Happy New Year.

I’ll be back in no time.

Jules

The post 5 most popular IKEA hacks of 2018 and Merry Christmas appeared first on IKEA Hackers.

10 best of the best IKEA hacks of 2018

$
0
0

Hey, hey. It’s the last day of the year and it’s time to wrap it up with the most important post of all … the most awesome, best IKEA hacks of 2018 on IKEAhackers.

Well, this year has been an interesting one. One that includes IKEA hacking itself. Though, not for the first time.

Truly gone are the days where we, IKEA hackers, lurked in the fringes. It’s fascinating to see how this obscure DIY trend has grown leaps and bounds in the last few years. Folks, we’re mainstream now. 😆

What holds for 2019? More IKEA hacks, of course.

But before we go there, let’s take a look at the best IKEA hacks of 2018 and give these hard-working, brilliant hackers a thumbs up.

10 best IKEA hacks of 2018 – The A-list

Presenting my top 10 favorite IKEA hacks of 2018, in no particular order.

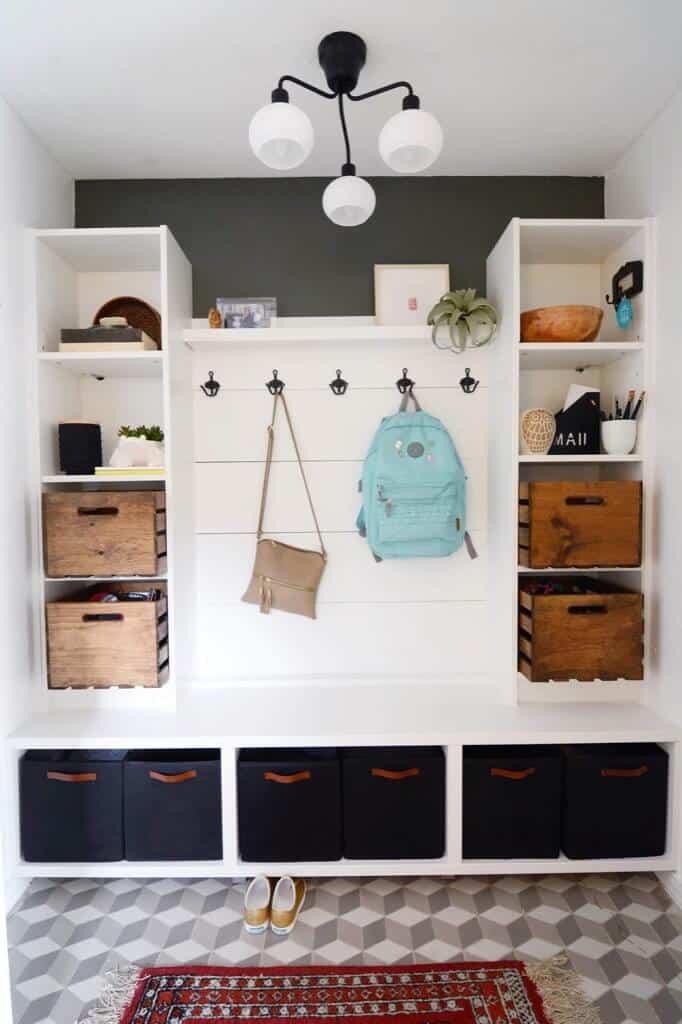
#1 Jessica’s mudroom redo

10 best IKEA hacks of 2018 - Jessica's mudroom

Jessica took an under-utilized closet, added some IKEA pieces (BESTÅ and BILLY) for storage and made them into beautiful mudroom furniture for her home. Click here to see the wonderful transformation. You got to see it to believe it.

#2 Mat’s extra long dining bench with storage

10 best IKEA hacks of 2018 - Mat's dining bench

Dining benches with storage, especially ones that span entire wall lengths cost an arm and a leg. But Mat put this together for under $200. It looks amazing, fits the nook almost like a built-in (it’s not!), and offers plenty of storage under the seat. See Mat’s dining bench with storage.

#3 Tina’s something blue for her wedding

10 best IKEA hacks of 2018 - Tina's bridal bathroom helper

Tina was getting married and was worried about not being able to handle herself AND keep her mermaid gown clean when she’s in the bathroom. Some stuff like this bridal bathroom helper exists but was expensive. Her bridal bathroom helper hack costs $1.49 and took only 3 minutes. What’s best, it made life easier on her wedding day. So here is Tina’s bridal bathroom helper.

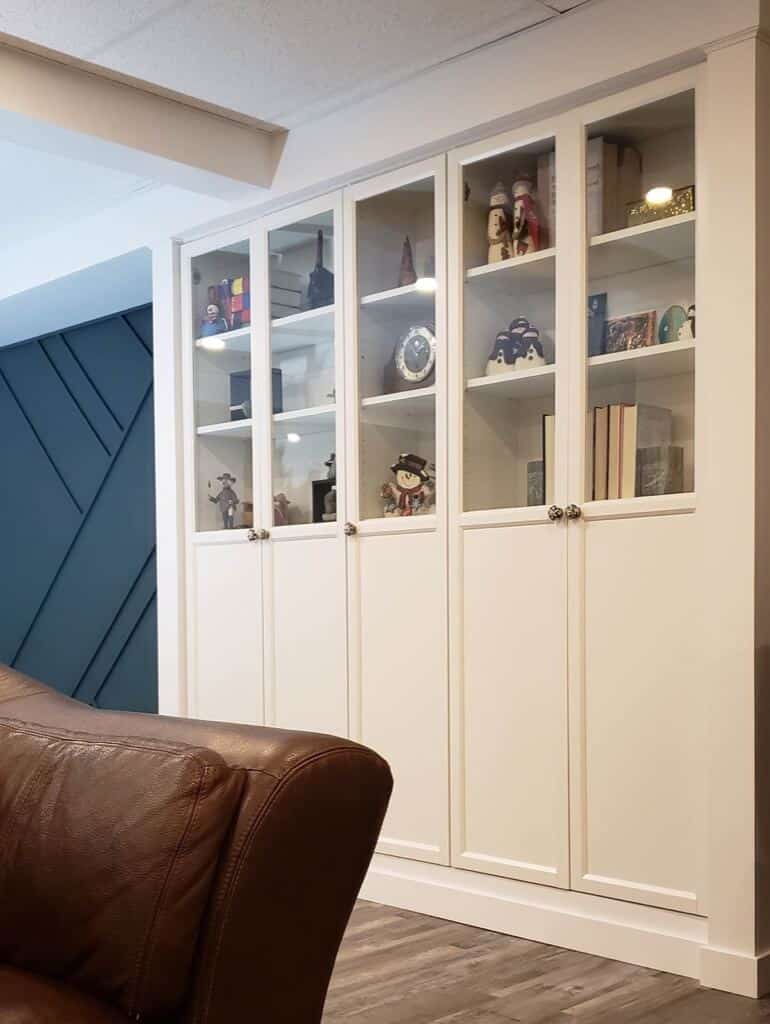
#4 Pauline’s tasteful IVAR built-in bookcase

10 best IKEA hacks of 2018 - Pauline's IVAR built in bookcase

If I didn’t tell you, you wouldn’t have guessed this floor to wall bookcase was made from the IKEA IVAR system. The system itself is typical IKEA bare bones but Pauline fleshed it out with trim, moulding and solid panels. You’ll hardly even notice the infamous IVAR holes. See more of Pauline’s elegant IVAR, reinvented as a full height built-in bookcase.

#5 Dylan’s hidden wireless charger

10 best IKEA hacks of 2018 - Dylan's hidden wireless charging pad

Dylan had this idea to embed wireless charging to his nightstand, which I think is brilliant. It keeps the surface clean of chargers and cables a.k.a. things we rather not see. Click to see Dylan’s wireless charging pad in action.

#6 Jeff’s KALLAX for the corner office

10 best IKEA hacks of 2018 - Jeff's home office furniture

Jeff received two KALLAX units for free and wondered whether he could make them unique. Plus, he needed storage in his office and the reconfigured KALLAX units fit perfectly. Take a look at Jeff’s KALLAX corner home office furniture.

#7 Ian’s cat resistant 3-seater POÄNG sofa

10 best IKEA hacks of 2018 - Ian's 3 seater POANG

Ian inherited a cat that shredded their furniture, apart from a 20-year-old IKEA POÄNG armchair. A few readers have attested to this astonishing fact. Ian was dismayed to find that no matching sofas were available in the POÄNG range. So he decided to give hacking a go and made a 3-seater POÄNG sofa.

#8 Cristina’s smart sewing table with a sliding tray

10 best IKEA hacks of 2018 - Cristina's smart sewing table

Cristina’s sewing table has a sliding tray that makes it so easy to store the sewing machine when she doesn’t need it. It’s definitely way easier to clear the table top for other aspects of sewing when you have a dedicated spot for the machine. See more of the smart sewing table.

#9 Courtney’s dog steps for small dogs

10 best IKEA hacks of 2018 - Courtney's DIY dog steps

After watching her puppy struggle up onto the couch, Courtney knew she needed a set of dog steps. The options online didn’t suit her decor so she made one from IKEA KNAGGLIG crates. And as you can see, the pup is beaming. See Courtney’s DIY dog steps.

#10 Game on with Adam’s expanding board game table

10 best IKEA hacks of 2018 - Adam's expanding board game table

What to do when you live in a small apartment but want to host board game nights without a space-hogging games table? This hack took around 2 hours total, and cost around $180. This expanding board game table provides flexibility in using the limited amount of space in the apartment. See the expanding board game table.

And that’s my list of favorites.

The 10 best IKEA hacks of 2018 on IKEAhackers. Which is your favorite?

Let us know in the comments below.

And now to look forward to more exciting hacks in 2019. See you over on the other side!

xoxo,

Jules

Want more? Take a look at the best IKEA hacks from previous years:

To see all posts on our annual best IKEA hacks list, please click here.

The post 10 best of the best IKEA hacks of 2018 appeared first on IKEA Hackers.

This clever white TV stand hides a heap. So practical!

$
0
0

I decided to update my TV stand, I asked myself:

… shall we buy a ready and durable combination or

… shall we try a cheap but functional DIY version?

I know our taste and needs can change, so I choose IKEA because it’s easy to customize, cheap and I know I can change it whenever I want!

My ideal solution should have light colors, almost 70 cm height, and almost 50 cm depth.

It should have simple lines, a glass cabinet for media devices, no visible cables, and many drawers. Better if they were hidden behind the doors/fronts.

The result is this IKEA white TV stand with honeycomb designWhite TV stand with pretty hexagon patterns

This project is a combination of STUVA structures and inner accessories + BESTÅ Vassviken/Glassvik doors (used as drawer front) = it costs 323 €

This is an IKEA hack for 3 reasons:

  • My white TV stand combines frames and drawers from the STUVA series (50 cm depth, 10 cm more than BESTÅ!) with BESTÅ Vassviken and Glassvik doors.
  • On the left section of the TV cabinet, the BESTÅ doors are not fixed with hinges but used as drawer fronts, fixed directly to the drawers. Pushing the door opens the lower drawer.
  • One door has been cut and fixed on the right end side of the stand as a cover panel. This gives the TV stand a more finished style.

White TV stand with pretty hexagon patterns

Original holes and connections of STUVA drawers and BESTÅ doors/fronts are NOT compatible, but I used simple L-brackets and shortened the bottom of the drawers to solve this!

Here the steps for my DIY white TV stand:

Build the two STUVA frames but do not add the back panels yet.

Shorten the bottom panel of the STUVA GRUNDLIG drawer, assemble the drawer (without front) and nail the bottom to the sides

White TV stand with pretty hexagon patterns

Add L-brackets to the sides and bottom of the drawer.

Fix the drawer guides to the STUVA frame.

Insert the drawer.

Next, place on the floor the BESTÅ door with the front facing down. I placed it on my carpet to protect it from scratches.

Then put the STUVA frame on the back of the door. As you can see from the photo below, the back of the frame is open and facing upwards. It’s like the stand is already completed but turned down.

White TV stand with pretty hexagon patterns

Check with care the centering of the frame on the door and mark the bracket hole positions on the door with a pencil

White TV stand with pretty hexagon patterns

Remove the frame from the door and extract the drawer.

Then, proceed to add the back panel to the STUVA frame.

Place the drawer on the door referring to the marked points and screw the brackets to the door

White TV stand with pretty hexagon patterns

Now that you’ve fixed the STUVA drawer and BESTÅ door  together, put the drawer on the guides in the frame to test it.

I added the push opener system: pushing the door, the lower drawer opens. If you rather not use push openers I think handles on the door can work well too.

I made these deep drawers for the last two units on the left of the TV cabinet. This leaves more room for larger items like pillows, blankets and games storage.

I’ve added removable wire drawers, one in each unit, to use also the upper space for VHS and smaller stuff.

White TV stand with pretty hexagon patterns

Completing the IKEA white TV stand

Once you have completed the drawer + door/front process, take the drawers out and fix together all 4 STUVA frames with screws.

Before fixing them, pay attention to adjust the feet of each unit while all 4 frames are placed in their final position.

In my case, the floor was not perfectly flat.

After that insert again the drawers on the left, and complete the assembly of the right part of the TV stand.

White TV stand with pretty hexagon patterns

On the last right unit, I preferred to use 3 STUVA wire drawers to store only DVD discs, and the door has hinges. Here you can follow IKEA standard instructions.

In the glass cabinet, I made holes in the back panel to allow the cables to exit just behind the shelves. I attached the glass door with hinges. Here you can follow IKEA standard instructions.

White TV stand with pretty hexagon patterns

Adjust the hinges to align the doors of the right part of the stand.

Finally, I shortened a Vassviken door and fixed it to the right end side of the structure, to give a uniform look.

Choose carefully the screw length to avoid damages to the visible side. Drill the screw from inside the cabinet outwards.

White TV stand with pretty hexagon patterns

White TV stand with pretty hexagon patterns

Materials for white TV stand:
  • 4 x STUVA frame (60 x 60 x 64cm)
  • 2 x STUVA GRUNDLIG drawer
  • 5 x STUVA GRUNDLIG wire basket
  • STUVA GRUNDLIG shelf x 2 (56 x 26cm)
  • GLASSVIK door (60 x 64cm)
  • VASSVIKEN door x 3 (60 x 64cm)
  • BESTÅ hinges
  • 10 L-brackets
  • Screws
  • Nails

(Download the Order List)

Tools:
  • Drill/screwdriver
  • Hammer
  • Saw

Time to complete the assembly: one day.

I’m waiting for a custom-made white painted glass top. That will be the finishing touch to my white TV stand!

I’m really happy with the result: functional, roomy and I love the honeycomb design!

To see more of my white TV stand and my home tour, come visit me on my blog.

~ by Silvia De Marchi, Italy

The post This clever white TV stand hides a heap. So practical! appeared first on IKEA Hackers.

IKEA PAX hack: Hands down the most stunning walk-in closet

$
0
0

After getting stuck on an image of a blue, custom walk-in closet on Jenny’s Wolf‘s site, I decided I was going to figure out a way to get a similar look in my own house with a non-custom budget.

In my search, the IKEA PAX kept coming up as the most common, highest-rated, and budget-friendly closet system.

Lots of people have hacked the IKEA PAX to create a built-in look and we thought we’ll use the PAX core, with some critical upgrades for a full custom cabinetry look.

View slideshow of IKEA PAX walk-in closet
IKEA items used for our walk-in closet:
  • PAX Wardrobe Frames (29″ and 13″ deep)
  • KOMPLEMENT Shelves
  • KOMPLEMENT Drawers
  • VARIERA Cover Plates
Other materials and tools:
Instructions for our custom IKEA PAX walk-in closet
The Planning

1. First, we cataloged how much space we each needed for our clothes (High, Medium, Low) and storage type by clothing category in a spreadsheet.

2. For the next step, the PAX Planning tool on the IKEA website came in handy. Using our spreadsheet, we created each of our sides of the closet. We ensured we had enough space for our existing wardrobe items and our storage preferences. eg. folded or hung.

For reference, the room is 14.6′ long by 6.5′ wide. We opted for the deeper IKEA PAX units on one side (29″ deep) and shallower units on the other wall (13″ deep). This allowed for a wide walkway between the two units.

Assembling the PAX units + light installation

3. Then, we built the units and made certain they were level. We only have standard 8” ceilings, so we had to build the units in the room. Because of our ceiling height we also couldn’t build a platform for the wardrobe units to sit on.

We shimmed under the units to ensure they were completely level to one another, so when we ran the baseboards across the front of them, everything looked flush.

Jaw-dropping transformation of IKEA PAX into a walk-in closet

4. Installed the puck lights ordered off Amazon and hardwired them into an electrical box.

Jaw-dropping transformation of IKEA PAX into a walk-in closet

In order to make the lights look very custom, we recessed them into the front of the top shelf in every unit. To recess the lights, we used a router to trace a template we made in a scrap piece of wood.

Installation of Baseboards + PAX floor

5. Next up, we ran the baseboards all the way around the walk-in closet space for a fully-built in look. The top of the baseboard profile is flat horizontally. It allows the wood that we applied later on to the fronts of the cabinetry to flow seamlessly.

Jaw-dropping transformation of IKEA PAX into a walk-in closet

We attached the baseboards to the front of the wardrobe units with construction adhesive. And added nails where the baseboards sat flush with the vertical sides of each individual wardrobe unit.

We set up our laser level to keep our baseboards level, which is critical for the creation of square openings for your drawer fronts later on.

6. The next step was to build up the bottom of the unit. Using some spare PAX/ KOMPLEMENT shelves, we installed them on top of the interior base of the units to bring it up to flush with the baseboards.

Jaw-dropping transformation of IKEA PAX into a walk-in closet

Fixing the wood trim

7. Installed the wood trim. We used 1/2 inch thick Poplar boards that we cut down into strips. The strips were used to cover where the wardrobe units met and the filler boards on the sides. Also applied to the top where the wardrobe units didn’t quite reach the wall.

Jaw-dropping transformation of IKEA PAX into a walk-in closet Jaw-dropping transformation of IKEA PAX into a walk-in closet

We then added horizontal poplar strips that aligned with the bottom of the crown moulding. This is so the bottom edge of the crown would look properly built onto the units and not recessed into it. (In the above photo you can see that there’s some wood behind the crown moulding).

Jaw-dropping transformation of IKEA PAX into a walk-in closet

Finally, we added the smaller horizontal strips to the front of the PAX shelves. The shelves in the PAX units don’t sit flush with the sides of the PAX units, so the depth of wood needed here was thicker than the 1/2 inch Poplar we used everywhere else.

Turns out they don’t sell 5/8 inch Poplar, and we ended up finding stain grade flat pine board at Lowes that worked like a charm.

Once all the wood was installed, we used Bondo to fill all the holes and seams where the wood strips met. We also used glue to add shoe moulding to cap off the space between the baseboard and the floors.

Crown moulding goes up our walk-in closet

8. Installed the crown moulding along the top edge of all the wardrobe units. This really capped off the built-in look and totally hid the gap from the top of the wardrobes to the ceiling. We then caulked all the seams.

9. Next, we created drawer fronts, opting for a flat front, which is a nice streamlined look and also lower effort than a shaker style. We used the same 1/2 inch Poplar board and just cut it down to size. Then, we left an 1/8 inch gap around the drawers and sanded the drawer fronts down.

Jaw-dropping transformation of IKEA PAX into a walk-in closet Jaw-dropping transformation of IKEA PAX into a walk-in closet

After cutting the fronts, we tested them on to the drawers themselves to ensure the drawers lined up throughout the room horizontally in each unit.

Once we had test fit all the drawer fronts, we used tape to label the drawer and the drawer front, so we could match them up later once they were painted, and then separated the drawer fronts from the drawers.

Jaw-dropping transformation of IKEA PAX into a walk-in closet

Wallpapered the backs of the built-in wardrobe units

10. One of the tell-tale signs of an IKEA PAX is the seam that runs down the back wall of the wardrobe unis. Because the MDF comes folded 1-2 times, there’s an unsightly seam that definitely screams low quality.

I didn’t want to put all this work into making the PAX look like a custom walk-in closet only to have a seam give it away that these are indeed IKEA!

So, I tracked down paintable faux grasscloth wallpaper and installed it on the back wall of the wardrobe units. I wanted a paintable wallpaper so it looked seamless with the units and I also love the hint of added texture.

Jaw-dropping transformation of IKEA PAX into a walk-in closet

Plugged up the holes

11. We using the VARIERA plugs from IKEA and went through at least 12 packs of these plugs. You can see in the above shot that we had installed the plugs.

As a note, we didn’t add in the plugs on the side where we have only shelves, since we wanted them to be adjustable long-term.

Prime and paint the built-ins

12. Then, we primed everything with a shellac based primer (specifically this one) with a high-density foam roller. In spots that were most difficult to reach, we used a paint brush.

We actually did two coats because the primer dries really fast and we’re a little bit neurotic.

13. We painted the room using a spray gun, which allowed for a super professional look. For the paint, we used Farrow and Ball Inchyra Blue in the Modern Eggshell finish, and it’s one of my most favourite moody colours of all time.

Finishing touches to our walk-in closet

14. Allow the paint to cure for a day or two before installing the drawer fronts. Once the drawer fronts were ready to go, we installed each drawer front one at a time.

15. Almost there. We installed gorgeous, super heavy unlacquered brass cup pulls. They were attached through the drawer front and onto the drawer itself. We used our favourite laser level to ensure all the drawer pulls were aligned horizontally on both sides of the closet.

Jaw-dropping transformation of IKEA PAX into a walk-in closet

16. The last thing we did was to add the wood hanging rods. We painted the original IKEA hanging rod hardware to match the closet paint. Finally, cut down the basic wood hanging rods to fit each wardrobe.

And that’s it! Now the walk-in closet looks super custom. You can see how all components came together in a space that feels much more high-end than a basic IKEA hack!

And that’s it! Now the closet looks super custom and you can see how all components came together in a space that feels much more high-end than a basic IKEA hack!

This is an abridged version. See the full tutorial of our custom walk-in closet where we lay down more tips and details here.

~ by Erin

The post IKEA PAX hack: Hands down the most stunning walk-in closet appeared first on IKEA Hackers.

See it. Or not? How to make a BILLY bookcase secret door

$
0
0

We wanted to achieve two goals with one project:

Find a clever, affordable, and easy-to-install (and break down) secret door in our rental home (we’ve always wanted one) AND …

… make this weird middle room in our home with doors and windows on every wall useful!

We already have a living room. Our kitchen has space for our table, and this room is just oddly in the middle of everything. New England houses, man!

Our solution was to turn the space into our whiskey and tea library, with a wall of dark shelves, some nice seating options. And, in doing so, create a secret door that leads to our home office/guest room, turning it into a unique secret room.

View slideshow of the Whiskey and Tea Library with Secret Door

After some late night creativity and lots of measuring, I realized the BILLY Bookcase the perfect width to fit in front of the door to our office/guest room. And it could be tucked into the wall well. But it was also really affordable and easy to assemble.

I’d also been considering some of IKEA’s closet and wardrobe systems, primarily the PAX system. But those were more expensive, stuck out more from the wall, and most of the door options didn’t feel right for the space.

IKEA items used:
  • BILLY Bookcase – 2 wide and 1 narrow
  • BILLY Bookcase Height Extension – 2 wide and 1 narrow
  • OXBERG glass doors for BILLY Bookcase x 5
  • OXBERG Height Extension glass doors x 5
  • 5 ÖSTERNÄS leather handles (technically 3 packs)
Other materials and tools:

How to make a secret door using BILLY bookcases

Measure the space

Measure the open wall space and door opening. This both ensures that you’ll buy the right number and sizes of the IKEA BILLY Bookcase and also that the door opening to the room you want to hide will line up with the wide BILLY Bookcase.

We have an extra ~14″ to the corner on the right side of the bookcase but we’ll solve that at another time!

Whiskey & Tea Library hides secret door to home office

before

Assemble bookcases and height extensions one section at a time based on IKEA instructions. Then, anchor WELL to wall using IKEA provided anchors and the proper screws for wall type.

Whiskey & Tea Library hides secret door to home office Whiskey & Tea Library hides secret door to home office

On the section that will be in front of the secret door, simply assemble the outer frame of the main bookcase – without the back or base. Then, assemble the full height extension and attach it to the BILLY frame. Carefully put in place and anchor well to the wall.

Whiskey & Tea Library hides secret door to home office

Whiskey & Tea Library hides secret door to home office

Install the doors

Install OXBERG doors on all units once anchored.

Whiskey & Tea Library hides secret door to home office Whiskey & Tea Library hides secret door to home office

We installed ÖSTERNÄS door handles on lower doors. (And we left the standard OXBERG handles on the height extensions just to save a little money. But I imagine it would look great for all doors to have leather handles).

Whiskey & Tea Library hides secret door to home office

Apply window tint film following manufacturer’s instructions. We used ZEALOTT Solar Control Window Tint Static Cling that we found on Amazon. It seemed to be the best dark tint.

Better yet, it also creates a nice reflective mirror effect for those sitting in the whiskey room (as we call it). I had to cut this for each window section and used a spray bottle to get the surface adequately wet.

Whiskey & Tea Library hides secret door to home office Whiskey & Tea Library hides secret door to home office

Fill shelves with whiskey and tea and books and enjoy!

How long did it take?

It took a full day to assemble the bookcases and doors. Another day to really do the window film right. And then an embarrassing four months to finish unpacking. (We had just moved into this house summer of 2018. I built all this, and then stashed all of our junk in the office so it was an utter mess until now!).

Clearly, we haven’t finished painting the office yet, but that won’t happen until later in 2019. But I can’t wait any longer to share this secret door hack.

Looking out from the home office/guest room through the secret door

View from inside the home office/guest room to the Whiskey room

What was the hardest part?

Honestly applying the window film was the hardest. It was so tedious and tricky to make sure the cut is centered, clean of all fuzzies. (Dog hair in our case). And then spraying and smoothing and spraying and smoothing to get out the air bubbles and creases.

But in the end, it was all worth it. Our whiskey and tea library is awesome. And no one will be any the wiser of our secret door to the hidden office.

~ by Meg Salocks (Follow me on @megandtinyblueberry)

The post See it. Or not? How to make a BILLY bookcase secret door appeared first on IKEA Hackers.

Need a study table for kids? Here are 10 of the brightest ideas

$
0
0

The school term begins yet again and soon, there will be piles of homework and books, strewn all over the house. Wouldn’t it be great to have a dedicated study table for the kids to do their thing?

“If only I have space”, you say!

A study table for kids doesn’t need to take up a lot of space.

It can fit into their rooms. Or even a corner of the living room or kitchen.

To spark some bright ideas for your space we made a list of 10 best IKEA study tables for kids. Let’s get right to it.

#1 Long study table and computer station for 2 – 3 kids

10 genius IKEA study table for kids

Tim made this kids desk and computer station for his three kids. It includes desks for them to read, write, draw and lots of storage. It also has a place to accommodate a computer (or kid number 4). His IKEA product of choice is the TROFAST frames and JULES chairs. See how he made the IKEA TROFAST kids desk here.

#2 Kids study tables with storage

10 genius IKEA study table for kids

In Janine’s L-shaped living room, they wanted their kids to read and play in the corner. She wanted to include little desks for them to draw and little cabinets on wheels to put their daily stuff to put into. She made a structure out of the BESTÅ system above for out of kids’ reach storage and made desks beneath them. See the BESTÅ study and play centre here.

#3 Loft bed upgraded to include study table for kids

10 genius IKEA study table for kids

Their son was starting school and Anca decided to make room for a study table under the IKEA KURA bed, which they already had. They added timber structures to elevate the bed and construct a desk and storage areas. See the KURA bed with study desk.

#4 Girl’s study desk with storage

10 genius IKEA study table for kids

Peter IKEA hacked a desk for his daughter to do her homework and art, as well as a place to store her books, stuff and art supplies. He combined 2 pink KALLAX units and fastened a gloss red LINNMON table top to the smaller KALLAX. Can’t be easier to construct a study table for kids. See tutorial here.

#5 DIY kids study table

10 genius IKEA study table for kids

Jane took a different route. She used MDF for the table top and attached it to IKEA KRILLE legs. On the side of the table, she added 3 SUNNERSTA containers to function as a desk tidy, to keep pens and pencils organized. See more of the desk tidy IKEA hack and DIY study desk.

#6 Make it a classy desk

10 genius IKEA study table for kids

Sometimes a little tweak is all you need to make the IKEA desk fit your kid’s room decor. If the MICKE desk is too plain, glam it up with a custom top and drawer pulls. See more here.

Themed study tables for kids

#7 The force is strong with this one

10 genius IKEA study table for kids

The RAST chest is perfect desk height. Pair it with the LINNMON table top and ADILS leg and you’ll get a very affordable study table. And the best thing is, you can Mod Podge the drawer fronts with your kid’s favorite elements. In this case, Star Wars. See the Star Wars kids desk tutorial.

#8 #Studygoals

10 genius IKEA study table for kids

Mike’s son was in need of a study desk, and since he loves soccer and already has IKEA birch effect furniture in his bedroom, he decided to build a goal post study desk.

#9 Racing themed desk

10 genius IKEA study table for kids

Sasse wanted a racing car themed desk for her son’s bedroom but didn’t find didn’t any that please the eye. So she made one. See the F1 themed desk.

#10 Kids table with map

10 genius IKEA study table for kids

Claire had an old IKEA kids table and decided to make it over with a map. Would be fun to cover it up with a world map and teach kids the name of cities and countries. See the kids table with map.

One last one before we go.

If your kids won’t share the same table space, here’s the hack for you. Theresa’s kids would complain that they had no privacy, and were always fighting over whose stuff was on whose side of the desk. So, she decided to put a stop to all the problems once and for all.

The solution?

10 genius IKEA study table for kids

The Great Divide.

Genius, right?

Which is your preferred study table for kids? Let us know in the comments below.

The post Need a study table for kids? Here are 10 of the brightest ideas appeared first on IKEA Hackers.


Dad does it! Hacks the most amazing princess castle bed

$
0
0

When my son was 4 years old, my wife and I needed to move him out of his convertible toddler bed to a “big kid bed” so that our daughter could begin to use the former.

He wasn’t excited about it, so I offered to build him a new bed that was “the most awesome bed ever”, and the result was a success that made him very happy.

Our daughter is no dummy though … as she approached her fourth birthday, she began asking for her own special “big girl bed”.

And while our son had given us complete “creative control”, our daughter was a little more specific: “a fairy princess castle bed … preferably pink,” she said.

A Fairy Princess Castle Bed - IKEA KURA bed hack

My daughter’s first draft of the hack

fairy princess castle bed hack

3D model before construction began

This is the Fairy Princess Castle Bed we built for her:

A Fairy Princess Castle Bed - IKEA KURA bed hack

Watch my YouTube video, including 3D model, time lapse of the assembly, and my daughter’s reaction to her Fairy Princess Castle Bed:

IKEA items used for castle bed:
Other materials:
  • ~30’ of 2x4s
  • ~80’ of 2x2s
  • ~16’ of 1x4s
  • ~15’ of 1x10s
  • 3’ of 1×12
  • 18 2’ x 4’ white mdf panels
  • 6 2’x4’ faux stone panels
  • ~30 ft2 of laminate flooring
  • ~30 ft2 of plywood
  • ~25’ of nature-themed moulding
  • ~50’ of plain moulding
  • Strips of hobby wood
  • 4 flat metal bars
  • 22 button magnets
  • Square dowels of varying thickness
  • Bundle of cedar siding
  • Various pieces of hardware
  • Roll of grey contact paper
  • Quart of pink paint
  • Several quarts dark brown (Jacobean) stain
  • Several quarts of clear lacquer
  • Quart of black paint
  • Various fake plants
  • 2 sets of remote-controlled LED strip lights
  • 1 Aukey table light
  • 2 sets of drawer slides
Tools:
  • Belt sander
  • Sandpaper (60-220 grit) and sanding block
  • Rip cut saw
  • Hack saw
  • Back cut saw
  • Miter box
  • Power drill and various drill bits
  • Hammer
  • Various screw drivers
  • Level
  • Various paint brushes
  • Super glue
  • Construction adhesive (i.e. “Liquid Nails”)
  • Caulk gun
  • Hot glue gun
  • Staple gun

How we put together the Fairy Princess Castle Bed

This hack was so extensive that giving detailed step-by-step instructions would be a book in itself, so here’s a concise summary:

The hack consists of 2 major sections (each of which is comprised of a separate Kura bed):

I. “The bed”

1. Use belt sander to strip preexisting lacquer off all Kura parts

2. Stain all wooden Kura parts

3. Cover mdf panels provided with the Kura with grey contact paper on one side.

4. Assemble Kura roughly according to IKEA’s conventional directions, but keep each of the 4 walls separate from one another. Only notable exception is to not include the upper rail to the side wall adjacent to the ladder – as this will be where “the bed” joins “the tower”. This will also require 2 2x4s (or alternatively 2 2x2s) to help support the back wall, which otherwise can’t be assembled independently of the others.

5. Create frames for the door and window using 2x4s and 2×2 respectively.

A Fairy Princess Castle Bed - IKEA KURA bed hack

Finishing the bed half

Front wall almost finished

Front wall almost finished

6. Construct the door from bed slats taken from the second Kura: Cut off the ends to create the proper height. Attach them together using rectangular dowels nailed to their back sides.

A Fairy Princess Castle Bed - IKEA KURA bed hack

Future door from bed slats

Use hacksaw to cut metal bars to the width of the door, superglue metal button magnets on the front to look like rivets, and paint the bar/magnet pieces black. Once dry, attach to the bed slats.

(Super gluing them didn’t hold well – I had better luck with drilling shallow holes into the slats, filling with construction adhesive, and then clamping the bars over them for 24 hours. Be sure to roughen the back side of the bars for maximum adhesion).

Once door finished, attach to the frame via hinges.

Optional: Attached pink wooden fairy to the door using the same drill hole-filled with adhesive approach.

7. Construct window shutters using square dowels and strips of “hobby wood”. Paint pink. Attach to window frame.

A Fairy Princess Castle Bed - IKEA KURA bed hack

Window shutters in various stages of completion

8. Use white mdf panels for the walls. (The ones I used were actually intended for whiteboards, so were smooth white on one side, and rough/unfinished on the other. The smooth white side replicated dry wall relatively well). Attached walls to the inside of each of the now-assembled Kura wall frames.

9. Cut faux stone panels to fit into the preexisting spaces in the front frame. (I used Wellington light grey panels from fauxpanels.com. Attach to the backside of the mdf panels using construction adhesive.

10. Create an inset for behind the ladder using the same general principles used in steps 8 and 9.

11. Cut, sand, and stain plain moulding to use inside the first floor of “the bed” to cover over seems

II. “The Tower”

This is the more difficult half to hack/construct.

First, the tower consists of part of the second Kura bed tipped on its side (It doesn’t include the top rail – which can be used as 2×2’s anywhere else in the project).

Also, the tipped Kura may not be structurally sound; I create a platform for the second floor of the tower using 2×4’s, 2×2’s, and plywood, which stood completely independently of the visible tower.

12. As with “the bed”, strip and stain all wooden Kura parts.

13. Also as with “the bed”, assemble the 4 walls using the 12 main edge pieces to the bed/tower.

14. Create a lower platform using plywood placed on top of spare bed slats. (This will go directly on the actual room’s floor when finished)

15. Create the upper platform using 2x4s for the vertical supports, 2x2s for the “beams”, and plywood for the floor. The plywood can be covered on one side with the white mdf panels to make a nice ceiling for the first floor.

16. Use a combination of 2×2’s and mdf panels to create a wall that will divide the first floor into 2 halves. The left half will become an alcove for the hide-away bookcase, and the right will become a “secret passage”.

A Fairy Princess Castle Bed - IKEA KURA bed hack

Inside castle bed – secret passage closed

A Fairy Princess Castle Bed - IKEA KURA bed hack

Inside castle bed – secret passage open

A Fairy Princess Castle Bed - IKEA KURA bed hack

Secret passage exit to outside

17. Create the sliding platform for the bookcase. I used 2 2x4s attached to the lower platform, 2 2x4s attached to a horizontal 1×12 that acted as a shelf, linked together by industrial-strength, full extension drawer slides. (I used 32” drawer slides made by Hettich)

A Fairy Princess Castle Bed - IKEA KURA bed hack

Sliding platform for bookcase

18. Use a combination of 2×4’s, 2×2’s, mdf panels, and faux stone panels to create the front and side walls in similar fashion to what was done for “the bed”.

This should include swinging doors covered with stone panel that will act like hidden compartments for the bookcase and secret passage.

The back wall of the tower will rest against the wall of the actual room and thus, can be left open as it was for “the bed”.

A Fairy Princess Castle Bed - IKEA KURA bed hack

Backside of tower, almost finished

19. Build door and window shutters as done with “the bed”.

20. Use plain moulding to cover vertical seams inside the tower, and additional moulding around the top (I used nature-themed moulding).

21. Cut wooden laminate flooring to cover both the lower and upper platforms. (You do not need to worry about underlayment for this kind of usage)

A Fairy Princess Castle Bed - IKEA KURA bed hack

Inside of tower without the upper platform

A Fairy Princess Castle Bed - IKEA KURA bed hack

Inside the first floor (i.e. under the mattress)

22. Build a bookcase that will fit in the alcove and on top of the sliding platform built during step 17. (I would have preferred to use an IKEA bookcase – for example, a Bestå or Billy bookcase – but there wasn’t one that was the appropriate size).

Paint (or finish) bookcase. I also glued some thin strips of nature-themed moulding to the front to add some character.

III. “The tower roof”

23. The tower roof was the most elaborate and challenging step.

A Fairy Princess Castle Bed - IKEA KURA bed hack

Calculating measurements for the tower roof

A Fairy Princess Castle Bed - IKEA KURA bed hack

Angled wood used as a radial beam for the tower’s vaulted ceiling

To begin, create a frame that will firmly attach to the top of the tower and also provide a lip for the roof to sit in.

(This way, the roof will stay on by virtue of its weight alone, and you won’t need to worry about separately securing the roof.)

A Fairy Princess Castle Bed - IKEA KURA bed hack

Vaulted ceiling inside tower

The roof is built from 4 triangular shaped mdf panels, joined together by pairs of angled wooden dowels that act as radial beams for a vaulted, pyramid shaped ceiling.

(I lacked the tools to do create those “beams”, so this involved a lot of sanding and revisions.) For the roof, I used cedar siding (which I needed to recut and sand prior to painting pink).

A Fairy Princess Castle Bed - IKEA KURA bed hack

Tower roof, about halfway finished

IV. Assembly of the Castle Bed

By this point, you should have 4-5 different pieces for “the bed” (4 walls +/- separate inset behind the ladder), slats for “the bed”, and ~12 different pieces for “the tower” (4 walls, 2 platforms, 2-4 vertical posts for upper platform, 1 inner vertical wall on first floor, bookcase, roof frame, roof). Time to put them all together. (The main assembly took me ~10 hours, separated across 2 days).

Now install the lights, any miniature furniture (e.g. pillows, kids chair, toy box), and attach fake plants (I literally stapled them to the wood frame).

A Fairy Princess Castle Bed - IKEA KURA bed hack

Parts that will eventually become the exterior light fixture

A Fairy Princess Castle Bed - IKEA KURA bed hack

Finished exterior light

Add mattress and bed tent.

Woohoo – you’re finally done!

Our daughter loves her Fairy Princess Castle bed.

fairy princess castle bed ikea hack A Fairy Princess Castle Bed - IKEA KURA bed hack

How long and how much did the castle bed cost?

Took 10 months and ~400 hours. Total cost was about $2000-2500 US (I didn’t keep receipts).

What do you like most about the castle bed?

How much my daughter likes it.

What was the hardest part about the hack?

Getting the hidden bookcase to slide in and out of its alcove with enough ease that my daughter could easily do it herself.

What to pay special attention to?

A Kura bed is not necessarily structurally stable if used on its side. Also, be 100% sure this monstrosity will fit into its destination room before you start!

Looking back, would you have done the castle bed differently?

I would have spent less time on the shingled roof, which is literally not visible without a step stool.

~ by Eric Strong

The post Dad does it! Hacks the most amazing princess castle bed appeared first on IKEA Hackers.

Create a delightful and cozy kid’s reading corner

$
0
0

I wanted to make my boy a room that he would love and reflect his love of reading and my nostalgia. The seat in the reading corner was made so he could have a snugly corner.

IKEA items used:
Other materials and tools:
  • Paint
  • Board

Hack instructions for our reading corner:

First, I built two PAX wardrobes in the space. (Preferably, anchor the units to the wall.)

Second, I measured and cut a board that was strong enough to hold a small boy and all the books he reads!

Retro styled kids reading corner

After that, I built a baton around the edge of the wall and wardrobes to hold the board.

Finally, I covered the board in the fabulous striped IKEA fabric and placed it on top of the baton to create the reading corner.

Once this was completed I painted the cupboard doors with the same design as the wallpaper.

Most of all, what I like about this retro reading corner is the way the doors provided a basic canvas to produce my art work.

The hardest part about this hack was ensuring I kept my boy inspired as I designed and built the corner.

Looking back, I would have put an undercoat on the coloured paint.

Retro styled kids reading corner

My design is featured in Mini Modern’s book in March 2109 on Amazon called Mid-Century Modern Living: The Mini Modern’s Guide to Pattern and Style

~ by Emma Clifton-Brown Follow me on Instagram @homesbyemma


You may also like these reading corner hacks

#1 Toy storage and kids reading nook

KALLAX reading corner

Natalie used the KALLAX cube, horizontally, to create a zone for reading. The top is removable and lets her cleverly hide away infrequently used toys and kid’s things. See more.

#2 Bunk bed with reading nook

loft bed with reading nook

Jean-Christophe makes a snug reading spot for his daughter by wrapping wood around the MYDAL bed. Seems like a really cozy nook in there. On the left, there is a bookcase for toys and books. Get the details.

#3 Fabulous BILLY daybed reading nook

daybed reading nook

Jessica shares her IKEA hack — a daybed reading nook — made from 4 BILLY bookcases. It’s amazing how it turned out. See the daybed reading nook.


The post Create a delightful and cozy kid’s reading corner appeared first on IKEA Hackers.

Improved IKEA bed with easy DIY tufted headboard

$
0
0

I am an interior designer and I love to do things by myself and very often I use IKEA products.

This time, I made a tufted headboard for the bed in my son’s room. We moved to new apartment and I had to furnish the rooms for all of my three kids.

I wanted nice interiors for all of them, but at the same time we could not spend too much. Also I dislike wasting things that could be used or reused if slightly changed. So this IKEA hack merged the best of my abilities.

Materials for tufted headboard:

FJELLSE bed frame | IKEA.com

I bought IKEA bedframe FJELLSE, second hand, so it was half price (app. 48 USD). We had our own mattress. Assemble the bed according to IKEA instructions.

Tufted headboard for IKEA FJELLSE bed

Making the headboard

First, I painted the bed frame with water based paint. Set aside and let it dry.

Then, I moved on to the headboard. I used a table top to form the base of the headboard.

On the table top, I drilled holes where I wanted the buttons. After that, I sprayed adhesive onto the desk and glued on the foam. This helps so that it does not move while working on it.

My plan was to wrap it with a grey Manchester curtain fabric, which was previously used in my dining room.

How to tuft the headboard

Tufted headboard for IKEA FJELLSE bed

For the tufting, I made my own buttons from denim. The denim was cut off from the old jeans of my younger son. I always do shorts when they make holes on the knees 🙂
Tufted headboard for IKEA FJELLSE bed

What I did was to first spread the fabric over the headboard. Then I started attaching the denim buttons, through the holes I had previously drilled.

Tufted headboard for IKEA FJELLSE bed Tufted headboard for IKEA FJELLSE bed

After they were in place I started to slightly pull and staple the fabric onto the back of the desk to get the shape.

Tufted headboard for IKEA FJELLSE bed Tufted headboard for IKEA FJELLSE bed Tufted headboard for IKEA FJELLSE bed

When the tufted headboard is done, I attached it to the FJELLSE frame. The tufted headboard slots snug between the frame and the mattress.

I hope you like my IKEA FJELLSE headboard hack 🙂

Tufted headboard for IKEA FJELLSE bed Tufted headboard for IKEA FJELLSE bed

~ by Tereza Scarlett. Follow me on Facebook.

The post Improved IKEA bed with easy DIY tufted headboard appeared first on IKEA Hackers.

Before you splurge, check out this $15 DIY pedalboard

$
0
0

As a guitarist and dad, I was searching for an affordable way to keep my effect pedals all secured and easy to move as my toddler likes to rearrange them while I play, disconnecting cables and cords as he fiddles with knobs and buttons.

Professionally built pedalboards (like these) can cost an arm and a leg. This was a flash of inspiration while looking for something else, as often happens at IKEA.

Materials:
  • GREJIG shoe shelf
  • Zipties, large and small
  • A basic linesman plier

$20 DIY Guitar Pedalboard made from IKEA shoe rack

Time: About 1 hour

Cost: $20 CAD (approx. $15)

The product I picked up for my DIY pedalboard is the GREJIG shoe shelf, which is $5 CAD ($3.99).

I also grabbed a 100-pack of 14″ black zipties from the hardware store. That was the longest I could find, for about $13 CAD, as well as some smaller zipties for about $2. Which brings this project’s cost to a whopping $20 (not counting my guitar gear, of course!).

I’d recommend setting up the legs of the GREJIG for the assembly process, which allows you to feed zipties and cables through the grid.

$20 DIY Guitar Pedalboard made from IKEA shoe rack

DIY pedalboard – layout

Then, figure out a pedal layout that works for you. This will probably be the most time-consuming part of the whole project.

The GREJIG is 12″ × 24″, which can neatly handle larger pedals like a wah, and has a sturdy metal 1″ grid. When laying out the pedals, ensure that their jacks have at least two squares open next to them to accommodate a right-angle input jack.

If you have a ton of pedals, just get more GREJIGs and lay them out so that you can chain them together!

$20 DIY Guitar Pedalboard made from IKEA shoe rack $20 DIY Guitar Pedalboard made from IKEA shoe rack $20 DIY Guitar Pedalboard made from IKEA shoe rack

I’d also recommend putting expression pedals on the sides of the board, as the center will be a little springy. I liked the added response to the feel of activating a pedal, especially the quiet Boss units. But you may not – if you like things solid, you might want to put together a simple layered wooden base for it to sit in.

DIY pedalboard – securing the pedals

Once you are good with your layout, use the large zipties to attach the pedals to the grid, making certain that they do not interfere with pedal functionality.

This is where you need long ties – my Russian Big Muff Pi was barely contained by 14″ ones.

Use a pair of pliers to help get things as tight as you can. Once properly tightened, you should be able to hold your pedalboard upside-down with no shifting.

$20 DIY Guitar Pedalboard made from IKEA shoe rack $20 DIY Guitar Pedalboard made from IKEA shoe rack

Once your pedals are strapped on, run the power cables. I chose to run mine under the grid so that moving audio cables would be less annoying, but you could run it on top. Ziptie it to the grid with the smaller ties to help prevent mechanical damage.

The nice thing about the grid-like construction of the GREJIG and using zipties is that when you inevitably want to rearrange your board, all you need to do is cut the ties and you’re ready to reassemble.

Once the legs are folded down the board has a remarkably small profile. It would be fairly easy to put together a small carrying case out of plywood to keep it safe while travelling. But that’s a project for another day!

That’s about it! I hope you enjoyed this DIY pedalboard tutorial!

$20 DIY Guitar Pedalboard made from IKEA shoe rack

~ by Garrett Everett


See more DIY pedalboard hacks


The post Before you splurge, check out this $15 DIY pedalboard appeared first on IKEA Hackers.

How-to: Make clean, precise cuts on IKEA LACK shelf

$
0
0

I worked out a precise and clean way to cut the IKEA LACK shelf to the length I wanted.

A few years ago, I built a bookshelf arrangement with a selection of LACK shelves and BESTÅ cupboards.

The black, white and yellow LACK parts exist in 190, 110 & 30cm lengths, but the dark brown parts exist only in 190 & 110cm lengths.

I wanted dark brown, of course, so I was faced with the problem of producing a number of 30cm parts.

I used a circular saw at work (used for cutting aluminium tubing), but it wouldn’t do a full cut. The solution was to turn the shelf over, then end-to-end, for each cut, with the hassle of re-measuring each time. I managed to get better than 1mm precision.

How-to: Make clean, precise cuts on IKEA LACK shelf

Recently, a friend asked me to place a couple of LACK shelves. She’d bought the 190cm parts, which needed to be reduced to 158cm*.

As I no longer have access to that saw at my old company, I had to think of another way. Using a portable electric saw, or a jigsaw, was out of the question, because of the rough edges.

Finally, I decided to try an angle grinder. I used a thin cutting disc, with a piece of aluminium tube as a guide, and didn’t cut too much at once. I did a practice cut and was pleased to see that I got a very clean edge.

*158cm is right by the end of the metal support – a piece of luck!

How-to: Make clean, precise cuts on IKEA LACK shelf

Cut the short (vertical) edges first, and use this as a guide for the top and bottom (or left and right!) cuts.

How-to: Make clean, precise cuts on IKEA LACK shelf

When making the long cuts, take care near the edge to keep the disc perpendicular.

And then install the shelves as per IKEA instructions.

How-to: Make clean, precise cuts on IKEA LACK shelf

~ by Richard


You may also like these IKEA LACK shelf hacks

#1 Custom sized LACK shelves (with end cap reattached!)

custom sized lack shelf

Brian wanted an IKEA LACK shelf to fit a space in the hallway that was 170cm wide but the nearest size was 190cm. His plan was to remove the end cap from the shelf, cut the shelf to size and then reattach the end cap. This is the approach that he took to create a custom sized LACK shelf.

#2 LACK shelves as bedside table

Lack bedside table

They were looking for new bedside tables to match the new bed but everything was either too expensive, too short, or both. So they ended up making this LACK bedside table.

#3 More stuff you can do with IKEA LACK shelves

lack shelves hacks

I’ve always loved the IKEA floating shelves – neat and uncluttered. Only problem is, you probably can’t put more than a few books and decorative items without it crashing down. Let’s see what IKEA hackers have done to the IKEA LACK floating shelf.


The post How-to: Make clean, precise cuts on IKEA LACK shelf appeared first on IKEA Hackers.

No doubt about it. BILLY is made for built-in bookshelves

$
0
0

The goal behind the IKEA hack was to create a useful division in the basement.

We had a really long wall that needed something to separate the games area from the media area.

What better way than to introduce more storage and some built-in bookshelves.

DIY built-in BILLY bookshelves

Items used for BILLY built-in bookshelves
  • BILLY bookcases + half glass doors
Other materials:
Tools:

Steps I took to build the BILLY built-in bookshelves

1. I started out by framing out the two walls that flanked either side of the bookshelves using 2×4’s. I wanted these to act like walls framing in the built-in BILLY bookshelves, thus I needed the walls deep enough to recess the BILLY’s in about 1 1/2 inches from the finished front.

DIY built-in BILLY bookshelves

2. After the framing was complete, I assembled the IKEA BILLY bookshelves for a rough fit. It is absolutely essential that everything fits snug. At this stage, you can still easily make changes.

DIY built-in BILLY bookshelves

3. Next is to secure the BILLY bookshelves to each other. Use screws of the right length, so it won’t poke through the other side of the BILLY unit.

DIY built-in BILLY bookshelves

Once all of the BILLY bookshelves are joined, go ahead and secure them to the framed walls with 2 1/2″ screws.

4. It is time to start closing in the framed walls. I used MDF for this project because I wanted them to look like trimmed out walls and not just a drywall wall. Remember to check for plumb-ness.

DIY built-in BILLY bookshelves

Then, fill any of the joints and nail holes with drywall putty. Let it dry, and then give everything a good sanding.

5. Prime all of the MDF and then paint.

DIY built-in BILLY bookshelves

6. Now is time to install the finishing trim. For my project, I went with an inside quarter round along the top. This covers the joint between the drywall bulkhead and MDF, as well as the small gap above the built-in bookshelves.

DIY built-in BILLY bookshelves

For the bottom, I used the same baseboards as the rest of the basement (standard 1×4″ MDF baseboards). Again, this helps provide continuity to the entire space, tying the built-in BILLY’s with the rest of the renovation.

Fill the gaps and nail holes with drywall mud, give it a light sand, and then finish off the new trim with a final coat of paint.

7. The last step is to install the BILLY doors and hardware. We replaced the regular BILLY knobs with white and grey ceramic pumpkin knobs.

DIY built-in BILLY bookshelves

I made a YouTube video instruction to go along with this build. It can really help explain some of the more finicky steps about how I settled on specific measurements.

Total cost was around $500.00 CAD.

The best part of the hack is it completely changes the look of basic BILLY bookcases into a custom built-in and functional piece of furniture.

The hardest part of the build is the planning. Taking the extra time to really understand the dimensions and how it would all fit together is highly encouraged.

It led to some rather specific measurements to get the intended look. In particular having the final inside quarter round fit perfectly under the bulkhead when finishing the top of the built-in.

DIY built-in BILLY bookshelves

See the full tutorial of the IKEA BILLY built-in bookshelves.

~ Jeff from The Homestud

See Jeff’s other hack, which is one of 2018’s top 10 hacks — KALLAX corner home office furniture.

The post No doubt about it. BILLY is made for built-in bookshelves appeared first on IKEA Hackers.

Rustic kitchen island: This is how I hacked HEMNES

$
0
0

Here’s my IKEA hack of a rustic kitchen island made from an IKEA HEMNES dresser.

I recently moved to a condo and I had a HEMNES dresser. Either, I was going to have to get rid of or think outside the box to keep it.

Rustic kitchen island - before

And, I was tired of my round dining table with chairs. For a change, I wanted something that was chic yet functional.

I also wanted something that would be a space saver. That was when I took a second look at the HEMNES dresser, observed a few kitchen island ideas on different websites and got to work.

Materials for rustic kitchen island:
  • 1 HEMNES 8-drawer dresser
  • 1 Maple butcher block countertop
  • I used a combination of chalk and flat paint to get my desired color of olive green.
  • I also applied a sealing wax finish to the dresser after several days, to help protect the paint.
  • To protect the floor, I used furniture felt pads on the HEMNES feet

Rustic Kitchen Island Project How-To:

1. Assemble HEMNES dresser per IKEA instructions or if it’s already assembled, leave the top portion of the dresser. I find that this provides more stability to the kitchen island.

2. Paint the dresser to the desired color. I would wait 1-2 days until the color really settles.

I ended up having to get a different green, due to the first go round was not the desired color of olive green I was looking for (see pictures).

Rustic Kitchen Island IKEA hack

The first color was a chalk paint and the second was regular flat paint. After a couple of days, when I was satisfied with the color, I applied the sealing wax. You may need 1-2 coats, depending on your preference.

I also decided to paint the knobs a gold dust color, to match the mirror.

3. I purchased the maple butcher block countertop on sale at a builders’ supply location.

The measurements were taken by comparing to another pub table of what the correct overhang should be.

Rustic Kitchen Island IKEA hack

The measurements of the countertop are 26” width and length 72”. This would also depend on how much overhang you want.

4. Once the countertop is placed, make sure to use either baby oil or the specialty rubbing oil to seal and protect your butcher block. The oil will also slightly darken the countertop.

5. I stuck felted pads on the bottom of the dresser legs to protect the floor when moving the kitchen island. You can also place rolling wheels; whatever your preference.

Rustic Kitchen Island IKEA hack

The costs for my rustic kitchen island project:

This rustic kitchen island was a fun and simple project. I did have to ask my sweet boyfriend to help me place the butcher block top on 😀👍🏼 The rest was all me!

The total cost of the project was about $300.

I bought the HEMNES dresser from another person for $50. The maple butcher block was the most expensive at $200 and paint/supplies costs $50.

~ Michelle H.


You may also like these HEMNES kitchen island hacks

#1 Kitchen island with seating area

kitchen island with seating

Lori made a kitchen island with seating for 3 to 4. The IKEA product she settled on was the IKEA KARLBY walnut countertop and HEMNES chest of 8-drawers to create her unique kitchen island. See the kitchen island with seating.

#2 Compact kitchen island with stainless steel top and drawers

kitchen island with drawers

After digging around on Etsy for what seemed like a million years, CommandoGirl still couldn’t find one that provided enough storage and was also small enough to fit into the limited space in her kitchen. So, enter the Hemnes dresser. And out came her small kitchen island with drawers.

#3 Country kitchen island

country kitchen island

Kitchen islands are expensive! And they are not very cute. Joanne took an old HEMNES 3-drawer chest (the bigger one) and re-purposed it into a charming country kitchen island.


The post Rustic kitchen island: This is how I hacked HEMNES appeared first on IKEA Hackers.


Big but minimalist bathroom mirror with lights

$
0
0

I wanted a minimalist bathroom mirror with lights without a cabinet. So, I found the HOVET mirror to be a perfect candidate for an IKEA hack.

Big but minimalist bathroom mirror with lights

On top of that I only need to drill two holes into the wall to attach the lights to the frame of the mirror.

Process of making a bathroom mirror with lights:

First, I taped off the size of the mirror on the wall to get a better feel for the proportions and where to put it.

Initially, I planned to hang the mirror in the middle of the wall. But later, I hung it in the middle of the drywall (more to the right), so that when standing in front of the washbasin the mirror looks more harmonious.

The second step was about finding a good placement of the lights and to determine if I would use three or four of them.

Big but minimalist bathroom mirror with lights

I also used some duct tape for some quick placement and quickly came to the conclusion to use four lights. The two lights on the outermost left and right should line up with the frame of the mirror.

Installing the bathroom mirror with lights

Next, I calculated the correct distance between each light. Then, I used the pre-drilled holes in the MAGLEHUT LED lights and a pencil to mark the positions for the needed holes.

To drill the holes I used a drill which was a tiny bit thicker than the threaded screws to have some play in the rotation of the lights. (This saved me from quite some trouble in the later step. 🙂 )

The rest was a simple assembly. The wing nuts made the installation a bit easier as I could hold them with one hand and with the other hand, use a screwdriver to tighten everything.

Lastly, I hot glued a piece of scrap wood underneath the transformer. This was just in case there would be some condensation collecting at the bottom of the frame.

I have also used a connection and an extension cable, so that I could make a proper connection on the floor in the bath before hanging the mirror onto the wall.

Big but minimalist bathroom mirror with lights

Material used for bathroom mirror with lights hack:
  • HOVET (mirror 80€) x 1
  • MAGLEHULT (LED lights 15€ each) x 4
  • TRÅDFRI (transofmer for up to 10 LEDs 25€) x 1
  • FÖRNIMMA (connection cable 5€) x 1
  • FÖRNIMMA (extension cable 5€) x 1
  • Picture hooks (M8, 80mm long) x 2
  • Threaded screws (M4, 40mm long) x 8
  • Wing nuts x 8 (M4 nuts are ok too, but wing nuts are easier to handle 😉
  • 1 x scrap piece of wood
Tip:

I have only used either galvanized or stainless screws and material. This is to avoid any rust stains, due to the sometimes higher humidity present in bathrooms.

Verdict:

The whole process went very well. And this setup of this bathroom mirror with lights is also future proof, which is a big plus. I like the clean look and setup very much and would not do anything different 😛

Note:

Although in my setup, splash water cannot reach any of this, please note that you will be installing this at your own risk, because I am not an electrician 😉

Take a look at the other hacks I made:

~ by Ralf B, Cologne Germany 🙂

The post Big but minimalist bathroom mirror with lights appeared first on IKEA Hackers.

How to use LACK shelves to create valance lighting

$
0
0

I did another small and simple hack. Using the IKEA LACK shelves, I created valance lighting for the bathroom.

I used the IKEA LACK wall shelves as the base to install shelves and then hid lights behind them.

This tutorial is also great if you just want to install floating wall shelves of any length.

IKEA items used:
  • IKEA LACK wall shelves (110cm version) x 3
Other materials and tools:
  • Plasterboards
  • Laths
  • Spirit level
  • Dry wall screws
  • Putty
  • Electric drill
  • Trowel
  • Paint

Instructions for DIY valance lighting

1. First, determine the length of the valance lighting to be created and select a corresponding number of LACK wall shelves.

In the case shown here, we used three IKEA LACK wall shelves with a length of 110 cm each. The LACK shelves do not have to completely fill the entire length of the newly emerging valance light. Gaps are allowed and sometimes even useful.

2. After determining the height of the lighting, it starts already.

How to use LACK shelves to create valance lighting

Mount the brackets of the LACK wall shelves on the wall. Use a laser level to make sure they align to each other.

How to use LACK shelves to create valance lighting

3. After mounting the brackets, push the LACK shelves in and locked them in with screws.

How to use LACK shelves to create valance lighting

Covering up the shelves

4. Then, cover the LACK wall shelves with plasterboard.

How to use LACK shelves to create valance lighting

On the bottom panel, we glued the plasterboards and screwed them in as well. Just as a safety precaution, as the drywall screws do not hold well inside the LACK wall shelves.

On the top panel, this is not necessary and in the front, the screws tighten very well.

How to use LACK shelves to create valance lighting

How to use LACK shelves to create valance lighting

View from top of LACK shelves, covered with plasterboard

How to use LACK shelves to create valance lighting

View from below

The front panel is designed as the valance lighting panel. In order to have an indirect valance lighting situation, we made the front panel a few centimetres wider than the LACK shelves.

How to use LACK shelves to create valance lighting

View from below, showing the overhang of the front panel

The Finishing

5. In addition, we glued a stucco profile to the front. That initially creates a gap between the profile and gypsum board which is not tragic. The entire construction is later filled and sanded.

How to use LACK shelves to create valance lighting How to use LACK shelves to create valance lighting How to use LACK shelves to create valance lighting

6. Depending on personal preferences, you can further outfit the new valance lighting to suit your room decor.

Here, you can choose whether you prefer a modern style or classic with stucco profiles. The limit is your imagination only.

DIY Valance Lighting complete

We used this valance lighting above our mirror as seen here.

How to use LACK shelves to create valance lighting How to use LACK shelves to create valance lighting How to use LACK shelves to create valance lighting

7. Finally, wire up the strip lights to get your valance lighting.

How to use LACK shelves to create valance lighting How to use LACK shelves to create valance lighting

It is a very cheap und useful hack.

See the full tutorial of the DIY valance lighting here.

~ by Benjamin Ferger

Take a look at my other hacks:

The post How to use LACK shelves to create valance lighting appeared first on IKEA Hackers.

How to make a West Elm inspired upholstered headboard

$
0
0

So, I was searching for a new bed and came across this fabulous one from West Elm, with an oatmeal linen upholstered headboard.

Source: Modern Bed – Linen Weave – West Elm

But at £1200 (without the mattress) it was way above my price range.

I wondered if I could create a similar look with a much cheaper product and ended up buying the TARVA king size bed frame for £125.

ikea tarva bed

TARVA bed | IKEA.com

It took a while to get around to it, but I found some Colron coloured Beeswax for £10, a remnant of oatmeal linen for £18 and a pack of 100 dome shaped upholstery nails in pewter for £2.

I used:

Here’s how I did the hack …

1. First, stain the whole bed frame with the coloured beeswax. You can ignore the centre parts of the headboard, which you’ll cover with fabric.

Upholstered headboard how-to

2. Measure the height and width of the front and back of the headboard. Measure, sew and trim an old (too hot and barely used) duvet to these dimensions.

Lay the sewn and trimmed duvet over the top of the headboard, so it drapes neatly down front and back.

Staple all duvet edges to the TARVA headboard. Now you have your upholstered base on which to put your fabric.

Upholstered headboard for an almost West Elm bed

3. Lay your fabric over the headboard and measure from the horizontal base of the front where you want the fabric to start, to the horizontal base of the back where you want the fabric to end.

4. Turn under your fabric (that will lie on these horizontal edges) and sew to give a neat edge. These edges will lie horizontally across the base of the front and back (not the sides, which have the tacks.)

5. Measure what the width of your fabric will be on your upholstered headboard, allowing enough overlay onto the wooden sides for you to put upholstery tacks in.

Iron your fabric, turning the fabric sides under and pressing to give a neat fold. I didn’t bother to sew these sides as I was going to nail them.

Add the domed tacks

6. Lay your fabric onto the headboard and carefully start hammering in the domed tacks. I started with all the corner ones back and front to make sure the fabric was lying correctly.

Then, I added tacks to the middle areas of the edges. To get the fabric to lie correctly going over the top of the headboard, I had to do a little pleat (facing towards the back) of the fabric, which I secured with a tack.

I didn’t bother adding tacks all the way along the bottom edges either. Just one at each side and a couple in the middle to keep the fabric lying smooth.

Here’s the finished result. It’s not quite as fab as the £1200 bed, but for around £150, I’m pretty pleased!

Upholstered headboard for an almost West Elm bed

~ Ruth H.

The post How to make a West Elm inspired upholstered headboard appeared first on IKEA Hackers.

Hackers Help: Seeking discontinued IKEA fabric

$
0
0

Dear Ikea Hackers community,

For several years, I have been trying to find a few meters or yards of a discontinued IKEA fabric that was sold here in the US sometime around 2010 or 2012.

It was one of several called “Kajsastina”, in dark grey with a large sunburst or dandelion design. (see picture below). It has been featured in at least one IKEA hack on this site.

IKEA items:
  • Kajsastina grey starburst fabric

IKEA Kajsastina fabric

I am hoping that somebody has some left over in a closet somewhere. If you have any leads, or have some of this discontinued IKEA fabric you are willing to sell, please email me at urchiken+fabric AT gmail DOT com.

~ by Wehaf

***

Hi Wehaf

I’ll also post this on our IKEAHackers Facebook Community Group and see if you get any leads there. 

Good luck,

Jules


You may be interested in these IKEA fabric hacks:

#1 Fabric sliding doors for BILLY bookcasefabric sliding doors

I have 2 BILLY bookcases for some years now. And I wanted to close them up but not with the classical doors (heavy, not nice and expensive) and more in line with my living room style. So I decided to hack fabric sliding doors for my BILLYs. See more of the fabric sliding doors.

#2 Fabric speaker doors for IKEA BESTÅ

speaker fabric doors

I wanted an easy to make a solution that would conceal my hardware; surround receiver, DVD player, front center speaker consoles and paraphernalia.

In case I would come to own a front-firing sub (my current one is down-firing), I opted for a BESTÅ TV unit with 3 sections, so I would be able to conceal the sub also and still have space for the mentioned hardware.

Instead of installing active cooling behind glass panels and having the problem of having a visible front center surround speaker (and sub), I wanted a TV unit with speaker fabric doors.

#3 Fabric and graffiti fusion wall art

fabric and graffiti wall art

Sublot used the discontinued IKEA fabric, SARALISA, IKEA fabric frame and a permanent marker to create a fabric and graffiti fusion wall art.


The post Hackers Help: Seeking discontinued IKEA fabric appeared first on IKEA Hackers.

IKEA Shoe Shelf for Big Feet and Big Collection

$
0
0

My partner and I both have big feet and lots of shoes. We live in a relatively small apartment together, and needed an efficient way to store our shoes.

I spent too many hours hunting for affordable shoe shelf options that were:

1. capacious,

2. easy to assemble and move, and

3. not hideous or hideously cheap-looking.

In the end, we found the IKEA FJÄLKINGE Shelf Unit. With a tweak, it would meet all our needs.

I love how the shoes are displayed now, and how easy it is to take apart this DIY IKEA shoe shelf. We’re renters, so I wanted something that we could move to a new home one day without having it fall apart.

IKEA items used for IKEA Shoe Shelf:
  • 1 x FJÄLKINGE Shelf Unit
  • The shelves from a second FJÄLKINGE Shelf Unit (In some places it is possible to purchase these individually from IKEA. I purchased a second shelf unit on Craigslist to keep costs down)

Follow the IKEA instructions to assemble one shelf unit. Using the same technique, add the shelves from the second unit at whatever height works for you.

IKEA Shoe Shelf for Big Feet and Big Collection

I’ve been incredibly happy with how this turned out. I wish it had been possible to buy individual additional shelves, but that wasn’t in the cards for this project.

The total cost came up to around $200.

What was the hardest part of the DIY IKEA shoe shelf?

It shoe rack is totally easy to do. The hardest part about this hack was figuring out what shelving to use. I wanted something that would look at least marginally polished in our front entry way, and that wouldn’t eat up all my free time to assemble. Once we decided on the FJÄLKINGE Shelf unit, it was full steam ahead.

IKEA Shoe Shelf for Big Feet and Big Collection

Keeping the frame for future hack

You could probably DIY additional shelves if you wanted to. For now, we’ve got the frame of the second unit hidden under our bed … maybe some day we’ll assemble both units individually?

IKEA Shoe Shelf for Big Feet and Big Collection

My friends are invariably jealous of our storage space. We are 100% judged for the size of our shoe collection.

I hope this hack spares someone else the pain of researching that I went through!

~ by Hannah


You may also like these IKEA shoe shelf hacks


The post IKEA Shoe Shelf for Big Feet and Big Collection appeared first on IKEA Hackers.

Viewing all 1516 articles
Browse latest View live