I wanted a challenge to see if I could make the KALLAX units unique after we received them for free. Plus they fit the bill perfectly as home office furniture.
The post Got 2 free Kallax units and here’s what happened appeared first on IKEA Hackers.
I wanted a challenge to see if I could make the KALLAX units unique after we received them for free. Plus they fit the bill perfectly as home office furniture.
The post Got 2 free Kallax units and here’s what happened appeared first on IKEA Hackers.
Mike shows us how to make custom fronts for IKEA drawers, which in his case, is the 4-drawer NORDLI dresser. His plan was to use his NORDLI hack as a combination dresser/ media center in his bedroom and wanted something that was not too obviously IKEA. This is before: And AFTER! Insanely gorgeous IKEA drawers […]
The post Alert! You’ll want to hack IKEA drawers after this appeared first on IKEA Hackers.
Jessica recently took an under-utilized closet, added some IKEA pieces (BESTÅ and BILLY) for storage and made them into beautiful mudroom furniture for her home. This is how it was before: And AFTER! It went from drab to absolutely fab. The main components of Jessica’s mudroom furniture are 5 IKEA items: 1 BESTÅ TV unit […]
The post Look at this mudroom! Here’s how to hack it in a day appeared first on IKEA Hackers.
Our white IKEA TV cabinet, the BESTÅ, was the perfect size for holding our Sky box, sound bar, DVD player and hiding an assortment of junk in the drawers. It had served us well for many years in our old house, which was light and modern, but when we moved to an older house and redecorated […]
The post Kudos to the moody makeover of this popular IKEA TV cabinet appeared first on IKEA Hackers.
I used a black horizontal KALLAX shelving unit for hifi set-up with a subwoofer cabinet. I had to remove an interior floor to place the subwoofer while retaining the original KALLAX design. With the small tweak, it perfectly integrates into the KALLAX compartments.
before
After
Related: Make a movable hi-fi rack in 30 minutes
To give character … I used wood imitation tiles, glued onto the KALLAX. I added aluminum rods to strengthen the furniture design. The result is a discreet hi-fi set-up, refined and perfectly integrated.


~ by Alexander
Related: A BESTÅ media / hi-fi storage furniture
The post A discreet subwoofer cabinet in a KALLAX unit appeared first on IKEA Hackers.
I turned the IKEA PAX Wardrobe into a custom built-in closet. I purchased a 1980’s condo which hasn’t been touched since it was built. Among a complete refresher to the unit was the master closet.
Here it is when I visited the place for the first time.
before
And right away, after trying to open the doors, one came off its track.
The closet is composed of 3-bifold doors for an opening of 85”

I looked online for new sliding doors but everything from Home Depot or other stores was over-priced. Also, I couldn’t find any sliding doors that size and would still have to build the shelving.
My thought process was to reduce the enclosure width so that I could slide in a 60cm deep, 201cm tall PAX system in there and use the PAX doors as closet doors. This would make it budget friendly and immensely customizable with the storage and doors.
The edges of all the closets in the apartment are built with drywall extending slightly past the opening and thought I could use this to my advantage, though this is not a requirement to build this system.

First thing, I had to remove the old doors and shelving. I also remove all the wall texture but this is a different project altogether.

Now that we have a nice clean area, we can start to work on some framing. Apologies for the Snapchat potato quality screenshot.
I had to reduce the enclosure by exactly 5 inches (85” to 80” and leave around 1 inch of wiggle room). Perfect. Screw 3 2×4 to the wall giving 1.5” depth, then create a 2×4 partition wall on the floor and lift it into place. Screw that to the floor, ceiling and the 3 2×4 you already put in place against the wall.
I am in no way an expert in any of this. I had never built a wall before or installed drywall but was able to build it in one evening (excluding taping, mudding, and painting). It’s easy, give it a try if you haven’t.

Drywall.

Tape and mud.

Finally, paint (oh and yes, new floors too).

Now we have space that is 3 cm larger than the PAX system. I am utilizing a 2m long, 2 door system. For that, I will use a 3 part system, and not 2 for good reason.
As mentioned earlier, the closets have a ledge of drywall to the side of the doors. Those measure a couple cm so I would not be able to slide two 1m wardrobes in. By sliding the side ones first and the middle last I was able to have all three units in with a couple cm left on each side. If you don’t have the ledge I did, then two one meter wardrobes will work just fine.
Take note that there is space above that I lost by building this system. But I was not able to find a way of saving it.

The next steps, are just the same as you would with the regular PAX system. Follow the manual and build the shelves as you want. Don’t forget to screw in the units together but don’t attach them to the walls just quite yet. Do that after the doors are on to make sure you left enough space in front.
The complete wardrobe including the doors need to sit behind the front wall. I will explain that just in a bit.
Here is my custom built-in closet complete. All smiles as the step sister and I are pleased with the result.

Now here is why the new custom built-in closet needs to sit slightly to the rear. Adding trim/casing all around hides the gaps at top and to the sides and gives it this clean look. It also give a little room to put your fingers and grab the end instead of touching the glass to open and close.

~ by Carl B
The post How to save by building your own custom built-in closet appeared first on IKEA Hackers.
I was wondering how to better separate the entrance (taking into account a fish tank stand with a large aquarium, 120L) from the other areas.

Related: There’s something fishy about this EXPEDIT

I found out from surfing on the Internet that doubling the KALLAX 2×2 shelving unit would support my aquarium. So I have bought and installed them by each other to make a wide piece of furniture able to support the weight.

To better visualise the room separation even better, I screwed on at the back of the KALLAX units painted MDF and wood slats. And then behind, screwed some thin and painted MDF panels (1200mm x 6mm) at 4cm from the ground in order to be able to hide the aquarium’s wiring system and create a more visual separation from the sofa side.

Related: How to grow your own food in your apartment with IKEA components

If you want to see more pictures, you can see the before/after and work in progress on my Instagram.
~ by Marlène

Esther transformed the IKEA SOCKER plant stand to create some privacy on my balcony, separating her space from the neighbour’s. Read more.

Jeanie attached 4 STUVA storage cabinets together and then added plywood and plaster to the back to make a free-standing room divider. Besides dividing the space, it offers plenty of storage. See the hack.

Laurence used STOLMEN poles (discontinued, replaced by the ELVARLI system) to create a stunning bookshelf and desk space. It also effectively divides the sitting room and bedroom. Take a look at the hack here.
The post Easiest fish tank stand ever and DIY room separator appeared first on IKEA Hackers.
The missing link in IKEA’s range. Why? We inherited a cat that shredded our furniture, apart from a 20-year-old IKEA POÄNG armchair, with no cat resistant seating products on the market, we decided to buy 2 additional POÄNG armchairs, we went for the new range that come with a blue/grey wash on the woodwork and a hideous faded yellow seat support (that shows when the chairs are sat upon).
Upon the success of the chairs (cat resistant) and re-visiting IKEA, we were dismayed to find that no matching sofas were available and that led me to this IKEA hacking site where I saw the previously modified, 2-seater (POÄNG2). Personally, I didn’t like the shock absorber addition or the fact that that the front cross members were set behind the chair legs, that led me to give it a go.
POÄNG chair | IKEA.com

(This wasn’t as easy as I had expected and took me 3 days)
1. I assembled one POÄNG chair, then took a measurement of the arm width, halved the measurement (as the plan was to support the central seat section of the sofa by using parts of the arm/leg sections to act as supports).
I then marked the front and bottom cross-members for cutting off one end, once cut to length (with the dowelled sections removed), I re-drilled the cut ends to receive two lengths of 10mm steel threaded rod that were long enough to be inserted into one cross-member, through one of the central legs and into a second cross-member.
This wasn’t as easy as I had expected and took me 3 days
When cutting the cross-members, I was very careful to cut as straight and accurate a line as I could, as these joints would be visible. I used a hacksaw (cut slowly through the front facing edge first, then the top/bottom and back sides). The same modifications were made to the chair that was to go at the other end of the sofa.
2. Cutting the arm/leg sections that are to support the central seat (no shock absorber needed). First, I used a set square to mark off where to make the cut.

I wanted it as close to the seat base as possible to provide support at the front of the seats when sat upon. The off-cut sections will be used later as the rear seat supports. Where the dowels are designed to fit into the legs, I drilled through them completely so that my threaded rod sections (mentioned earlier) could slide through. Two of these arm/leg sections would need to be cut to provide support for both sides of the central seat.
3. I then switched from working on the frame of the POÄNG, to joining the three seats together, when laid out, the outsides of the outer seats are unchanged as I wanted the sofa to look like a normal POÄNG chair from the side.
When laid out I could see that the chairs would easily align with each other as the bolt holes and the solid rod at the front would fit together easily. What was necessary, was to remove the threaded bolt receivers that are built in from the inner sides of the upright backs of the two seats that would become the two outer sections of the sofa.
These were then relocated and reused to provide secure attachment of the outer sofa seat sections to the central seat by simply drilling through and bolting, along with the solid rods (provided, positioned as designed).
The upright sections of the seats were attached by drilling and bolting together using the bolts provided in two places. So, per each side of the central seat there are three bolts and one factory bar per side. (Sufficient support).
4. With the three seats now attached together, I then measured the total seat length and turned my attention back to the cross-members of the frame. The front and back cross-members of the central seat needed to be addressed. As I knew the overall length of the seating section, I could deduce how long the central cross-members needed to be shortened (approximately double that than cut off the previous cross members).
I cut them and drilled them as above to receive my two rebar sections. Once complete, I applied generous amounts of Liquid Nails (a bonding agent) to the threaded rods and into my drilled sockets in the cross-members, forced them together and left them 24 hours to set.
5. Once set, the POÄNG frame was complete (except for the rear supports of the central seat), the triple seat section could now be mounted in the frame and the end arm/leg sections secured using the factory fittings. (looked awesome).
6. I now positioned the previously cut off arm sections against the bottom of the two inner legs. Then, marked them and drilled them to receive four 6mm bolts (in each support) to secure the supports very firmly to the leg sections as this would be where the maximum stress would be exerted on the frame when in use. Captive nuts were used on the underside to give a clean aesthetic finish.


7. Now, what I consider to be the clever bit, the upright sections of the cut off arms now align perfectly between two of the seats. I then marked and drilled through the seats and my support section exactly where the support contacted the seat. These could now be bolted together using my 6mm bolts with captive nuts on the rear (my additional support sections provide a little flexibility and cushioning without a shock absorber which was my primary intent.

8. My plan was to then cut off the excess arm material curving out of the back of the POÄNG sofa, but I haven’t got around to that yet. (So, you could do that at this stage. I might leave mine as the sofa is positioned against a wall and the upper parts of the supports cannot be seen with the covers attached).
…the damn cat sits on it now instead of destroying it, so mission accomplished i.m.o
9. There is a horizontal hole going completely through the base of the supports, this was intended to receive a bolt that holds the arm to the seat frame, what I did was to cut down four IKEA bolts that were left over and pushed them into four (cut down) wall plugs that I had, and squirted Liquid Nails in the hole before pushing them in place from either side, again just to add to the aesthetics.

10. So that was about it … until I fitted the seat covers, which showed up that horrible yellow seat base colour, that doesn’t match the covers or seat frame colour at all. So, I quickly dealt with them by cutting out sections of a dark blue table cloth and stapling those along the front edge of the seats, they look much better now.


Hopefully, there you go, that’s how I hacked my POÄNG 3 seat sofa. There are things I would do differently if doing this again. My main regret is that from the contents of my garage and the tools/ materials I had available, I couldn’t come up with a better method for securing the central cross member sections together in such a way as to a provide compressive force (bolting).

I just used the bonding agent which has so far been sufficient particularly when the central supports were attached. All in all, I am really happy with the result for my first crack at this and the damn cat sits on it now instead of destroying it, so mission accomplished i.m.o. 


~ by Ian
The post Triple POÄNG – The astonishing cat resistant sofa appeared first on IKEA Hackers.
For their 75th Anniversary, IKEA brought back some of their old favourites in the GRATULERA series. But wait, those are not the only discontinued IKEA products we wish the yellow and blue mothership will bring back. When I posted the question to readers some time ago, I received a slew of responses. I’m sure you have one or two (or many) items you hope IKEA will reissue. Add to the our big, big “Discontinued IKEA Items Wishlist” in the comments section.
Earth to IKEA, pleeease beam these discontinued IKEA products back.
(It’s a long one, in no particular order)
KIVIK single seater | IKEA.com
#1. “The Kivik single seat … or at least the freaking slipcovers! Grrr… ” ~ Neva
Jerker desk cable management hack. Click photo to see the hack.
#2. “I would love to see them bring back the Jerker desk. I have two. One I use as a desk and one I use as my electronics workbench). Not only are they big enough to support my three monitor computer setup, but because the uprights have holes every 1.5 inches they are easy to hack. I don’t think I am alone in wanting to bring back this discontinued IKEA product. There was a facebook petition not too long ago and I don’t know of any other desk with its own fan site.” ~ Steve
I don’t think I am alone in this wish, there was a facebook petition not too long ago and I don’t know of any other desk with its own fan site.” ~ Steve
“I would love to see the Jerker desk back! It is modular and well made. And can be made to be a stand-up or sit-down desk (adjustable but fixed height). They make an excellent workbench.” ~ Wayne Yoshida
Source: Anyaadores
#3. “Hi, there was a limited edition wallpaper, which I can’t find anywhere- can’t remember the name, but a multicolored zig-zag effect, very modern. Not seen anything like it since.” ~ Elaine
I think you are referring to the limited edition IKEA BRAKIG wallpaper. I was lucky enough to snag 3 rolls before they ran out.  ~ Jules

#4. “What I’d really like to come back – I never will understand why they dropped it out this summer – is the Ängsö garden series, especially the BIG garden table which is, no; was the only one at 1 by 2 meters. Really a pity :-(” ~ Stefan
Benjamin stool hacked into a laptop riser for watching movies in bed. Click photo to see the hack.
#5. “The non-existence of BENJAMIN at the IKEA stores hurts a lot these days …! When I wanted to complete my two stools with another two couple years ago — ha-hah! My theory on phasing them out (which probably applies to many other discontinued IKEA items, too) is, that IKEA rather withdraws the item from their catalogue than raise its price significantly: The BENJAMIN cost about 17 Euros back in the day — which is almost ridiculously little money for that kind of quality in material and built you got.” ~ uwe s. / Germany
The BENJAMIN cost about 17 Euros back in the day — which is almost ridiculously little money for that kind of quality in material and built you got. ~ uwe
#6. “The shaker style white doors (solid, not the glass ones) for the BESTÅ system!  ” ~ Sarah
Discontinued IKEA FIntorp wire basket I Image source: IKEA.com
#7. “I wish that Fintorp #10238148 would come back. I also wish the Undredal series would have a tall chest of drawers. The Undredal is so solid. I love it !!!!!” ~ Fran
#8. “One thing I miss – have missed for so long I’ve even lost the bookmark to the product page, so I don’t know its name. Right now, we have the RISÖR room divider – very nice and classy, but also expensive at nearly € 100. There used to be a much simpler one: just three metal frames (with crossbars) hinged together, and a simple piece of cloth stretched over each of the crossbars. It cost something like € 30 or € 40, and with the simple construction, it would be easy to pick your own fabric and use it for the room divider as well as pillowcases and other details.
That – typically IKEA – simplicity, and adaptability have disappeared and there’s nothing similar to replace it. (I do not consider RISÖR a replacement as it has neither its cheerful simplicity nor its adaptability.)
And, for quite a while, I could not even find *any* room divider at that price point – everything was much more expensive – and I could not afford them even if I wanted them for design (which I didn’t!).
And yes, I want it back! I could use 2 or 3 of them, even (and would buy, and adapt, them when the product came back).” ~ Marjolein
RONDO dinner set | IKEA.com
#9. “I would like the RONDO dinner set back. Some of mine are getting chipped. It was a wonderful design.” ~ J Palmer, Canada
Karlstad 3 seat sofa | IKEA.com
#10. “If there are any chances that we could request any discontinued IKEA item would come back, I would choose IKEA 3-Seater Karlstad. I agree with you that this sofa definitely should come back.
Well, I have been using Karlstad 3-Seater for year 5 now at our rented house somewhere in East Malaysia. And now we bought a house in West Malaysia and I’m always thinking that it would be good if Karlstad was still in production.” ~ Zull.
And now we bought a house in West Malaysia and I’m always thinking that it would be good if Karlstad was still in production.” ~ Zull
#11. “Yes, the wire mini Xmas trees!” ~ Pam
NYTTJA frame | IKEA.com
#12. “I’d like to see this picture frame come back – NYTTJA 8.5 x 11. I have a photo gallery in black and white frames that I add to every year or two. I found out last year that they are no longer available. I really like their basic look.” ~ Kathey
#13. “I should like to see the return of red-brown as a colour option across the Hemnes range. I have a Hemnes Console table in red-brown which sits well with my other furniture which is antique walnut. I should like another to hack for hi-fi storage but it is discontinued in red-brown.” ~ Kim
An UDDEN kitchen. Click photo to see the hack.
#14. “Like to see the Udden kitchen collection back.” ~ Lucas Kallinosis /Australia
IKEA VARDE range | IKEA.com
#15. “I would like to see the Varde cabinets back…just love them!” ~ Gretchen
#16. “I do not the name anymore, but I loved a seat in the seventies: Just a metal frame and a textile seat and back, it came in orange, yellow and dark blue.” ~ Michael köhler
The EMMABO? ~ Jules
#17. “I’d like to see Grytnas glass door come back so that I can start a project on a low cabinet.” ~ Dilip
Antonius laundry hamper turned gorgeous side table. Click photo to see the hack.
#18. We love the Antonius series – also the original wooden step stool (the new one is thinner and shorter but the original was more stable.” ~ Avriel
#19. “More patterned slipcovers for the Ektorp sofas. There used to be a much wider selection.” ~ Marianne
Lack shelving unit as dining benches. Click photo to see the hack.
#20. “IKEA needs to bring back the LACK bookshelf. It was so versatile and made a great media unit on the wall. Also, the BESTÅ panels for wall mounting that were made of glass need to come back. It hid all your cables and made wall mounting large format TVs much easier.” ~ Kyle Mangano
IKEA needs to bring back the LACK bookshelf. It was so versatile and made a great media unit on the wall. ~ Kyle
IKEA Mandal headboard hacked into a room divider and shelving. Click photo to see the hack.
#21. “YES!!! The Mandal headboard! I have been so bummed about that one! I bought the bed and the headboard was out of stock. Then, I kept waiting for it to come back and was so upset it never did!” ~ Amy
Lerberg wall shelves and decor. Click photo to see the hack.
#22. “YES! YES! I would love to see the Lerberg media storage racks come back!! Perfect for CDs, DVDs, and paperbacks! I love them and should’ve bought dozens when they were still available. Originally costing $CDN 5 or thereabouts, they’re now being flogged on eBay for $US25 or more apiece – ouch!” ~ Rebecca

#23. “The product I am dying for them to reissue is the PS 2017 room divider, photo above. It was announced, came out VERY briefly, and then was suddenly discontinued. The stores don’t seem to know anything about it. I really wanted to buy a few of these for our home studio, where we record music and my voice acting jobs. It looked to be a great sound baffle!” ~ Amy Guskin
Source: donebymyself.nl
#24. “For me, IKEA Ps Ellan (rocking chair) and Lindmon (shutters) should come back!” ~ Christine
#25. “I would love to see the Markor and Leksvik lines again. They are both very different styles but I love them. Also, I’d like to see the return of the Antique stain (Leksvik had an entire line) in just about anything (hehemmmm Hemnes maybe?). If I can’t get the matching pieces, at least the matching stain would work. I find the black/brown colour they’ve shown for a few years too dark (the old dark brown of the Markor was nicer).” ~ Elizabeth
I’m quite sure this isn’t an exhaustive list. What about you? Do you have any discontinued IKEA products you would love to see (and buy) again? Tell us in the comments below and let’s keep our fingers crossed someone at IKEA sees our wishlist and flicks the magic wand.
The post 25 things on the “IKEA bring back” wish list. What’s on yours? appeared first on IKEA Hackers.
My sister and I found an easy way to make a dog raincoat from an IKEA shopping bag. It only takes around two hours of work and costs 4 Euro in total.

1. Take the measurements of your dog (back length, neck & belly girth).
2. Cut the bag along the seams into two halves.

Related: See more IKEA hacks for dogs
3. Cut the handle of one bag and attach an elastic band with a length suited to the dog’s neck size.

4. From the second half cut out a rectangular piece as a closure around the belly.

5. Sew one of the small ends of this rectangular piece on one side of the bag.

6. Sew a Velcro strap on the other end of the rectangular piece.
7. Attach the reflective stripe to the outside of the bag wherever you want.


For the sewing jobs, you can either use a sewing machine or do it by hand.

See our video on how we made our dog raincoat as well as our dog happily wearing it.
~ by Ilona and Ola

For larger dogs, the KNALLA shopping bag raincoat may not be big enough, unless you want to sew a few bags together. An easier way is to use the bigger IKEA shopping bag – FRAKTA, like how Francesca did. Just one IKEA FRAKTA Bag is roomy enough for her big dog raincoat. See more.

Sarina made this super cute IKEA FRAKTA raincoat for her kid. It’s lined so that it won’t be too cold under the rain. See the full tutorial.
Source: Instructables.com
And here’s the grown-up version. You’ll need 4 FRAKTA bags for this kimono style raincoat.
The post The best DIY dog raincoat. With reflectors and only $4.50! appeared first on IKEA Hackers.
My daughter’s bedroom had a built-in wardrobe with an airing cupboard next to it. We changed the boiler to a combi a while ago, so we no longer needed the airing cupboard. In its place, we wanted an IKEA PAX with sliding wardrobe doors.
The old wardrobe was fully built-in with concrete blocks, render, plaster, architraves and folding doors. The doors were well past their prime and kept coming away from their guides.
Installing IKEA’s PAX wardrobes presented two issues to overcome – width and height.
I didn’t want to remove the end wall by the door as I was concerned it may de-stabilize the adjoining bathroom wall and the ceiling height was an inch or so lower than the PAX wardrobes.

First, I narrowed the right-hand wardrobe carcass by 70mm and shortened both carcasses by 40mm in height. Then, I installed the bottom door guides/runners under the base-board. This meant the sliding wardrobe doors could be about 10mm closer to the floor which I think looks better.
I won’t lie, it was a pain and took a fair bit of head-scratching, swearing, and so-on but the result looks like a custom-made-to-measure wardrobe. For £400.


I didn’t attempt to narrow the sliding wardrobe doors but nobody has noticed.
By taking the time to replicate the original fixing holes on the shortened panels it all fitted together as if it were straight out of the box.


The small wall enclosing the right-hand side of the wardrobe was about 120mm short of the front of the PAX assemblies. So I framed it out to match the front of the forward sliding door. Then spent quite a while getting the corner beads for plaster aligned to the sliding door as best I could.
Next, I gave it a quick skim with regular multi finish plaster. The result is quite a neat shadow line between the two of about 1/2”. A couple of people who have been to inspect my handy work didn’t even realise there was a wardrobe there until it was pointed out to them.
My final comments would be that yes; you can shorten sliding wardrobe door kits for PAX wardrobes (as long as the doors are not mirrors etc!). But it’s a lot of work, easy to make mistakes and requires a fair level of confidence in your own abilities. But I suspect it saved me upwards of £1,500.
~ by Chris
The post See the beautiful transformation of this wardrobe space appeared first on IKEA Hackers.
When I started to live on my own I bought the MELLTORP square table. First it was a dining table. Later, when I could afford more space, I got another dining table and I changed the MELLTORP into a coffee table by cutting down the legs to sofa height. But eating from that table or working was quite uncomfortable with the body hunched over. So I decided to hack it into a lift top coffee table. I call it my Magic MELLTORP.
MELLTORP | IKEA.com
1. I took off the plate by turning out the screws that were holding it.
2. Next, drilled four holes into the metal frame of the table.
3. And put a thin screw with washers and nuts through the holes.
4. Then, added four bars of aluminium to the screws and fitted them with the nuts. The fixing-point of the bars on the frame and on the back of the plate as well as the length of the braces depend upon how high you want the table in the end. I experimented with it (you can see the holes of failed attempts in the picture )


5. The position of the brackets to fix the plate to the bars could be easily found by turning the table upside down.


Now the top of the table can be pulled up and towards one side, giving comfort and safety for the sofa from smudges caused by the snacking in the evening.
~ by Stephan
Shop for lift top hinges and hardware

Adam added a lift-top functionality to his HEMNES coffee table to raise it up and move it closer when seated at the sofa. It’s useful for eating or working at the coffee table. See the tutorial.

Inspired by a similar hacks, DB spent 10 months taking a used IKEA Ramvik coffee table and making it into the functioning arcade table with an added lift top function. See the hack.
The post Transform your TV dinners with this uplifting hack appeared first on IKEA Hackers.
Having successfully built the “MYDAL kids loft bed with play area” hack in 2014 for my two sons it was time to rebuild the children’s bunk beds into something less bulky and with more storage space.
The challenge was to recycle some of the contents of the old hack. So I removed the MDF boards and one of the MYDAL bunk beds. I used the remaining bed for the new hack. Of course, the hack can also be built from scratch.
Inspired by a photograph on Pinterest I placed the STUVA frames in the form of an “L” against the corner of the room and increased stability by attaching some wooden beams to their backsides and the room’s wall.


Related: See more hacks for IKEA children’s beds
Then, I attached an MDF board on top, cut off the legs of the MYDAL bunk bed and put it on top.


Now the bed itself was covered with MDF boards again and painted white. For extra stability, I screwed the MDF-boards on the walls where possible.


The gap between the bed and the wall was also closed with a piece of MDF and serves as a shelf for teddy bears and books.

Related: A clever addition turns the KURA bunk bed into a storage bunk bed


Related: Make an indoor kids playhouse and bunk bed

The STUVA frames were closed with doors and drawers, except for the one under the ladder which is used as a shelf.
~ by Philip
The post 4 years later: How I re-hacked this IKEA children’s bunk bed appeared first on IKEA Hackers.
We were building a holiday small house, with emphasis on putting as much of the space as possible into the living areas, where we spend our time. We are happy having fairly small bedrooms where we spend little time.
At first, we had planned to put wardrobes on either side of the bed in the master bedroom. But when we were halfway through the build we realised that it would be quite claustrophobic and not allow for any bedside tables. Aargh!
The solution is built-in PAX wardrobes recessed into the wall on either side of the bed and popping out under the eaves outside. It’s elegant and works very well. The pop-out boxes were built around two PAX fitted wardrobes, which fitted neatly under the line of the external eaves. They are clad with the same steel as the rest of the house.
The pop-out boxes to contain the wardrobes under construction.

The wardrobe fitted inside the pop-out box, without doors, during construction of the small house.

The same wardrobe after completion.

The completed pop out boxes.

Wardrobe in use.

The final bedroom, with mirrored doors on the two PAX wardrobes. Those are discontinued IKEA lights, sadly I have forgotten their name, and a GRUNDTAL valet stand on the right-hand side.

~ by Penny

Sally and her husband live in a 300 sq. ft. home. While he walked the 200 mile Camino Primitivo in Spain, she designed and built a small space storage unit to fill a 6 x 16″ niche in their “living room”. On the far right appears a floor to ceiling custom built-in shelving unit. On the left, an efficiency kitchen and laundry room built from a SUNNERSTA KITCHEN and CART in a 5 x 3 ft. former laundry closet). See the full hack.

Movable walls is a project currently being researched at the “Home Living Lab” of IKEA. Office space by day, bedroom by night. Or anyhow you like it. Read more.
The post This is what they did to max out space in their small house appeared first on IKEA Hackers.
This waterbed frame hack is very similar to the “A full-sized bed built from KALLAX shelves + a DIY headboard“, but was build to support a full-sized waterbed.
This construction must be much more stable to support approximately 400 kg, but on the other hand, requires no ventilation for the mattress.
For obvious reasons, I decided to use the KALLAX shelves. They have a comfortable height for getting in and out of bed and can be easily combined due to the variety of modules.
This is the first sketch I did when I had the idea for this waterbed frame. It did not include the four wooden boards to support the weight.

Related: See more IKEA hacks for bedrooms
But, I was not sure if the KALLAX shelves where strong enough to carry a waterbed. So I placed four wooden boards between the shelves.

I used some L-brackets and steel braces to connect the shelves

To support the main weight, I used eight legs, that held up an Oriented Strand Board, that exactly fitted between the shelves


The waterbed base was finished. Time to do something for the optics. I bought two MDF boards that when combined were a bit larger than the base.
The reason, I had bought two boards and not one was a single board 150×200 cm would not fit into my car.

I was not sure if I would need it, as no one ever would walk on the laminate boards. But I had enough impact sound insulation left over from the last conversion so I had it installed under the laminate boards.


The laminate did not have to be laid floating and so I screwed it on to the MDF board.

I sawed the aluminum profile, mitered and glued it with hot glue on to the MDF board.

The aluminum profile is 4 x 4 cm, which left enough room, to stick an adhesive-backed LED strip on the inner vertical side of the profile.


Well, I thought this is it and the work is done…
…but after looking at the bed for a while I thought a headboard was missing. Not much. Just a place to drop a book or smartphone or something like that
I cut a short MOSSLANDA picture ledge in half and screwed the four ledges on the chipboard. The lower ledge was on the same height as the bed and the upper ledge at a height so that a book or tablet would not accidentally drop over the edge.

Since the chipboard was cut to the correct size, I had to iron on the banding.

The headboard was just placed between the wall and the bed and not fixed to either of it. The last step was to glue the quarter round strip moulding to the bed.
I did not do any calculation of how much weight this bed might carry, but I can tell you that it is now supporting my 140×200 cm waterbed for more than a year.


And here’s how the waterbed frame looks complete with waterbed mattress.


~ by Christoph Bock
The post This is how I made a waterbed frame from IKEA KALLAX appeared first on IKEA Hackers.
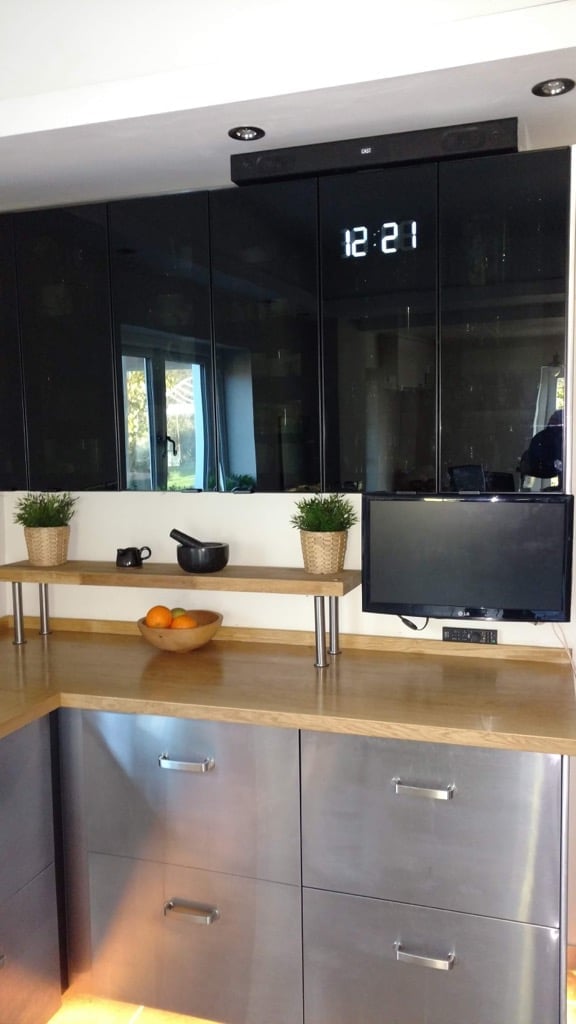
The problem with an uncluttered kitchen was finding a place for a kitchen clock. Two years later I had a eureka moment for a place for this ‘3D LED’ clock, powered by a regular USB charger. A glue gun fixed it in place.
Total time 10 minutes to find USB cable and 10 minutes to find glue gun = 20 minutes.
Total cost
£10 – £15 for the clock which may or not come with a charger.
JUTIS | IKEA.com
Related: Make a countdown timer using IKEA clocks
First, get the clock. Search eBay, Amazon or Gearbest for 3D white LED clock and check the dimensions. The 400mm JUTIS black glass door has a space for a 190mm clock.
My clock is 210mm long so it’s glued behind the door at an angle until I find a smaller size clock. But hey, it works! (It doesn’t seem to matter if the leftmost hour digit is obscured – that hour position only shows a ‘one’).

*Works with other stuff
This idea not only works with the black JUTIS door on IKEA Kitchens, it ought to work with the diffused glass or plastic doors found on other IKEA storage.
Related: A gorgeous bamboo wall clock for your kitchen

Oh and another thing. The space above the kitchen wall unit was just tall enough to fit a Sony sound ‘bar’ that’s normally used under a TV. This model HT-X2 has Chromecast built-in so you can use a Google device to play music while your food cooks.

~ by Roger Fro
The post No space for a kitchen clock? How about this! appeared first on IKEA Hackers.
Running out of Christmas decoration ideas? Fret not. Take a look around at the IKEA items you may already have. With a little ingenuity and hacking, it’s possible to turn them into unusual festive Christmas decoration, IKEA style.
Source: MerMag
This is a gorgeous idea, especially if you do not wish to invest in a tree. Swap out the ornaments and lights and the picture ledges work as usual on regular days. Merrilee used the old RIBBA picture ledge which is now discontinued. Use the MOSSLANDA instead. See more on MerMag.
Source: BootlegBaubles
I’m sure, you would have an IKEA FRAKTA bag, if not several, stashed away somewhere. You can turn them into a one-of-a-kind Christmas stocking, like how Bootleg Baubles did. Unfortunately, the link to the site doesn’t work anymore. But if you know how to thread a needle and make stitches, you can definitely sew one. Follow this pattern and sew away. More info.

Make a large scale advent calendar from a KALLAX / EXPEDIT. See how it’s done.
Related: See our curated list of 30 best Christmas Gifts for the IKEA obsessed
Source: IKEA.com
Now, here’s a novel Christmas decoration idea. Take one wide IVAR side unit (19 5/8 ” / 50cm). Next, string Christmas lights around the frame. Then, add strings horizontally across, creating a ladder effect. Lastly, create a tree shape out of ornaments. Click here for more info.
Source: poppytalk.com
You can easily make your own gift wrap with cookie cutters, MÅLA paint and MÅLA drawing paper roll. Your kids will also love helping out with this project. Get the details on Poppytalk.
Related: Last minute IKEA Christmas decoration ideas to deck your halls and walls. See all 10 ideas.
Source: IKEA.com
The idea is from IKEA itself but the link to the original tutorial is gone. But from what I can see, all you need to do is to measure out a string of twine. Knot the end. Thread a Christmas bauble through to the end of the twine. Add one or two more baubles. Then a little ways above the initial cluster of baubles, add another cluster of baubles, spacing them out as you see fit. Repeat the process until you complete the entire length. Then end the garland with a knot and hang it up. (Via Apartment Therapy)
Source: IKEA.com
Put this up for Christmas and you can leave it on till Valentine’s day. Cut a firm cardboard to the shape you want. (It doesn’t have to be a heart). Hot glue the baubles onto the cardboard and let dry. At the back of the cardboard, stick on one or two picture hooks or 3M Command picture strips and hang up. (Via Apartment Therapy)
Source: wonderfullymadebyleslie.com
Do you have a spare tray lying around? Turn it into a chalkboard sign. Leslie used the ROMANTISK tray and chalkboard spray paint. See more.

Just for the holiday season, swap out the images in your RIBBA photo frames to Christmas scenes. Decorate the ledge of the frame with the ornaments you like. See the full tutorial.
Nest a Christmas scene inside the ROTERA lantern.
Here’s another version, using the BORRBY lantern. See the tutorial.
Source: thegirlcreative.com

Hope you liked these 10 Christmas decoration ideas! Share with us how you’re decorating with IKEA this holiday season.

The post 10 IKEA Christmas decoration ideas for the unexpected sparkle appeared first on IKEA Hackers.
I collect vinyl records
I like the way record stores display their records on top, covers facing forward, so you can quickly flip through the records and find what you are looking for.
So:
I decided I would try to make my own …
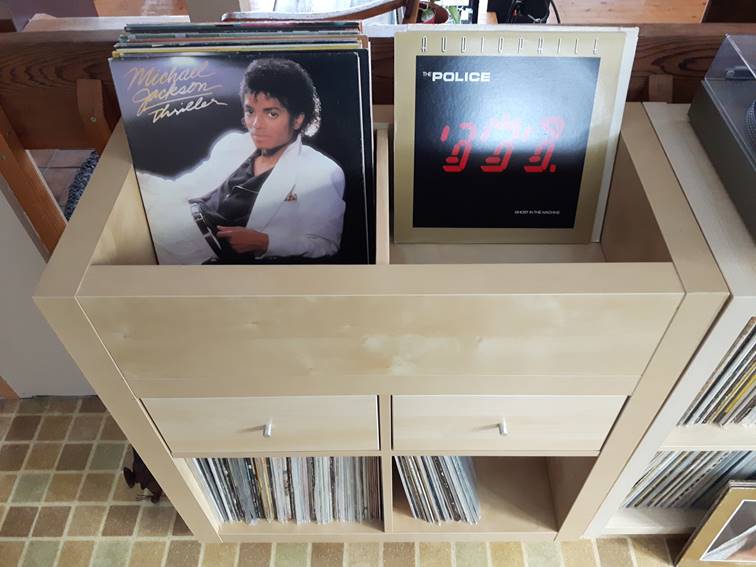
… it takes a bit of time but I think it worked out pretty well.
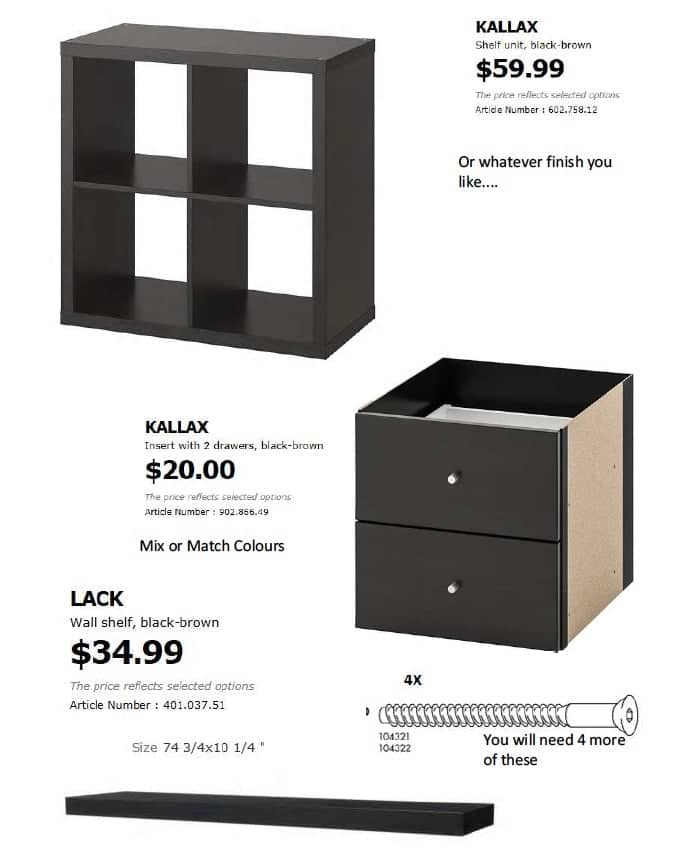
You will need a 2×2 KALLAX storage shelf and a KALLAX drawer kit. You will also need some extra parts for the front and back of the upper storage bin.
Most IKEAs have an “as is” area. I scored some extra pieces there. If not, look at the LACK shelving, which comes in similar colours. IKEA also has extra hardware in bins near the Customer Service area. Score some extra screws as well.
The tough part of this hack is making accurate cuts. So you should have some reasonable shop skills and access to a table or chop saw and a drill.
Now:
Let’s move on to the vinyl record storage cabinet, IKEA hack edition.
Start by assembling 2 Sides and Bottom along with long horizontal divider and short vertical divider.

The KALLAX drawer insert must be cut in half as accurately as possible to provide 2 identical drawer inserts. An inaccurate job will cause assembly issues later.
Use a tape measure, a carpenter’s square or good straight edge and sharp box cutter. Measure twice, cut once.

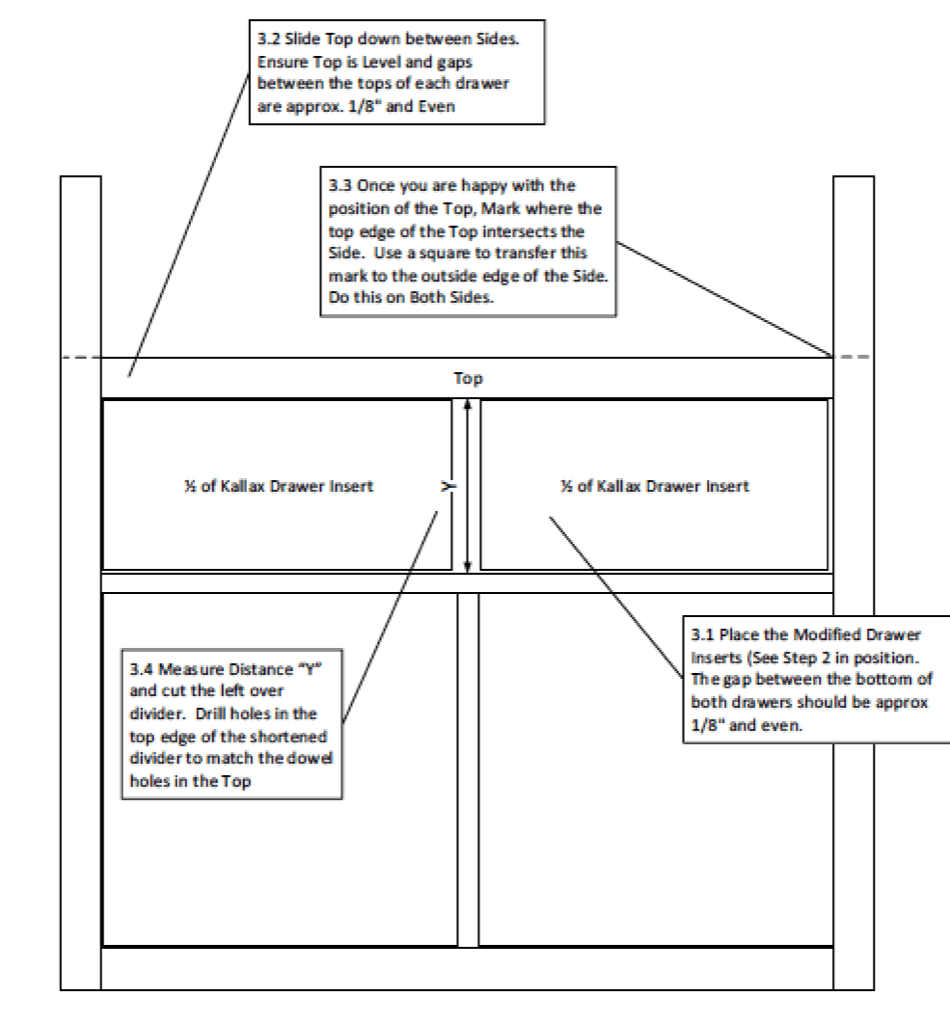
3.5 After completing all steps, disassemble the shelf.

5.1 Re-Assemble and install the drawers. Check for alignment and adjust as needed. Use the short screws provided with the Drawer Kit to fasten the inserts in place.


Download the printable vinyl record storage cabinet instructions PDF here.
~ by Jim Larocque
The post How to hack a store-like vinyl record storage cabinet appeared first on IKEA Hackers.
We already had a MAGNARP table lamp in the living room, but we were missing a reading lamp next to our couch.
For a standing MAGNARP floor lamp, we didn’t have space. And the available other IKEA lamps were not for our taste.
I already saw solutions with FRÄCK, so I decided to make my own wall mounted reading light, fused with MAGNARP.
Here goes:
1. Take apart both sets.
2. Cut the power line of the MAGNARP to be able to pull it out from the pipe. (Cut at both ends of the switch)
3. Cut the pipe. Besides the threaded part which goes inside the bulb socket you I will need approximate 5mm.


4. Cut M10 thread on the pipe’s end, and drill over the thread inside the main plate with M10 as well.
5. Bend the mirror’s fork as seen on the picture.
6. Mark the holes from the bent fork onto the main plate, and drill holes.
7. Make the electric work with a new switch. (I laced it inside the arm before doing so, but this is optional)
8. Cut out the shade for the arm. Don’t forget to reinforce it with something. (First time I missed this, and the paper was torn apart. That is why you may see some glue on the picture. I will cover it later with similar paper.)
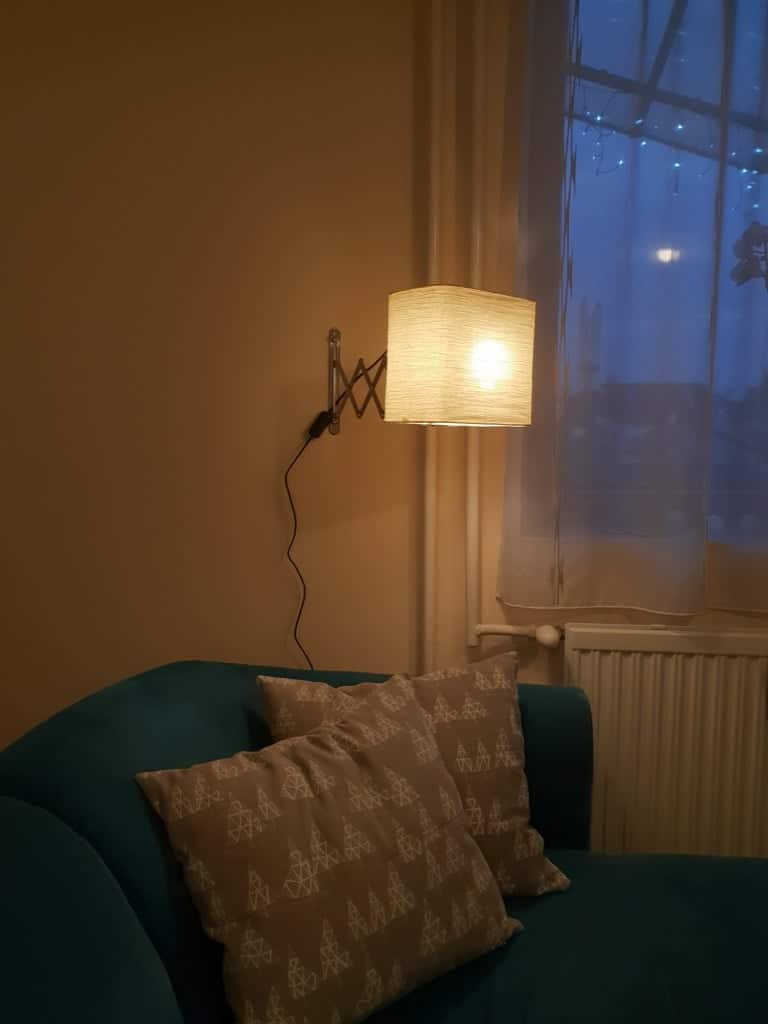

9. Assemble as seen. You will have almost no space for the tools. But it is not impossible to make 
~ by Bence Fazekas

This hack took advantage of the hollow core of the LACK shelves to make a pair of Minimalist bedside reading lamps. See more.

So the pair of bedside lamps throw out fantastic mood light. But what happens when you want to read in bed? Light from wall lamps are often diffused and not directed onto a page. Now, what if we can combine a pretty wall lamp and a spot reading lamp in one? That’s just what Peter did. Merging the best of the ALANG wall light with the Jansjö LED spot light. Read more.
The post Brighten up: A reading lamp the book lover will love appeared first on IKEA Hackers.
I forgot one thing when I ordered the MALM dresser:
The baseboards in my apartment are very tall and very wide.
So, when I installed it, I had a 4 cm gap between the wall and the back of the cabinet which was not aesthetically possible for me.
As it is not possible to cut the back of dresser at the bottom to leave room for the tall baseboard, I decided that MALM should be raised.
And it was much simpler than I had imagined.
Place the MALM upside down.

Fix the plywood onto the underside of the MALM with screws.
Predrill holes for the leg screws (if you have the same baseboard problem as me, make sure you measure that the back legs are far enough from the wall. Otherwise you’ll have to do it again, I know what I’m talking about. ¯\_(ツ)_/¯ )
Fix the mounting plates.
Screw in the bed legs.
Iron on the edge banding tape on the exposed plywood edges.
Flip the MALM upright and that’s it. The tall baseboard is no longer an issue.


I added leather handles that I found on Etsy because I thought something was missing, and am very pleased with the result.

~ by Stéphanie

Stacy’s goal was to take two dressers and make them look like one, big dresser. And she succeeded fantastically. Read more.

Nadia saw a gorgeous vintage credenza with gold accents and have been looking for a similar one for a long time. But she couldn’t find anything nice and affordable. When she decided to do her bedroom makeover, she thought that it would be the perfect project to finally give it a try. See the tutorial.

Otis desperately needed a desk since moving into a rented room. After adding two wardrobes and two MALM chests of drawers he was left with absolutely no room for anything else, so an IKEA hack was in order. Read more.
The post Mind the gap: Fit IKEA MALM over a tall baseboard appeared first on IKEA Hackers.


