Quantcast
Channel: IKEA HACKS – IKEA Hackers
Viewing all 1542 articles
Browse latest View live

Stunning Cherry Wood Closet with Secret Passage to Walk-in

$
0
0

This is our hack of a cherry wood closet, with PAX frames at its core. What’s surprising is it has a secret passage leading to a hidden existing walk-in closet.

In order to make space in our bedroom, we decided to go with IKEA PAX system.

However, our larger wall had a door leading to a walk-in closet.

Therefore, we put PAX modules on each side of the opening and connected them with a “fake” module allowing access to the walk-in.

Stunning Cherry Wood closet with Secret Passage to Walk-in

Pax-based cherry wood closet – closed

Stunning Cherry Wood closet with Secret Passage to Walk-in

Pax-based cherry wood closet opens to secret passage to walk in

IKEA items used for our cherry wood closet:
  • PAX modules and any PAX-compatible accessories you want
  • Hinges (but not the doors)
Other materials and tools:
  • Veneered particle panels
  • Veneer Edge banding
  • Veneer to cover bottom of the modules
  • Contact Cement
  • Cutter
  • Sanding paper
  • Shellac (or varnish)
  • Track saw (optional)
PAX based cherry wood closet – instructions:

1. Instead of using IKEA doors, we cut new ones in some American Cherry Wood Veneered panels. (We bought one of the cheapest IKEA door and used it as a template).

Tip: We used a track saw but you can get the panels cut to your specs by your retailer.

Stunning Cherry Wood closet with Secret Passage to Walk-in

2. We covered the exposed edges of the veneered panels with real cherry pre-glued banding. (hours of sanding and buffing).

Stunning Cherry Wood closet with Secret Passage to Walk-in

Stunning Cherry Wood closet with Secret Passage to Walk-in

3. Then, we drilled holes in our doors to reuse the original IKEA door hinges.

Stunning Cherry Wood closet with Secret Passage to Walk-in

4. We covered left and right sides of the PAX modules with additional cherry panels.

Stunning Cherry Wood closet with Secret Passage to Walk-in

5. The panels leading to the walk-in were made deeper to form a corridor. We made additional panels for more storage over the “secret passage”.

Stunning Cherry Wood closet with Secret Passage to Walk-in

6. After that, we glued a cherry veneer sheet to the base of the PAX modules to hide what was not covered by the doors. That veneer was not pre-glued so we used contact-cement.

Stunning Cherry Wood closet with Secret Passage to Walk-in

7. Now, on to the finishing.

American Cherry Wood has very interesting properties. It darkens as soon as it is in contact with light.

Any finishing product makes it instantly dark and reveals interesting contrasts. We tried a dozen of products on prototypes and the most stunning was a real Shellac (see picture). It is a natural product, dries very fast and the color is wonderful.

Stunning Cherry Wood closet with Secret Passage to Walk-in

8. We decided not to install knobs on the doors. IKEA push buttons work perfectly and allowed us to keep our design very clean.

Stunning Cherry Wood closet with Secret Passage to Walk-in

Additional insights from our cherry wood closet:
  • Cut adjacent doors in the same panel for a perfect match

Stunning Cherry Wood closet with Secret Passage to Walk-in

  • Choose your panels by yourself (insist to the salesperson)
  • Buy panels that are from the same production batch: for two consecutive panels in the pile, the pattern should match!
  • Never leave cherry exposed to light before you finished them as the color will change very fast (a few hours) and your panels won’t match anymore.
  • Our others wood furnitures were not made from cherry. The MinWax dye company has a color called “Cherry” that gives regular wood the color you get when you apply a clear coat to cherry.

Stunning Cherry Wood closet with Secret Passage to Walk-in

~ by Jonathan Gaudreault and Nathalie Turgeon

The post Stunning Cherry Wood Closet with Secret Passage to Walk-in appeared first on IKEA Hackers.
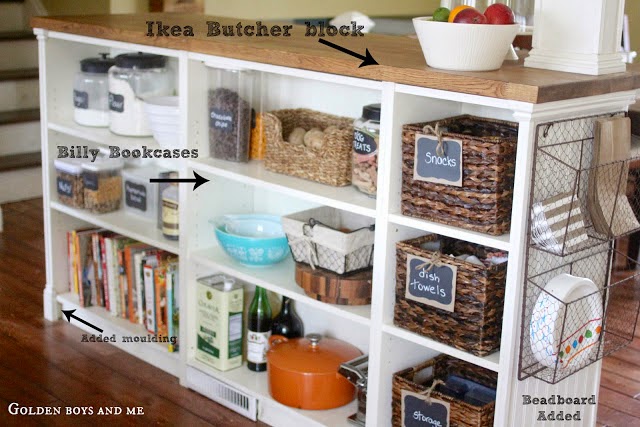

Built-in Home Bar Cabinet with IKEA BILLY

$
0
0

I wanted to create a place to house all the wires and components of a home theatre. And I wanted to create a home bar cabinet to store wine glasses, etc.

We already owned the BILLY bookcases and they looked great in the room they were in. It took about five hours to build our BILLY home bar cabinet. The bookcases were already assembled, which shaved off our build time considerably.

It would cost about $650 if we had purchased everything new. Pay special attention to making sure everything is level before screwing it together.

Making the BILLY bookcases into a home bar cabinet is a fabulous idea. We love how it turned out!

IKEA items used:
  • Six BILLY bookshelves (41.5” height)
  • One nine foot pre-finished IKEA kitchen wood countertop
Other materials:

Steps for our DIY home bar cabinet

1. We took six already assembled BILLY bookshelves that we owned and moved them into a living room area where we set put three of the shelves along the front section, and the three other shelves back to back with the first set.

2. We assembled the shelves in this arrangement loosely first, prior to screwing them to the floor and the shelves’ sides together.

Home Bar Cabinet IKEA BILLY hack


Related: Man Cave Bar


Home Bar Cabinet IKEA BILLY hack

3. We removed the back panel from the first set of shelves, nearest the wall, to house several home theatre components and the wires to a home theatre.

Home Bar Cabinet IKEA BILLY hack

Home Bar Cabinet IKEA BILLY hack

4. When the shelves were levelled, we secured the first set to the wall, with a board between the wall and the first shelf for a solid background for the screws to go into, instead of drywall.

5. The shelves were then bracketed and screwed together.

Home Bar Cabinet IKEA BILLY hack Home Bar Cabinet IKEA BILLY hack Home Bar Cabinet IKEA BILLY hack

6. Next, we placed the wood countertop on the top of the six bookshelves. Then screwed into place from the underside of the top panel of the bookshelf into the wood of the countertop.

Home Bar Cabinet IKEA BILLY hack Home Bar Cabinet IKEA BILLY hack

7. Small decorative brackets were added for further stability and aesthetics to the end of the bar top.

Home Bar Cabinet IKEA BILLY hack Home Bar Cabinet IKEA BILLY hack Home Bar Cabinet IKEA BILLY hack

8. Lastly, we finished the bar top with a water based Varathane. Five coats on top and edges, with a light sanding in between each coat

~ by Bonnie Landry


You may also like these IKEA Bar hacks


The post Built-in Home Bar Cabinet with IKEA BILLY appeared first on IKEA Hackers.

A fabulous Earring Holder for your giant earring collection

$
0
0

I chose to hack the MACKAPÄR into an earring holder because I have a very large earring collection. I wanted something minimalist and removable. The cost was under $20.

IKEA item used:
  • MACKAPÄR Shoe Rack

MACKAPÄR shoe rack | IKEA.com

Other tools and materials:
  • Drill
  • Screw in L hooks
  • Wall plugs

Instructions for large DIY earring holder:

Use the shoe plates in the MACKAPÄR, legs are not necessary. I mounted them horizontally and used the small holes on the side.

Ensure the L hooks fit the small holes on the side (see picture). If they do not, enlarge with the drill.

IKEA MACKAPÄR earring holder for a giant earring collection

I mounted mine to drywall so wall plugs were required. Drill holes in the wall, knock in the wall plugs and screw in the L hooks.

The hardest part was matching the hook length and strength with the hole size. Similar hooks could work well. And if it being removable is not important, then the earring holder could be screwed directly to the wall.

IKEA MACKAPÄR earring holder for a giant earring collection

~ by Ari Kennedy


You may also like these earring holder hacks

# Purse rack and earring holder

purse and earring holder

I mounted a Grundtal Paper Towel Rack on the wall in my closet to hang my earrings on for easy access. It also holds a clutch handbag or two. See the earring and purse rack.

#2 Open and close earring display

open and close earring display

Nina used the RIBBA frame and hinges to create a one-of-a-kind earring case.

#3 Frame up your earrings

frame up earring

I wanted something fancy to store my tons of earrings, and it would have to fit into my old fashion de viennese pseudo baroque room. I thought the Ung Drill was just perfect for this purpose. See more of the earring picture frame.

#4 From office to earring organizer

accessories organizer

Having lots of hook earrings I was looking for somewhere to hang then cause they always get tangled into each other. I had seen the mesh system stapled into a picture frame but I didn’t feel like crafting. A quick scan on my office and I found the perfect solution. See the quick and easy earring organizer.

#5 Cheap and easy earring display

earring display

This hack is great for someone like me who loves to own a lot of earrings and need something to display them out neatly without costing too much.

The TOLSBY is an excellent choice for earring display at home and for product selling, I have used this display for my local craft fairs to great effect. See the TOLSBY earring display.


The post A fabulous Earring Holder for your giant earring collection appeared first on IKEA Hackers.

Easy tweak for a new dining buffet with hutch

$
0
0

I turned an old IKEA LEKSVIK cabinet into a dining buffet with hutch.

IKEA item used:
  • LEKSVIK glass door cabinet. (Some items in the LEKSVIK range are still available, but this particular cabinet model does not seem to be in production anymore.)
IKEA LEKSVIK

IKEA LEKSVIK – before

Other materials:

Instructions for dining buffet with hutch

To make my dining buffet with hutch, all I need to do was to apply a simple coat of flat black paint to make it match my dining room furniture. I painted the inside of the glass cabinet too.

Then I nailed on a birch backing, cut to size, to fill the cavity between the lower cabinet and upper glass cabinet. I painted the birch backing board in the same colour as well.

Easy tweak for a new dining buffet with hutch

It looks fabulous and is a great fit in my dining room.

Easy tweak for a new dining buffet with hutch

~ by Jeff


You may also like these dining cabinet hacks

#1 Tall and elegant glass dining cabinet

dining cabinet

The empty wall between the kitchen and dining area was very disturbing, even screaming at me to fill it with something. I came up with a hack on the IKEA MALSJO cabinet turning it into a tall glass cabinet.

#2 BILLY China Cabinet

IKEA BILLY china cabinet

I wanted to share my China Cabinet hack that I recently installed. I had been searching for a couple of years for the perfect china cabinet for my breakfast nook. I wanted it to be tall, approximately 60 inches wide, and no more than 15 inches deep.

Glass doors on top and closed storage on the bottom. Also needed integrated lighting and glass shelves. Nothing I found had all of the requirements I needed, so I decided to hack my own. BILLY was exactly what I needed! See the IKEA BILLY China Cabinet hack.

#3 Dining room sideboard from the HEMNES

dining room sideboard

We took our unused large, black HEMNES dresser and repurposed it into a dining room sideboard. First we removed the four large drawers and their drawer slides. The holes were filled and sanded and the entire base was painted with two coats of white paint. See the rest of the tutorial.


The post Easy tweak for a new dining buffet with hutch appeared first on IKEA Hackers.

42 EKETs make a unique IKEA Cube Bookcase

$
0
0

We built a new house three years ago and now decided to build a new book case to replace our ages old EXPEDIT.

The idea was to cover the whole wall with books and bookcase.

As we did not find anything we like, I came with an idea to build an IKEA cube bookcase. In this case, I went with the EKET shelves.

It is not a tough hack, but the final look is really amazing and beautifully replaces our EXPEDIT shelf.

IKEA items used:
  • 42 pieces of EKET cubes

EKET | IKEA.com

Other materials and tools:

How to make an IKEA cube bookcase

I measured our wall and very easily made a first sketch of the design on paper.

IKEA Cube Bookcase out of EKET shelves

Then I used my skills from modelling for Google Earth 3D buildings to draw a model in the free SketchUp programme (formerly Google SketchUp).

IKEA Cube Bookcase out of EKET shelves

This application measures the pieces automatically, so I ordered the needed particle boards according to it. I then asked a carpenter to edge them with black color.

IKEA Cube Bookcase out of EKET shelves

The design idea was to use the dividing black shelves between the EKET boxes with shorter depth (about 3 cm).

The building of the bookcase itself was easy by screwing the EKET boxes on the back (behind their bottom) with the horizontal black wooden shelves.

IKEA Cube Bookcase out of EKET shelves

The small vertical dividers I left without any fixing them to the boxes.

On the higher levels I used the attached wall mounting kit to fix the EKETs to the wall.

IKEA Cube Bookcase out of EKET shelves

IKEA Cube Bookcase out of EKET shelves

The most time consuming operation was to build the 42 cubes.

To build the cubes and shelves together took me about one afternoon.

The hardest part was to assemble the highest two levels which were the longest. They had to be mounted and screwed together with upper and lower boxes.

The final effect of my IKEA cube bookcase impressed all of my family who were at the beginning rather skeptical about my plan and idea.

IKEA Cube Bookcase out of EKET shelves

IKEA Cube Bookcase out of EKET shelves

I’ve leave you with one last idea. When I was planning this IKEA cube bookcase, I thought of using the black LACK shelves as the black dividers. So that may be an option too if you’re thinking of doing something a similar IKEA cube bookcase.

~ by Peter

The post 42 EKETs make a unique IKEA Cube Bookcase appeared first on IKEA Hackers.

Computer hutch hidden away in BILLY Bookshelf

$
0
0

My goal was to build a computer hutch that looks clean and uncluttered for a room that doubles as my home office and guest bedroom.

I use a Mac Mini but a larger computer would probably fit in the bottom space of the cabinet.

IKEA items used:
Other materials:
  • 10” x 21 ¾” x ¾” pine plywood. (Any plywood will do) Corners eased with sander, top sanded and clear coated with gloss spray. After paint is dry, sand, dust, put second coat
  • Two 10 in. Full Extension Ball Bearing Side Mount Drawer Slide ($4.09 Home Depot)
  • Two 10 in. long 1″ x 4″s
  • Two 6″ long furring strips (¾” x 1 ½”)
  • 2 or three packages of 5/8″
  • #8 Pan Phillips metal screws
  • 20 pack of zinc plated
  • 1 ½” corner braces
  • 1 ½” wood screws
  • 1/8 inch drill bit to predrill
  • Makita battery operated drill
  • Black and Decker power file
  • 1 1/8” Forstner bit

How to build a computer hutch in a BILLY bookshelf

I built my slide out keyboard piece first. Attached drawer glides to side edges of the 10″ plywood.

Then, I attached 6″ furring strip aligned with the end of 10″ 1 x 4. I pre-drilled with a 1/8″ bit into the side of each furring strip.

Next, I installed the other sides of the drawer glide on the inside face of the 1 x 4.

Computer hutch in BILLY Bookshelf

Computer hutch in BILLY Bookshelf

Removed the shelf from the BILLY and attached the slide out keyboard upside down on the shelf. For this, I used wood screws going through furring strips and into the bottom of the shelf.

I left about 3 1/2″ of space on the left hand side to allow for an electrical opening to be made. That leaves about 2″ of space on the right side.

Then I drilled an electrical opening using a Forstner bit. It went about 6” deep on the shelf and over about 1 ½” to the side.

I drilled a hole using the Forstner bit. Then used the power file to make additional openings in the circular hole to allow for a variety of power cords to go through.

The additional slots make a cross like opening in the shelf. Repeated this for the shelf that will go above the keyboard shelf so electrical can reach my Mac Mini.

I varnished all unfinished wood to keep moisture from seeping in.

Computer hutch in BILLY Bookshelf

Electrical wiring for the computer hutch

I used a 1 1/8” Forstner bit and power file to make a hole at the bottom corner of the cabinet to allow the plug from my power strip to be threaded through. This keeps the neat appearance, which I’m looking for with no wiring showing.

Computer hutch in BILLY Bookshelf

Computer hutch in BILLY Bookshelf

To stabilize the pull out keyboard, I screwed on eight L Brackets. (2 on each end of the top of the shelf and 2 on each end of the bottom of the shelf holding the keyboard.) I did not screw L brackets into the shelf, only into the inside of the sidewalls of the cabinet.

Last, I did my most dreaded chore. Which was cutting into the stationary shelf on the BILLY to make room for my monitor.

I measured and drew the lines I wanted to cut, adding curves on the corners for appearance and comfort.

After the cutting, I sanded the edges and varnished them with a small brush as a finishing touch.

Computer hutch in BILLY Bookshelf

Computer hutch in BILLY Bookshelf

Finally, here’s how the completed computer hutch in a BILLY looks.

Computer hutch in BILLY Bookshelf

Computer hutch in a BILLY – closed

Computer hutch in BILLY Bookshelf

Computer hutch in a BILLY – opened

~ Sharon Cozad

The post Computer hutch hidden away in BILLY Bookshelf appeared first on IKEA Hackers.

The best 14 IKEA BILLY hacks for every room in your home

$
0
0

We made a list of the best IKEA BILLY hacks to celebrate the world’s most beloved bookcase.

It’s been around for an incredible 40 years and have undergone new colours and accessories, doors and add-ons. For this birthday, BILLY gets three new skins — yellow, dark red and beige. But structurally, it has remained the same hardworking bookcase, first envisioned by the late Gillis Lundgren.

In 1978, Gillis sketched out the design on the back of a napkin. And he named it BILLY,  after a colleague who expressed his desire for a ‘proper’ bookcase.

Both Gillis and Billy would be happy to know every year, about 4.5 million new BILLY bookcases join the 60-odd million already in homes and offices all around the world.

I think Mr Lundgren would also be very pleased to see how far we, people who tinker with IKEA, have evolved his iconic bookcase. Now not just for books, we’ve have IKEA BILLY hacks for shoes to toys to wine and so much more.

And it’s so versatile, you can practically use the IKEA BILLY anywhere in your home.

Let’s celebrate this illustrious bookcase with the best 14 IKEA BILLY hacks.

#1 In the kitchen: BILLY island

diy kitchen island

Courtney’s farmhouse styled kitchen island with open shelving. She made in out of 3 BILLY bookcases, a butcher block countertop and beadboard. See more of the DIY kitchen island.

#2 At the Entryway: Mudroom furniture from BILLY bookcases

mudroom furniture

Jessica recently took an under-utilized closet, added some IKEA pieces (BESTÅ and BILLY) for storage and made them into beautiful mudroom furniture for her home.

#3 Craft room: This is sew good

sewing cabinet craft pod

Liz hacks a sewing cabinet / craft pod with 2 BILLY bookcases. Open to craft. Close to hide the clutter. Perfect. See the sewing machine cabinet and craft pod.

#4 In the Library: BILLY hides a secret door

Billy bookcase secret door

Meg’s solution to turn an awkward space into a whiskey and tea library includes creating a secret door that leads to their home office/guest room. See the secret door BILLY bookcase hack.

#5 Upstairs landing space: Daybed reading nook

daybed reading nook

Jessica shares her IKEA hack — a daybed reading nook — made from 4 BILLY bookcases. It’s amazing how it turned out.

#6 Dining room: Tall Wall-Like BILLY bookshelves

tall cabinet

Roel needed to add some extra storage space in the living room. They came up with the idea to make a tall cabinet at the head of the table, with a more “wall like” appearance. See their tall cabinet hack.

#7 Bedroom: IKEA BILLY hack hides a murphy bed

queen murphy bed ikea hack

MSILBERBERG lives in Manhattan where space is a premium. They were fortunate to have a playroom that also doubled up as a guest room. Their idea was to hide a queen Murphy bed behind their IKEA BILLY bookcases.

#8 Anywhere: Cat shelves in one compact BILLY

cat shelvesCave Lion fashions a fantastic set of cat shelves in a BILLY bookcase. It looks pretty easy to do too. And it looks a lot of fun! See the cat shelves.

#9 Basement: DIY home bar

DIY home bar

A gorgeous bar from tall and short BILLY bookcases. The tall ones form the storage cabinets for the bottles. The bar counter are 2 shorter BILLY bookcases and a walnut kitchen counter also ordered from IKEA. Read more on this DIY home bar.

#10 Playroom: Dollhouse bookcase

dollhouse bookcase

By adding a roof, chimney, wooden details, paint, fences, walls and even windows, the BILLY Bookcase becomes a chic beach house, or a fab urban row-house. Use as a bookcase, shelf, or dollhouse… you get to decide! See the dollhouse bookcase.

#11 Living room: BILLY is for built-ins

built-in bookshelves

Jeff had a really long wall that needed something to separate the games area from the media area. What better way than to introduce more storage and some built-in bookshelves.

#12 Home office: Hide a workspace in a BILLY

secret bureau

Here’s a desk that hides away completely in a BILLY bookcase. A great idea when you don’t have space for a big workspace. See the secret bookshelf desk.

#13 Living room: Full BILLY wall

full BILLY wall

When you need to fill an entire wall with shelves, BILLY’s your man or bookcase. See the full BILLY wall.

#14 Hallway: Make it float

floating bookshelves

The BILLY bookcases take on a new lightness when hung on the wall. Also, furniture off the floor is the way to go for me. Makes cleaning so much easier, eh. See the floating bookshelves. Here’s another version if you prefer a wood wrap-around.

Hope you like these IKEA BILLY hacks. Which is your favourite? Tell us in your comments.

The post The best 14 IKEA BILLY hacks for every room in your home appeared first on IKEA Hackers.

Terrarium lamp: An easy hack for your miniature garden

$
0
0

I’ve just finished an IKEA hack to transform my terrarium into a terrarium lamp.

My terrariums needed light, specially during winter. So I decided to create a terrarium with lamp attached.

IKEA items used:
  • TVÄRS Lamp
  • IKEA 365+ Jar with Lid
TVARS lamp | IKEA.com

TVÄRS Lamp | IKEA.com

Cost: 2.50€ (Tvärs) + 2€ (Light Bulb) + 2€ (Glass cover 365+)

Other materials and tools:

Hack instructions for terrarium lamp:

First, cut the 3 legs of the TVÄRS Lamp with scissors.

Unmount the cable going to the light bulb and pass the cable at the upper section of the system, so you can glue the lamp on the jar lid.

terrarium lamp-2

Lastly, glue the lamp into the glass jar lid with an adhesive suitable for glass.

And your terrarium lamp is finished!

terrarium lamp-1

The hardest part about this hack was trying to figure out how to fix the lamp without the light bulbs being too close to the plants.

~ by Foret De Verre (See more of my terrariums here.)


You may also like these terrarium hacks

#1 Easy DIY Star Wars Terrarium

terrarium in a lantern

For my daughter’s woodland themed room I took the MORKT Lantern and used silicone and a plastic ring to seal up the bottom.

I then planted succulents and placed an AT-AT Walker for a terrarium from a galaxy far far away. Read more about the Star Wars Terrarium.

#2 Wall terrarium in magnetic containers

airplant in spice containerHoping to bring a little green to your office? Or kitchen? These vertical terrariums absolutely fits the bill. They don’t take any room, and are extremely easy to maintain. And because they are magnetic, you can just fix them on your noticeboard or fridge. Read more on the wall terrarium.

#3 Hanging succulent garden

succulent wall planterI have a tiny patio which receives very little light, but I still wanted a home for plants. The patio wall managed to get a little light, so I lined the 2 bath caddies with felt, filled ’em with dirt and stuffed them full up succulent cutting to make a cheap-o hanging garden. Read more of the succulent wall planter.


The post Terrarium lamp: An easy hack for your miniature garden appeared first on IKEA Hackers.


Box shelves: Make them really quick and easily

$
0
0

I hacked the IVAR shelving system, because I wanted to have stackable box shelves which are more flexible and easier to moving around. They also save space.

The hack wasn’t very hard to do and it took me just half a day, approximately 4 hours.

NOTE: Obviously, this hack is not suitable for homes with small children who may attempt to climb the shelves. The shelves will certainly fall as the individual units are not fastened to each other or to the wall.

IKEA items used:
  • 2 IKEA IVAR side units (the tall one)
  • 10 IVAR shelves

IKEA IVAR system

Other materials and tools:

Hack instructions for DIY box shelves

The general idea is to built independent ‘stackable box shelves’ you can later pile up anyhow you want.

The first thing to do is to saw the IVAR side units. Measure the lengths you want your box shelves to be. Make a mark on the side unit with a pencil and then, saw it.

You’ll need 2 sawn side units of the same length to make one box shelf. After sawing the side units set them aside for now.

I chose to paint the side units on one side. Feel free to paint to suit your home decor.

box shelves IKEA IVAR hack

Now, you can work on the shelves. Drill a hole at all 4 corners of each IVAR shelf. The hole should align to the top of the sawn side units.

After that, place the shelf panel on top of the sawn side unit and screw the shelf in. Repeat on the bottom to complete the box shelf.

(You may want to drill pilot holes on the tops of the sawn side unit, which will make it easier to screw in the shelves.)

And tadah!

You now have five stackable box shelves you can put on top of each other as you wish.

As the units are not fastened to each other or the wall, be careful how you stack the units and the items you place on them to maintain balance.

Recommended to place heavier items at the bottom unit.

box shelves IKEA IVAR hack

What I really like about the hack is the whole system of stackable box shelves stays flexible. I can easily disassemble and reconstruct it.

If I don’t like the look anymore, it’s possible to change the configuration of the box shelves. It also fits really well with my high walls.

~ by Kolja


You may also like these IVAR storage hacks

#1 Floor to ceiling built-in bookcase

full height built-in bookcase

I would like to share my hack of IKEA IVAR shelving system into a built-in bookcase. It all started with the wish to have a bookcase that could store all the books we still had in the moving boxes. Read more on the IVAR built-in bookcase.

#2 IVAR goes chinoiserie

Ivar storage chinoiserie cabinet

I recently made an IVAR cabinet go chinoiserie. What I used was the 20″ deep IVAR cabinet, two 20″x49″ IVAR side units, and an extra 20″ deep shelf (in addition to the two that come in the cabinet.) Read more about the IVAR chinoiserie cabinet.

#3 Massive IVAR workstation and storage

IVAR workstation

I was searching for the right height standing workstation for months until I came across the IVAR system from IKEA. It’s completely modular so you can set the desk height and cabinet configuration however you’d like. Read more about the massive IVAR workstation and storage.


The post Box shelves: Make them really quick and easily appeared first on IKEA Hackers.

IKEA corner table in beautiful beech: A DIY

$
0
0

Here’s how I made a large IKEA corner table from their work tops and legs.

In total, we spent $325, which was far cheaper than buying a custom made L-shaped desk to fit the space.

IKEA items used:
  • 2 x GERTON table top
  • 5 x OLOV adjustable legs
Other Materials:
  • Screws
  • Metal brackets
  • 4 x 6 ft. long 1×4″ wood planks
  • Cable grommets
  • Keyboard tray (optional)
Tools required:
  • Circular saw
  • Guide for the circular saw
  • Drill
  • Tape measure

How to make an IKEA corner table

The first thing I did was decide how big I wanted the desk. I used the 29.5 x 61″ table top from IKEA whole, and cut the 2nd piece for the “L” with the circular saw with a guide to create a straight cut.

I made that piece 18 x 34″ so that it would fit where we were going to use the desk.

There are metal braces on the bottom of the table tops. Remove them before cutting, and make sure that you cut the table top so that the finished side of the desk will point outward, otherwise you’ll have the hole for the metal bracket channel facing out.


Related: Upsize LINNMON table tops into a large corner desk


I brought the pieces into the office where the desk was going to reside and started assembling.

Joining the two separate desks into one corner table

DIY IKEA corner table from table tops

First, I used one metal brackets to brace the 2 pieces together, and then used the 1 x 4″ wood to trim around it and added more metal brackets for extra stability.

DIY IKEA corner table from table tops

Since we have baseboard heat, and I wanted the desk to sit flush against the wall, I offset the rear facing 1×4 so that the legs could be bolted to it far enough away to clear the baseboard heater.

DIY IKEA corner table from table tops

Once I secured the 1 x 4 wood around the the table tops (with 2 pieces in the center of the 29.5 x 61 piece for the keyboard tray to mount to), we flipped the desk over onto 2 saw horses. I screwed the legs into the desk and then removed the saw horses.

After that I stained the desk and installed a couple cable grommets for power and monitor wires.

DIY IKEA corner table from table tops

My only advice would be to measure twice, cut once.

In my books, the IKEA corner table project went well and I ended up with the desk I wanted. And it fits the room to a tee.

I even ended up using a scrap piece to make a small laptop tray for another room which is secured to the wall with fold away shelf brackets.

~ by Peter

The post IKEA corner table in beautiful beech: A DIY appeared first on IKEA Hackers.

This loft storage hack is anything but ordinary

$
0
0

This is my loft storage hack for the awkward space, where the sloping ceiling meets the wall.

I can’t put anything there, but I wanted to find a way to add in more under-eaves storage.

IKEA items used:
  • IKEA MALM — 1 x single and 2 x doubles
Other materials and tools:
  • Birch wood front for each drawer
  • Carrera C Marble on top
  • Colour Deco Blue on MALM base

IKEA hack for loft storage:

I’ll let the pictures tell the story. I wanted to show how I refurbished my loft bedroom using IKEA elements in the process.

In the project, I went with the IKEA MALM chest of drawers. The chests are integrated under the eaves, in my attic bedroom.

Stylish loft storage with customised built-in IKEA chests Stylish loft storage with customised built-in IKEA chests Stylish loft storage with customised built-in IKEA chests


Related: The best under-eaves wardrobe hack yet


Stylish loft storage with customised built-in IKEA chests Stylish loft storage with customised built-in IKEA chests

I also cut the inner wall to get the chests in as deep as possible. It was nothing hard, just time consuming. As I was already replacing the windows, it was necessary to open up the walls and ceilings anyway. If not, making built-in furniture is a big job, if you want good results.

Stylish loft storage with customised built-in IKEA chests Stylish loft storage with customised built-in IKEA chests

I live in Norway and based the design on natural Nordic design. In Northern Europe, design is all about natural materials and the minimalist look. So I added a few natural elements to the IKEA MALM chests.

I opted for all birch wood drawer fronts to replace the particleboards that come with the MALM. The birch panels are cut in an angle at the top to get a descent grip when pulling open the drawers.

Stylish loft storage with customised built-in IKEA chests


Related: How to hack a classy bespoke loft wardrobe


Stylish loft storage with customised built-in IKEA chests

I had to get a guy who had a CNC Cutter to fashion the custom birch drawer fronts. All I did was to provide him with one original MALM drawer front panel. He entered the correct measurements into his computer and the CNC cutter did the rest. It was not expensive and he billed me for a couple of hours of labour and a couple of plywood plates, totalling $500.  Stylish loft storage with customised built-in IKEA chests Stylish loft storage with customised built-in IKEA chests

Then, I treated the drawer fronts with a decor wax with white pigments to keep them from turning yellow.

Loft storage finishing touches

On top of the chest, I used Marble Carrera C top pieces which cost me about $500.

Stylish loft storage with customised built-in IKEA chests
I’m very happy with my loft storage solution and wouldn’t do anything different.

So far, my visitors find it a unique piece. I love the design yet still a very functional piece of furniture.

Stylish loft storage with customised built-in IKEA chests Stylish loft storage with customised built-in IKEA chests

~ by Peik Helly-Hansen, Norway. Follow me on Instagram @peikhellyhansen

The post This loft storage hack is anything but ordinary appeared first on IKEA Hackers.

How we painted kitchen cabinets for our new kitchen nook

$
0
0

We had an open wall in our kitchen and needed some extra cabinet storage. We really liked the look of open shelves and wanted something that would complement our current gray cabinets. Here’s the result our IKEA kitchen nook and painted kitchen cabinets.

IKEA Kitchen Nook with painted kitchen cabinets

IKEA items used:
  • SEKTION kitchen cabinets
  • BODBYN doors
  • VADHOLMA shelf
  • KARLBY birch countertop
Other materials:
  • 1/2″ Iron pipe and fittings
  • 10′ pine boards
  • MDF sheets
  • Crown moulding
  • Gold cabinet hardware
  • Sherwin Williams Emerald Trim Urethane
  • Minwax stains
  • Subway tile and accessories

Kitchen nook instructions

1. First, I assembled the base and wall cabinets. And I decided I could fit the VADHOLMA shelf between the 2 SEKTION base cabinets with drawers to give some open storage as well.

2. Next, I created trim and side cover panel pieces using sheets of MDF. All cut using a table saw and mitre saw.

3. Then, I installed the base cabinets with VADHOLMA mounted between SEKTION drawer units. Installed the upper cabinets and added crown moulding.

4. Painting IKEA SEKTION kitchen cabinets. Here’s how I did it.

Painted kitchen cabinets: Preparation

I prepared to paint doors and side panels by first sanding all BODBYN doors slightly to remove the sheen and give some profile for adhesion.

Do not sand too much or you will penetrate lacquer coating and expose MDF below. Sanding is critical for primer adhesion. After sanding I wiped with tack cloth to remove residue.

IKEA Kitchen Nook with painted kitchen cabinets

I prepared the MDF panels for paint by filling cut edges with Drydex filler and sanded flat. If you don’t finish the edges with some type of spackling the edges will soak in more paint and you won’t get a proper finish.

Painted kitchen cabinets: Priming

Next, I primed each door using Sherwin Williams water-based adhesion primer Extreme Bond and a mini roller. You must apply this very thin. The next day I sanded lightly with 220 grit sandpaper and and wiped with a tack cloth. This is key to a perfect kitchen cabinet finish.

I then primed all MDF panels with Multipurpose Oil-based primer and sanded after dry. The reason to use an oil-based primer is because a water-based primer can swell MDF, especially on cut edges. I wiped each with a tack cloth.

IKEA Kitchen Nook with painted kitchen cabinets

The panels are now ready for the finishing coat.

Painted kitchen cabinets: Spray finish

I borrowed a paint sprayer. For the best possible finish, the only way to go is HVLP – high volume low pressure or cup gun and compressor.

An airless sprayer will work with a fine finish type but you will have more overspray and lack control. As I was doing this in my garage and finished kitchen, it would have been challenging.

The paint is Sherwin-Williams Emerald Urethane Trim Enamel. This is the best trim finish paint you can buy. After much debate with my wife over the colour, I finally made my own colour from samples and had the store colour match.

IKEA Kitchen Nook with painted kitchen cabinets

IKEA Kitchen Nook with painted kitchen cabinets

IKEA Kitchen Nook with painted kitchen cabinets

Finally, ready to spray. I set up shop in the garage and taped off and papered base cabinets for the overspray.

I sprayed a total of 3 coats. Ideally a garage isn’t the best environment. I did get a little dust on the doors but not noticeable. It would be best to lightly sand with very fine sandpaper and tack cloth between coats but I didn’t have time for this.

Voilà! Painted kitchen cabinets complete.

Installation

5. The next step would be to install the door hinges and drawer hardware. Then, I installed the doors.

6. Now, on to the countertop. I cut and installed the KARLBY countertop. Birch was too light for the blue so I sanded, wiped down and stained with Minwax Special Walnut Stain. I finished with Minwax pasting wax.

IKEA Kitchen Nook with painted kitchen cabinets

7. I then installed the iron pipe shelving brackets with heavy duty drywall anchors in each screw. These were rated for about 200lbs each. Next, I cut pine boards stained using Special Walnut Stain. I had to mix a bit of Natural Stain to lighten it up. Also I spray painted the pipe with flat black spray paint from Krylon.

IKEA Kitchen Nook with painted kitchen cabinets

8. Installed subway tile, grouted.

IKEA Kitchen Nook with painted kitchen cabinets

9. Ordered brushed brass hardware from CB2 and installed.

Kitchen nook and painted kitchen cabinets — all done!

This project took me every weekend for 3 months.

I was very limited in the time I could spend on this with a sleeping baby at home. It took some adjustment and changes of plans along the way but well worth it.

Total cost is probably about $2500. I’m sure a professional would charge much more.

~ by Micah DePeuter


You may also like these IKEA kitchen hacks


The post How we painted kitchen cabinets for our new kitchen nook appeared first on IKEA Hackers.

Make it a double sink vanity {A kitchen cabinet hack}

$
0
0

We had a 74” black (painted) double sink vanity with a black granite top and glass bowl vessel sinks.

Over time, because the sinks weren’t sealed properly, they began to leak, and the backer board below the granite disintegrated from water damage.

I tried to repair it, but nothing was working, so I decided to start from scratch and build a double sink vanity from IKEA kitchen cabinets (SEKTION).

IKEA items used:
  • SEKTION white frames, 24” wide, quantity 3
  • KUNGSBACKA doors and drawer fronts (recycled plastic material)
  • MAXIMERA drawers (3 low 14-3/4” depth, 1 high 17-3/4” depth)
  • EKBACKEN countertop, 74”, concrete effect
Double sink vanity IKEA SEKTION Kitchen Cabinets

SEKTION frame + KUNGSBACKA front | IKEA.com

EKBACKEN counter top concrete effect

EKBACKEN counter top concrete effect | IKEA.com

Other components:
  • Kraus vessel faucets and pop-up drains, satin finish (Amazon)
  • Seafulee 16-1/2” round ceramic vessel sinks (Amazon)
  • Various plumbing connectors, etc. (Lowe’s)
  • PVC trim boards (Menards)
  • LED light strip (Amazon)

Double sink vanity IKEA hack

Because kitchen cabinets are too deep for the space, I used a table saw to cut off about 4” from the sides and bottoms. This meant I also had to re-drill new holes for the mounting posts and other hardware. I used cabinet bolts to join the cabinets together tightly.

I had purchased steel CAPITA legs for the cabinets, but I realized that the IKEA cabinets were taller than the old ones and adding the legs would make the sinks uncomfortably high. So instead I created frames of PVC trim moulding and screwed them to the bottoms of the cabinets, set back a couple of inches.

This raised the cabinets 1” above the tile floor, enough to clear rugs that will eventually be in front of the vanity. The PVC is waterproof, so cleaning the floors won’t be a problem. I even added a strip of waterproof LED lights along the bottom, which I can controlled from my phone. At night they come on a dim blue, just enough to see your way around. (The color and brightness, as well as the timing, can be changed at any time.)

Double sink vanity – placing the countertop

The standard 74” EKBACKEN countertop was too deep, too, so I cut off about 5”. I flipped it up 90 degrees to create a backsplash. Some heavy-duty adhesive keeps it secured.

Hole saws cut the necessary holes for the sink drains and faucets. The middle 24” cabinet was quite a bit wider than the previous one, so it just barely fit between the water supply lines, but I lucked out. I secured the sinks to the countertop with silicone adhesive. Some flexible drain connectors under the sinks made everything work.

Double sink vanity IKEA SEKTION Kitchen Cabinets

Having the soft-close drawers and doors is really nice. This double sink vanity feels much more sturdy than the old one, and there is tons more storage. The bottom drawer is tall enough to hold spray bottles and other tall items easily.

I know this isn’t a hugely original hack, but I really love using IKEA kitchen cabinets for bathrooms. I’m getting ready to redo our main bathroom on the first floor of the house and have already built the vanity and a storage cabinet from AKURUM cabinets (it was bought some time ago and just not installed yet).

~ Steve Reubart, Chicago

The post Make it a double sink vanity {A kitchen cabinet hack} appeared first on IKEA Hackers.

Minecraft Villager Costume in simple Swedish style

$
0
0

My daughter wanted a Minecraft villager costume for a party, which meant we needed an elongated cubic head.

We did not have lots of time, so we decided to look for an off-the-shelf box to start with. Off we went to IKEA and the PAPPIS box had a perfect size for an 11 year old.

We also had some fun in IKEA and the reward for the costume was a slice of ALMONDY. The cost is negligible; we used stuff we found at home.

Pay attention to size, because the box must fit on a head and shall not rest on the kid’s shoulders. This hack is really simple, but an adult is needed for the cutting part.

IKEA items:
  • 1 PAPPIS box
Other materials and tools:
  • Pair of scissors (big)
  • Knife (sharp, pointed)
  • Glue gun (for speed and strength)
  • Acrylic paint & brushes (other paint can do)
  • Pencil
  • Styrofoam sheet (5 cm thick minimum)
  • Brown packing paper (or cardboard) (optional for covering back with IKEA instructions)
  • Foam rubber (1 cm thick) (optional for 3D nose)
  • Piece of wire and a pincer (20-30 cm) (optional for heating and cutting Styrofoam)

Instructions for Minecraft villager costume

1. Assemble the PAPPIS box according to original instructions, except for the lid.

DIY Minecraft villager costume


Related: IKEA KURA bed with Minecraft Decor


2. Cut the folding sides of the lid with a sharp knife or scissors, because we do not need them to cover the box.

DIY Minecraft villager costume

DIY Minecraft villager costume

3. The lid will be the face and will be painted later. The assembly instructions will be on the outside (normally the bottom of the box), so that will be the back of the head. Turn the box so the face is long as show on the picture and the side becomes the bottom. Mark with a pencil.


Related: Minecraft inspired coffee table


4. Cut a hole in the bottom of the head (originally the short side of the box). Make sure the hole is big enough to fit your kid’s head in. Ours was 19 cm in diameter.

It does not need to be perfect. It’s easier to cut, if you glue the cardboard pieces that make the side of the box together.

Minecraft Villager Costume: Fitting the head

5. Cut the Styrofoam board into 3 square pieces roughly 24 cm on each side, so they fit in the top of the head, on the opposite side to the hole. These will help to hold the head on the kid’s real head.

We used 3 pieces, to make the thing 15 cm thick. If you have thinner or thicker Styrofoam, adjust accordingly. You can also use scrap Styrofoam from old boxes, quality does not matter, as it will be inside and the sole function is to hold the head.

6. Glue the Styrofoam sheets together and make sure they fit in the box. I used a glue gun. Do not glue it to the box yet.

7. Cut an indentation into the Styrofoam with a hot wire or a knife. Take extra care with both tools, one is hot, the other is sharp. Do a dry fit on your kid’s head. Make adjustments until it fits and is comfortable. Also try it out within the box. See the diagram.

DIY Minecraft villager costume


Related: Minecraft window seat and stools


DIY Minecraft villager costume

8. When it fits, glue the Styrofoam head holder in the box.

DIY Minecraft villager costume

9. Now you can close the box with a glue gun by gluing the edges. I also strengthened the other parts of the box by adding some extra glue.

Minecraft Villager Costume: Painting the grids

10. When the head is assembled, draw a 3 cm grid with a pencil on the face. This will allow you to paint pixels from Minecraft. It will not fit perfectly, so you can be generous with the top and bottom lines, as the will be slightly wider than 3 cm. A few millimeters don’t make a difference. The box is 34 cm long and 11 pixels are 11×3=33 cm.

DIY Minecraft villager costume

11. Paint the grid according to the diagram below or in any other way you like. You can Google up any Minecraft face and copy it, or you can make your own creation.

DIY Minecraft villager costume

12. Cut a 1 cm wide hole for eyes. We did it right below the black eyebrows in one version and right in the eyebrows in another one for a friend. The latter looked better.

DIY Minecraft villager costume

13. Cut the rubber foam to the size of 6×12 cm or 2×4 pixels measured on the face grid. Paint it and glue it to the head making sure one pixel hangs off from the side. You can also use Styrofoam for the nose, if you really want it to be three dimensional. It should be one pixel or 3 cm thick.

DIY Minecraft villager costume

14. Finally, cover the back of the head as it shows the IKEA box assembly instructions. We used a brown packing paper, but you could also paint it. You can also paint the entire head with pixels, if you have time.

We generously ignored this step as it was already 10pm and the costume party was the next day.

Here’s Sylvia in her Minecraft Villager Costume.

DIY Minecraft villager costume

~ by Sylvia & Tom Biro (daughter and dad)

The post Minecraft Villager Costume in simple Swedish style appeared first on IKEA Hackers.

How to make an Upholstered Bed Frame on a Budget

$
0
0

I love all the Ikea hacks I’ve ever done, but none have brought a room together as much as this one. I knew I wanted to do an upholstered bed frame for my son’s first “big boy bed,” but definitely didn’t want to fork over the cash for an expensive bed for a three year old.

So I decided to use the cheapest, basic IKEA Bed Frame, the NEIDEN Frame, and DIY the upholstery. I saw a different upholstery tutorial and the maker used blankets from an Army surplus store, so I decided to check that out myself.

I was picturing Navy fabric, but the beautiful grey-green color caught my eye. If you don’t have a local Army Surplus store, I found options on Etsy or you could always use felted wool by the yard.

Upholstered Bed Frame on a Budget - before

before

Upholstered Bed Frame on a Budget

After! An affordable upholstered bed frame

The project took an afternoon, about 3 1/2 hours (not including assembling the bed). The total cost of the hack was about $200, $100 for the bed frame, $25 for the batting, $60 for the blankets and I had some plywood and construction materials on hand, so I spent an additional $10-15.


Related: Professional looking FJELLSE upholstered bed hack


IKEA items used:
  • NEIDEN Bed Frame
Neiden Bed Frame

NEIDEN bed | IKEA.com

Other materials and tools:
  • 3/4” plywood, I used pine
  • 1” x 3” pine lumber – 8ft
  • Extra loft batting, I used the entire roll of 90” x 108”
  • Scissors
  • Staple gun
  • Drill
  • Rotary cutter (I prefer over scissors)
  • 1 1/2” wood screws
  • Felted wood, I used 2 vintage army blankets

Upholstered Bed Frame on a Budget

Upholstered Bed Frame step by step:

1. Screw plywood to front of existing headboard.

Upholstered Bed Frame on a Budget

2. Use the 1”x3” lumber to build a “box as shown in photo.

Upholstered Bed Frame on a Budget

3. Cut batting and wrap side rails and foot of bed. Use the staple gun to secure in place. Careful to keep the corners and edges as clean as possible. I took several photos below to best show my wrapping technique.

Upholstered Bed Frame on a Budget


Related: How to make a West-Elm inspired upholstered headboard


Upholstered Bed Frame on a Budget

Upholstered Bed Frame on a Budget

4. Cut and wrap the headboard with batting. I used the remainder of batting to wrap the top edge and corners with an extra layer. Use the staple gun to secure in place.

Upholstered Bed Frame on a Budget

5. Cut and wrap the head board with fabric or blanket. Fold the corners and trim to keep as clean as possible. Again, I added detailed shots to try and show how I folded and tucked the fabric.

Upholstered Bed Frame on a Budget


Related: From plain to luxe upholstered bench


Upholstered Bed Frame on a Budget

Upholstered Bed Frame on a Budget

**I did not finish the back of the headboard, since I knew it would be hidden.

6. Cut and wrap the side rails and foot. Secure in place with staple gun. Again, play around with folding and tucking at the corners to get the cleanest look.

Upholstered Bed Frame on a Budget

DIY upholstered bed frame bonus tip

The hardest part of the hack is making the corners look nice and clean. It took careful attention, trimming and a lot of staples to keep it smooth.

If I had enough supplies on hand, I probably would have gone ahead to finish the back of the headboard. Though I’ve never once thought about or noticed that it’s not finished, it’s just one of those things that irk me on some level.

The perfectionist in me aside, I am so thrilled with how this upholstered bed frame hack turned out!

Upholstered Bed Frame on a Budget

Upholstered Bed Frame on a Budget

See the full tutorial of the upholstered bed frame on my blog.

~ by Lauren Koster

The post How to make an Upholstered Bed Frame on a Budget appeared first on IKEA Hackers.


Cheap but eye-catching DIY baby changing unit

$
0
0

I made another hack. This time it’s a cheap baby changing unit. We made it out of 4 IKEA LACK side tables in high gloss yellow.

Lack side table

LACK | IKEA.com

Ingredients:
  • LACK side table x 4
  • LINNMON table top x 1
  • BROGRUND towel rail x 1
  • KLÄMIG babycare mat x 1
  • VÄDRA babycare mat and cover x 1
  • ÖNSKLIG storage basket x 1
  • Spare hardboard from a previous BILLY project
  • Duct tape
  • Screws
  • Right angle brackets
  • Bits of wood
Tools:
  • Saw
  • Screwdriver etc. for woodworking

How we hacked our baby changing unit:

Bolt the IKEA LACK tables together with right angle brackets. Then, use more brackets to support the middle shelf (LINNMON table top). This adds strength to the whole unit.

There are some longer sticks of wood at the back of the unit joining the upper and lower tables, which are then out of sight once it is against a wall.

Attach BROGRUND towel rail to one end of the baby changing unit.

Optional bits are the door covers for the lower section, and shallow drawers which were very fiddly and I can’t recommend bothering with.

The hardboard surround is optional too – our antenatal advisor warned us of “poonami” moments, so this was added to avoid any leakages going down the wall!

Last job is to decide whether to use the shelves as they are or to find some storage boxes.

See my other hack which is a BILLY wrapped around our spare room.

~ by Nigel


You may also like these related baby changing unit hacks

#1 MALM baby changing unit

baby changing table

After I came across those two hacks, I decided that I had to build my own changing table for my baby daughter, who will be born soon. Yes, I could buy an already built changing table, but all the ones I saw, including Ikea ones, lacked storage space. See more of the IKEA MALM baby changing table.

#2 HEMNES diaper changing table

diaper changing table

I used an old “Hemnes” sideboard. And pulled the drawers out and painted the rest in white (little tricky on the side but it works. Use lots of “children safe” paint). See more of the IKEA HEMNES diaper changing table.

#3 Over the crib baby changing table

crib top changing table ikea gulliver

In our little apartment we fight for every inch of space. I had to use our dining table as a changing table (I know, yuck..)

Otherwise I would have to move both twin girls into another room to change diaper for one and risk waking up the other twin.

That is why I came up with an idea for a changing table attached to the Gulliver crib. See more of the detachable crib top changing table.


The post Cheap but eye-catching DIY baby changing unit appeared first on IKEA Hackers.

Charging station organizer to line up your devices

$
0
0

The USB charging station organizer originally came with plastic separators to hold each device. But they were flimsy and broke off. Furthermore, the gap spacing was too narrow to fit my devices.

I was also looking for a headphone stand, so this charging station organizer hack killed two birds with one stone.

It took me about 30 minutes to get it done. And my new charging station organizer costs me $AUD9.99.

IKEA items used:
  • IMMELN shower basket

IMMELN shower caddy | IKEA.com

Other materials and tools:
  • Hacksaw and file
  • Hot-glue gun
  • Dremel (optional)
  • Electrical USB charger base-station

Instructions for USB charging station organizer:

1. Cut off basket arms with hacksaw.


Related: Multi-device charging station built into an IKEA bench


2. File rough edges on basket where arms were attached. (Optional, use a grinding wheel on a Dremel to do this step more quickly).

3. Use hot-glue gun to stick the holder onto the charger base.

Tablet and phone USB charging station organizer

As a bonus, one can stick the 2 suction cups, which come in the IMMELN packet, to the wall and use as stands for rechargable wireless headphones, as shown in photo.

Tablet and phone USB charging station organizer


Related: One charging station to rule them all


I like that it’s tough and shiny stainless steel, which I think will last a long while.

The hardest part of this hack was filing the surface to remove the sharp edges.

It took some work but it worked out great.

~ by Yingwee


You may also like these charging station hacks

#1 Wireless charging station in BESTÅ bench

wireless charging station

The finished result looks great, a wireless charger which sits seamlessly in my unit underneath my wall-mounted TV. The MORIK also has an in built USB port underneath it which is still accessible from within the BESTÅ unit – I complimented this with a GLIS box full of USB cables for charging devices that currently don’t have wireless charging. See more of the wireless charging station.

#2 LACK table with built-in USB charger

usb charging station

Our extended family has grown quite a bit over the years to include Cousin iPad, Auntie iPhone, Grannie Kindle, and that crazy Uncle Android. It’s a full house, and they’re hanging out on the kitchen counter, in the home office, and especially in the living room. Our wall plugs are always at their limit, jammed up with our smart “relatives”. We want more space for ourselves yet don’t want to be without our beloved family of devices. See more of the built-in LACK coffee table USB charging station.


The post Charging station organizer to line up your devices appeared first on IKEA Hackers.

Screen with greens: Make an Indoor Plant Room Divider

$
0
0

This is our hack of the PINNIG coat rack and shoe bench into an indoor plant room divider. Which we now call “The Pinnig Sprout Screen”.

Backstory

We have always wanted a room divider to have clear demarcation between the living room and dining area.

And we’ve looked through countless number of dividers, which are beautiful, but somehow lacking in character and individualisation.

After months of trawling through countless furniture stores, we finally decided to make our own. Instead of asking a contractor to erect a feature divider or buying a ready-made divider, I wanted to challenge myself to create a one of a kind indoor plant room divider. It will also serve as a mini garden.

After scouring the net for inspiration, I finally sketched out a draft room divider that consists of mostly items from IKEA. Then, we embarked on this DIY trip, full of enthusiasm and a prayer that it’ll turn out like what we’ve always wanted.

Indoor plant room divider aka The Pinnig Sprout Screen

IKEA items used and other materials:
    • PINNIG coat rack with shoe storage bench x 1
    • HEKTAR wall clamp spotlight x 2
    • FEJKA artificial plant x 1
    • OBSERVATÖR clip on basket x 2
    • BITTERGURKA plant pot x 2
    • TJENA storage boxes with lid x 2
    • Metal hanging pendant x 3
    • Wire mesh frame x 3
    • Velcro strips
    • Cable ties

How we put together our indoor plant room divider:

1. First and foremost, we ran through a long list of items on the IKEA Singapore website. The goal was to find a tall and wide enough structure that can provide the function of a divider.

Instead of settling for ready made dividers such as from the VEBERÖD and KALLAX series, I decided to think out of the box. Be brave and go for the PINNIG coat rack!

Indoor plant room divider aka The Pinnig Sprout Screen

PINNIG coat rack shoe bench | IKEA.com

My wife wasn’t totally convinced of my choice. But after looking at my tireless enthusiasm, she relented and agreed! Yeeeay! With the hardest part over, I began the process.

Adding lights to our indoor plant room divider

2. To make it an indoor plant friendly room divider, I purchased 2 HEKTAR wall/ clamp lights to provide just enough lighting for the indoor plants to thrive.

Indoor plant room divider aka The Pinnig Sprout Screen


Related: A freestanding room divider using STUVA cabinets


As I envisioned it to be a room divider and mini garden, I purchased a couple of BITTERGURKA plant pots to house the potted plants.

3. Last to go from my IKEA shopping list are a couple of OBSERVATÖR clip on baskets and black TJENA storage boxes with lids for storage purposes. I bought them to provide ample storage space for miscellaneous items such as fertilizer, spade, newspaper etc.

Indoor plant room divider aka The Pinnig Sprout Screen


Related: A plant stand to plant screen


4. Now, on to the construction process.

To enable lights to be fixed onto the PINNIG coat rack, I decided to do without the upper hook fixtures. In their place, I secured the 2 HEKTAR wall clamp lights instead. The aesthetics of these lights blend in perfectly with the PINNIG rack to give the whole structure a seamless look!

“Wow! I must be lucky”, I whispered to myself!

To keep the divider lines “clean”, I tidied up the wires by securing them with Velcro strips and run them along the side of the rack to make it look neat.

5. To realise the vision of an indoor plant room divider, we got ourselves some indoor potted and air plants. The potted plants were placed in the beautiful BITTERGURKA plant pots whereas the air plants go to the hanging pendants.

Indoor plant room divider aka The Pinnig Sprout Screen

We used fishing lines to hold up the hanging pendants so that they won’t be visible. On the other hand, the FEJKA artificial plants were draped over the wire mesh boards to create a “vine” effect around them.

Storage boxes and baskets to keep things tidy

6. With the mini garden concept slowly coming to a fruition, we added both the TJENA storage boxes with lids and OBSERVATÖR clip on baskets to provide ample storage space to make the whole structure look clean and uncluttered.

Pheeew …! Definitely an awesome and handsome solution to store away those gardening tools!


Related: A gorgeous IKEA room divider hack for a studio


Personalisation as the final touch

7. With the project almost 90% completed, it was time for personalisation. We decided to inject a little character to the newly christened “The Pinnig Sprout Screen” FKA (formerly known as) coat rack. 😊

Using black cable ties, we secured three black wire mesh boards to the divider to allow us to add our family photos and also favourite quotes!

Indoor plant room divider aka The Pinnig Sprout Screen

8. Tadaa! We’re extremely proud and happy how this project had turned out! On top of being a one of a kind indoor plant room divider for our place, it snugs nicely into our home concept! The mini garden is looking great and it gives me the opportunity to work on my hobby!

Indoor plant room divider aka The Pinnig Sprout Screen

9. The whole process, from research, drafting, shopping (the wife’s favourite part!) and execution took about a week to complete.

Upon reflection, the hardest part of this project was … convincing the wife to improvise the PINNIG coat rack into a room divider instead of just getting a ready made one!

However, after all is done and dusted, she and a bunch of our guests adore the one of a kind product! Happy wife, happy life!

~ by Mohamad Zahrin Omar

The post Screen with greens: Make an Indoor Plant Room Divider appeared first on IKEA Hackers.

Height adjustable kid’s desk: A desk that grows with you

$
0
0

Joy hacked a height adjustable kid’s desk using the IKEA HEJNE system. Besides the desk, it also has plenty of shelves for toys and books.

This is a simple desk set up that will grow with your kid. The HEJNE is also perfect for this project because it already has holes all pre-drilled for you. If you wish you can add extra holes for smaller height increments.

Height adjustable kid's desk: A desk that grows with you


Related: Need a study table for kids? Here are 10 of the brightest ideas


Materials:
  • HEJNE posts x 8
  • HEJNE shelves x 8
  • Wooden board
  • Nuts and bolts (to fit HEJNE hole size)
Instructions for height adjustable kid’s desk

Assemble the IKEA HEJNE system following IKEA instructions. Combine the posts and shelves as you wish.

Joy decided to have the desk in the middle. But you can certainly have it on the right or left section too.

Now, onto the kid’s desk

First, decide how deep you want the desk to be. Joy made it a little deeper than the HEJNE, resulting in a larger desk top. But don’t make the desk too deep to prevent a tip over accident.

Then, get a wooden board and cut it to size according to the size you want. The width should span the length of 2 HEJNE posts. Curve the corners for a safety.

Use a router or jigsaw to cut notches at all 4 corners of the board. The notch should be wide enough for the board to slide into the posts.

Sand down all cut edges and surfaces till smooth.

As the HEJNE comes untreated, paint or stain it to fit your kid’s room decor. Joy stained the HEJNE posts and shelves.

Fasten nuts and bolts into the holes on the HEJNE posts, at the height you wish to rest the wooden desk on. (You could also use a fitting wooden dowel for this.)

Slot the wooden desk into place to complete your height adjustable kid’s desk.

One last but very important step, secure the entire HEJNE set up onto the wall.

As your little one grows, unscrew the nut and bold to raise the desk one step higher.

~ by Joy


The post Height adjustable kid’s desk: A desk that grows with you appeared first on IKEA Hackers.

10 best IKEA and LEGO storage ideas

$
0
0

IKEA and LEGO go so well together that it’s inevitable to use them together.

While we wait for the fruit of their collaboration, we round up a few of our best IKEA and LEGO storage ideas.

But first … a few words from the wise.

An expert LEGO organiser recommended a 3-step process, which makes a lot of sense if you want a super organised LEGO storage system.

1. Organisation – set up a list of rules to decide where each type of element goes

2. Storage – decide on the right sized containers / storage unit for your categories

3. Sorting – the process of putting each piece in its right place (which is probably the hardest bit to keep up with)

Taking these steps to organise and sort will make it much easier to find the pieces you need and build your LEGOs. Less time hunting and more time playing.

Now, once you’ve decided on the LEGO organisation best for you and your stash of bricks, it’s time to go shopping at IKEA.

10 best IKEA + LEGO storage ideas

#1 A LEGO organizer with TROFAST toy storage

LEGO stationAn impressive storage system to store over 9,000 LEGO bricks! See how Uncle Kai hacked this LEGO organizer.

#2 Dual personalities table and storage

This LEGO shelf serves a dual purpose. It is a LEGO table on one side and a smooth work surface (to be used as a shelf, art table, etc.) when the table top is flipped over. It’s capable of storing LEGO bricks and takes up no floor space. See more of the dual personality LEGO shelf.

#3 Mega LEGO storage table

LEGO storage table

Got tons of bricks? Try this U shaped mega LEGO storage table on for size. It’s based on the TROFAST storage system. See more of the U-shaped large LEGO storage table.

#4 Ultimate LEGO bricks organizer

LEGO bricks organizer

Need to store your LEGO bricks but have them accessible as well when you want to use them? This is an amazing LEGO organizer made with the MANDAL headboard (unfortunately discontinued. You can replace it with wooden slats) and GLIS boxes. See the GLIS LEGO bricks organizer.

#5 LEGO wall storage

LEGO wall storage

Now, this is one of the top LEGO storage ideas for fans of IKEA and LEGO. The BESTÅ doors can be transformed into giant LEGO plates. See the LEGO wall storage.

#6 LEGO storage and height adjustable TROFAST play table

LEGO storage play table

A height adjustable LEGO play table and storage unit that grows with your kids. This hack used the IKEA Trofast storage systems, with an adjustable shelf that serves as a surface for building. See more of the height adjustable LEGO play table and storage unit.

#6 LEGO Play table and storage

LEGO play table

Need a place for your kid to build his LEGO pieces? This DIY LEGO play table with drawer storage is the perfect solution! It’s so easy to make and affordable too. It uses the IKEA LACK side tables and TROFAST bins. A cheap and easy project anyone can make. And don’t you just love the red mini drawers with brick pulls? See more of the DIY LEGO play table with drawer storage.

#7 LEGO tray storage

LEGO tray storageThese 2 trays are perfect for containing LEGO bricks and even better at sliding away under the sofa at the end of the day. See more of the LEGO tray storage.

#8 LEGO table with undertable storage

LEGO table with undertable storage

It turns out that the large LACK coffee table is perfect as a LEGO play table. It is easy to fit 9 road plates and 2 large base plates with double-sided tape. See more of the LEGO table with undertable storage.

#10 Rolling LEGO storage cart

LEGO storage cart

Roll this LEGO storage cart to where the action is. When playtime is over, roll it away from sight. See more of the LEGO storage cart.

Here are also a few useful items to help you complete your IKEA + LEGO storage ideas. (contain affiliate links)


What other LEGO storage ideas can you come up with? Let us know in the comments.


The post 10 best IKEA and LEGO storage ideas appeared first on IKEA Hackers.

Viewing all 1542 articles
Browse latest View live