Quantcast
Channel: IKEA HACKS – IKEA Hackers
Viewing all 1550 articles
Browse latest View live

Hide your electronic devices behind the TV

$
0
0

I wanted to get rid of the devices around my TV (decoder, router, hard drive, Android box, and of course cables!); so my TV stand (or the furniture I’m using for it) would seem to be more clean.

Materials:
- PRÖJS Desk pad
- Fish line
- VESA mounting screws

Idea:
Because my TV is in a stand, I used the VESA mounting holes (mine has two) to hang the desk pad and (of course) the devices attached with fish line to it.

Procedure:
1.  Take the desk pad and do measures to highlight the location of the screws
2.  Mark with a ball pen the space needed for the devices (NOTE: leave some space for cables)
3.  Make holes for VESA screws and to pass the fish line

Hide your electronic devices - Step 3

4.  Attach the devices and tighten the fish line
5.  Be sure everything is OK
6.  Attach the desk pad to the TV using the VESA screws

Hide your electronic devices

7. Connect all cables
8. Test everything is up and running

Hide your electronic devices

To me it was really good to have all this stuff ‘out of my sight’, and the desk pad is good to manage and heavy to attach all electronic devices (not all I have, unfortunately!).

Regards from Belgium!

-Iñaki P.

The post Hide your electronic devices behind the TV appeared first on IKEA Hackers.


BESTÅ living room storage goes custom width

$
0
0

Right after I finished installing 3D decorative panels on my living room’s TV wall I went on a hunt for a piece of furniture that would fit into both pillars. Some slick, modern and that offered plenty of storage, yet keeping the new wall as focal point. Most modern/contemporary storage units range from 900 up to 2K. BESTÅ solution seemed to suit my needs better.

To fill the entire wall’s width (99,5″) I needed at least 2 BESTÅ frames (47,25″ each). Both frames together (94,5″) wouldn’t be enough to cover the entire width. I came up with the idea of extending the storage 2,5″ each side, that would keep the frames centered giving it a look of custom design solution.

Materials:

  • 2 wide BESTÅ frames (47 1/4 x 15 3/4 x 25 1/4″). Plus high gloss black doors/drawers and black smoked glass doors for media IR devices.
  • 1 color-matching BESTÅ door picked from IKEA’s As-Is section.
  • 1  2″ X 1.5″ wood stood
  • Wood screws
  • Gorilla glue

Drafted the intended design to define addition specs.

Initial draft

Extension is formed by adding L-shaped frames on each side of the storage. Using the 2″ x 1.5″ studs, cut at 45 degree angle and glue them together, screw them too for max strength.

Frame

Building extension frames

According to the specs, cut the color-matching door to create the 3 pieces (Front, top and visible side) that would cover each extension. Then glue them to the L-shape stood frames and if possible, screw them from the inside since doing it otherwise would mess up the finish.

Covers added to the extension frame.

Covers added to the extension frame.

Once all the pieces are put together, let the glue dry thoroughly (For at least 24-hr).

Attach each extension to the side of the BESTÅ frame with glue and screw it from the inside of the storage unit. Then place both storage frames side-by-side and using provided screws, firmly join both frames.

Assembled Assembled 2

Project turned out exactly as planned, 99,5″ wide to fit snugly into the available space.

BESTÅ living room storage - Final Width

Then piece together all components (Shelves, doors, drawers..). Since glass-top sold by IKEA did not cover the whole width of my new storage, I had it custom-cut by a glass store. It was delivered on grey smoke color so I had to coat black the underneath.

BESTÅ living room storage finished

Besta TV storage finsihed – Front view

BESTÅ living room storage  - Sideview Finished

BESTÅ living room storage finished – Side view

Besta living room storage front


Finished 2

The post BESTÅ living room storage goes custom width appeared first on IKEA Hackers.

Light from PRYDLIG pen holders

$
0
0

I used TIVED ceiling lamp…

TIVED

… and orange PRYDLIG pen holders. Gray and green not so bright.

PRYDLIG

I detached LED ends of lamp and drilled hole in bottom of pen holders.

Detached

Then insert end in drilled hole and fixed it by glue gun.

One for testing

So, that is result.

Result

The post Light from PRYDLIG pen holders appeared first on IKEA Hackers.

‘Dahl Vader’ Home Theatre Gaming Workstation Boss Chair

$
0
0

Gaming Workstation

What You Need:

  • 2x Glivarp extendable glass tables
  • 1x Timsfors swivel recliner
  • 1x PS2012 dropleaf table OR 1x Besta Burs shelf
  • 1m 1 1/4″ (32mm) steel channel
  • 4 castor wheels
  • 1x truckload of bolts and brackets (see video)

View the complete construction of the Gaming Workstation in a 2-part YouTube video(s):

The post ‘Dahl Vader’ Home Theatre Gaming Workstation Boss Chair appeared first on IKEA Hackers.

When LILLÅNGEN mirror gets magic

$
0
0

IKEA items used: LILLÅNGEN medicine cabinet

Turn your medicine cabinet into a MagicMirror that displays the time, weather forecast, your personal calendar and the news, with my IKEA Hack:

LILLÅNGEN MagicMirror with Raspberry Pi

This is my second hack and it was very intense and time consuming, but I definitely wanted to turn my medicine cabinet into a magic mirror and look how awesome it looks!

There are plenty items you need to buy to build this MagicMirror:

For the “woodwork”:

  • LILLÅNGEN medicine cabinet (I chose the one with only one door)
  • Two-Way-Mirror (at the local glass store – measures were 39,3 x 63cm. Take a polished one)
  • Plat wood to close space behind display (I took 4mm thin wood, measures were 39,5 x 62,5)
  • Screws
  • Ducktape
  • Mirrortape

For the technique:

  • Raspberry Pi 3
  • Micro SD Card (Min. 8 GB)
  • HDMI Cable (a short one)
  • Cable and power adaptor for Raspberry (take a strong power supply and a cable long enough to get the distant to the next socket
  • An old Laptop display (I used a display with the size of 15,6“ (around 36x25cm), but that was to close to the wood edges. (Spoiler: The wood broke, so maybe use a smaller display)
  • Suitable Controller for the display (So you can power and connect the display to the raspberry)
  • Power adaptor for the Controller

As you can see, there are plenty items you need to purchase, so the magic mirror is not that cheap. I don’t really know exactly how much money is spend, but I think it was about 150€. As the hack took me about 8-10 hours, I will describe it in steps.

1. Step: Installing the software
Before hacking the medicine cabinet, you have to get used to and configure the Raspberry Pi. The inventor of the MagicMirror published his software, so you can follow the steps to get the Raspberry ready. Then try it with the display outside of the cabinet, so you know it’s working. Here is the link to the software.

2. Step: Working on the door
First of all you have to get rid of the old mirror. That was very easy. Just take the screws of the bars on the bottom and the top. Then you can remove the mirror with a scraper. To remove the glue in the middle you can use some tape. After you removed the old mirror, lay the display on the wood, how you would like it to be at the end and draw a line around it. Then cut the wood with a saw. If the display fits in the hole, you can lay the display with the wood on the backside of the new 2-way-mirror. When it is in the right position, remove the wood, but hold the display. Now you can glue the display to the mirror with some ducktape. Before you glue the wood also onto the mirror, make sure, you don’t need to cut another hole for the hinge (If so, cut it now). Then glue the wood to the mirror with “mirror-tape”. Connect all the wires from the controller to the display and fill all gaps between the wood and the display with tape, to make sure it’s dark behind the mirror. This is a step you have to make very accurate, so the effect will work nicely.

To cover the hole of the display I used the plat wood. Drill holes on the place, where the HDMI-Cable and power cable for the display controller will have to be. And also drill holes for the hinges. Then you can stick the plat wood to the back of the mirror. At the end I attached the bars onto the mirror again, although it didn’t fit that good, because the new mirror was thicker than the new one. After all these steps you can attach the door to the cabinet.

The back of the mirror

(Behind the mirror, before the back wood was attached. Unfortunately the wood of the door broke on two points)

3. Step: Connecting, hiding and testing
The cabinet is ready to get the last steps done. Cut a hole in the backside of the cabinet, where you want to get the cables for the Raspberry Pi and the electrical cord for the display. I attached the display to the bathroom light, so it just turns on, when somebody is in the room. The Raspberry has to be connected to electricity every time, because the time for booting would take to long. To connect the display power supply to the bathroom light, I used a socket, which I installed into the cabinet. Now connect all the cables (HDMI to Raspberry, Display to socket and Raspberry to USB power cable). I covered the devices and cables with a plastic boxes with some holes inside (see picture).

The tech

(I hid the technology later, when the cabinet was already mounted.)

And it’s done.

LILLÅNGEN MagicMirror with Raspberry Pi

LILLÅNGEN MagicMirror with Raspberry Pi

LILLÅNGEN MagicMirror with Raspberry Pi

~ By Maximilian Bartels

The post When LILLÅNGEN mirror gets magic appeared first on IKEA Hackers.

Upcycled Brusali shoe cabinet

$
0
0

Upcycled Brusali shoe cabinet using old floorboards

IKEA items used: Brusali

After having my Brusali shoe cabinet a few months I felt it looked a little plain and I wanted to make it looked a bit more interesting. I went to my local reclamation yard and bought an old floorboard, but a pretty thick one as you can see from the pictures.

Tip – Try and buy ones without/the least nails in.

I cut two pieces of the floorboard down to the size I wanted to go on top of the Brusali, scraped off the dirt on the joints using a stripping/filling knife and then glued the pieces together to create the top.

Next I sanded down all sides of the new top to get through all the dirt and down to the grain. Two coats of Ronseal wood varnish and it looked great.

Attaching the new top. Undo the locking caps for the screws that hold the top of Brusali in place and remove the top. To fix new top I didn’t want to stick four wood screws through the new top into the sides of the Brusali. So I took the locking screws out of the old Brusali top and drilled through the (pictured) so they went all the way through. I then used the old Brusali top as a template to drill the holes in the new top (make sure you use a drill bit a few sizes smaller than the hole).

drilling new holes for the lockings screws

Use a drill bit a few size smaller than the locking screw

Screwed locking screws into the new top flipped it over and pushed the locking screws into the existing holes in the Brusali unit and re-tightened the locking caps. Alas the new top wasn’t quite level because of a knot in the wood, so there is a small gap between the new top and the Brusali (pictured), nothing a bit of sanding and re-varnishing can’t solve (but best get it right 1st time).

Upcycled Brusali shoe cabinet using old floorboards

Upcycled Brusali shoe cabinet using old floorboards

~ Hacked by Shaun

The post Upcycled Brusali shoe cabinet appeared first on IKEA Hackers.

A video projector stand that won’t screw up your wall

$
0
0

  A video projector stand that won't screw up your wall

IKEA items used:

  • KALLAX 1×4 shelving unit (could probably work with EXPEDIT too, but they had stopped selling it by the time we made our hack)
  • 6 brackets – I am not sure which ones we used, I think it was the EKBY, but you can probably pick whatever brackets you like the most – as long as there aren’t too many decorations, and are sturdy.
  • screws for the brackets (no longer than 1.5″ – the thickness of the Kallax top shelf)

Why this hack?
We have a video projector and wanted to put it behind our couch. We could have put a shelf on the wall, but a video projector can be heavy so we’d have needed a strong shelf/bracket. We weren’t sure it would stay safely on the wall (and above our heads!). We would rather avoid making holes in the wall, and also wanted to be able to move our furniture around in our apt. Therefore we needed a video projector stand.

We just couldn’t find one with the proper height or without large feet that wouldn’t have fit behind our couch, so we came up with this hack.

How to do it?
You mount the Kallax partially (following IKEA’s manual): you only need the top and the bottom shelf (the thicker ones) of the Kallax, and one side (one on the 2 long boards).
You reinforce the structure with brackets, just to feel safe. You screw 3 brackets to the top shelf, and 3 brackets to the bottom shelf.

A video projector stand - brackets

You’ll end up with a C shaped piece of furniture. What is normally the side of the Kallax is the back of your stand. The lower part of the “C” goes under the couch (not visible on the picture), while the video projector stands on the upper part of the “C”.

A video projector stand that won't screw up your wall

We kept the other boards of the Kallax, but haven’t found any use for them yet.

~ Hacked by Emilie

The post A video projector stand that won’t screw up your wall appeared first on IKEA Hackers.

Floor to Ceiling Kids Playhouse under IKEA Loft Bed

$
0
0

Floor to Ceiling Kids Playhouse under IKEA Loft Bed

Floor to Ceiling Kids Playhouse under IKEA Loft Bed

IKEA items used: IKEA Tromso Loft Bed, IKEA Trofast Storage Stair shaped frame

We started with a Tromso loft bed because it was the tallest I could find at 64 5/8” from floor to bottom of bed. (I’m 5’1″ and I can stand in the house!)

We removed the latter and then moved the entrance to the bed from the side to the foot of the bed by cutting and opening with a sawzall.

We attached the bed posts to the studs in the walls with U hooks and screws so it would be stable. I used pieces of pool noodles to insulate the legs so the U hooks wouldn’t scrape the metal and the bed wouldn’t wiggle.

We measured the room, and created a rough blueprint of how big the house would be.

We then used 1 1/4″ PVC and attached it to the outside legs of the bed with hose clamps. This created a square frame to connect the siding to.

On the upper floor and the top half of lower part of the house, we measured, cut windows, and attached plywood siding to the PVC with self-tapping screws. On the bottom of the house we used fake brick paneling that I painted white and attached with self-tapping screws.

tromso playhouse 8

tromso playhouse 6

We used piano hinges and attached a piece of wood as the roof. Then we used a staple gun to attach actual shingles. This made it weigh A LOT! But I was insisting that it look authentic. My husband thinks I’m crazy.

I used moulding pieces that I painted blue for around the door, windows, and to hide the seems between the siding and the brick paneling. I used old pieces of tile from our bathroom remodel as corners for the window and door moulding so I wouldn’t have to miter them.

tromso playhouse 7

tromso playhouse 9

We put the Trofast Storage stairs up to the side of the house and then used an existing dresser that happened to be the perfect height, as the final step.

tromso playhouse 3

tromso playhouse 2

As final touches, I put contact paper on the inside of the siding and around the PVC pipes. Then I added the window boxes, address, little ‘door-bell’ and #4 address. Finally, I cushioned and upholstered the siding that encloses the bed so if my daughter rolls around in her sleep, she won’t hit a hard piece of wood!

tromso playhouse 1

Hacked by Vikki Kelleher

The post Floor to Ceiling Kids Playhouse under IKEA Loft Bed appeared first on IKEA Hackers.


Integrated, paneled kitchen appliances

$
0
0

This space was designed using the older line of cabinets, but the overall concept can be achieved with the new line of SEKTION cabinets.

When designing the wall of high cabinets for the pantry and refrigerator, I made note of the Sub-Zero built-in refrigerator design requirements – rough opening width, cleat sizing, water supply and electrical placements, etc.

We purchased a panel-ready 36″ Sub-Zero. We also picked up a retro-looking exhaust grill from a parts supplier to complete the MCM look we were going for. In order to fit panels to the refrigerator and freezer door, we bought a 36″ wide x 92″ tall cover panel from IKEA and used a table saw to rip the panel into three pieces – one for the refrigerator door, one for the freezer door, and one for the space above the refrigerator. Finished edges were placed in the most visible locations, the refrigerator and freezer handles concealed a couple of the cuts, and we used iron-on edge trim from IKEA to hide the remainder.

Integrated, paneled kitchen appliances using IKEA AKURUM

We also ripped down IKEA deco strips to frame in the refrigerator and the top panel on either side. Since we were working with a 37″ rough opening and a 36″ wide panel segment, I ripped down the width of the cover panel and flanked it in pieces of deco strip. I would have preferred too have a single piece span the entire width, but you have to play the cards you’re dealt.

Integrated, paneled kitchen appliances using IKEA AKURUM

Integrated, paneled kitchen appliances using IKEA AKURUM

We also panelized a third party Bosch dishwasher using the IKEA dishwasher panel hacked to accommodate the Bosch-specific mounting requirements.

Integrated, paneled kitchen appliances using IKEA AKURUM

Integrated, paneled kitchen appliances using IKEA AKURUM

And, finally, we hacked a base cabinet to accommodate a microwave drawer. I used a piece of the old-style kick panel to trim out above the microwave. This small panel is held on using 3M plastic click connectors (the plastic Velcro stuff) so that it can be removed for cleaning the microwave.

Integrated, paneled kitchen appliances using IKEA AKURUM

~ Hacked by Spencer Guy

The post Integrated, paneled kitchen appliances appeared first on IKEA Hackers.

KALLAX Platform bed

$
0
0

Ikea Hack platform bed

I made this bed for my daughter after she had been begging me for bunk beds and I totally knew she would out grow them way too fast. She loved this bed and it was super easy to make!

Materials:

(2) KALLAX 8 cubby
(1) KALLAX 4 cubby
(1) Large piece of plywood Approx 60″ X 80″ for Queen Size. Home Depot cuts it for free!
(1) 3′ X 3″ piece of Plywood
(1) 3″ X 5″ landscaping wood tie cut to height of bed
(2) Long wood screws

Place (2) 8 cubby KALLAX shelves on floor against wall aligning with footboard and headboard of bed. We placed our bed sideways to get the most space in the bedroom.

Connect the wood tie securely to the 3X3 plywood using wood screws. This will serve as the center support for the bed. Place this piece on the floor in the center of the bed.

Place (1) 4 cubby KALLAX in the front of your platform – we put ours to the side but you could center it as well.

Place the 60″ X 80″ plywood over the KALLAX shelves. You may want to screw the plywood into your center base support so it doesn’t slide.

We covered the plywood in fabric and then placed the queen mattress (no box springs) onto the platform. My daughter used this for 3 years and then decided to change her bed but kept the KALLAX shelve units for storage.

This Hack is great as it left tons of storage under the bed that was easily accessible!

~ Sarah Baugher Crosby

The post KALLAX Platform bed appeared first on IKEA Hackers.

KVARTAL light rails

$
0
0

kvartal rail light_1

I made this hack from 3 pieces of rails.
1 Tramrail slice of 2 cm thick.
1 Trainrail slice of 2 cm thick.
AND 1 KVARTAL curtainrail from IKEA 120 cm long.

The idea was to put 3 pieces of rails together and call it railsrailsrails.
Inside the rails I placed 2 strips of LEDs. A 12 volt adapter was placed separately.

kvartal rail light_3

kvartal rail light_5

kvartal rail light_2

kvartal rail light_6

kvartal rail light_4

After this project I made another lightstrip of the same KVARTAL curtain rail of 240 cm long for the window.

KVARTAL light rail

~ Hacked by Koos Valken

The post KVARTAL light rails appeared first on IKEA Hackers.

Happy striped Tote bag

$
0
0

signe tote bag hack_1

IKEA items used: SIGNE rug

As soon as I saw Signe rugs in IKEA, it lit a lamp in my head, this would make a cool and happy tote bag!

I remembered I had old bamboo handles that I could use, so I bought one rug. The bag construction is really simple. First I turned the the fringed edges down about three centimeters, making sure the prettier side of the fringe is on top, to make attaching place for the handles, and some cool decor from the fringe.

I sewed the fold on top of the previous sew line on the fringe. Next I folded the rug in half, placing the right sides in (=fringed sides) and sewed the sides with heavy-use yarn. Then I folded the corners on the bottom, and sewed them. Then I turned the bag around the right side out.

signe tote bag hack_2

signe tote bag hack_3

signe tote bag hack_4

To get nice sharp edges on the bag sides, I sewed the edges from the right sides, about 1 cm wide, following the green stripe on the fabric. The upper fringed and folded edge was absolutely too thick for my sewing machine, so I took heavy white string and sewed it by hand firmly.

Finally the handles. My bamboo handles have metal rods, so I just pushed them through the fabric, making sure not to cut any yarn. Afterwisely, if I would make another bag, I would glue the spots to make the fabric more sturdy, and push the holes, before folding the upper edge. I think I will glue it from the front side now, with invisible glue, just to make sure it will take the stress better.

I really like my new tote bag! It took about half an hour to one hour to make it. Oh, remember to iron the rug before starting! Much easier, and you don’t have to worry about the folds on the rug. :)

~ by Anna-Mari Kaipainen

The post Happy striped Tote bag appeared first on IKEA Hackers.

The ALGOT Radiator Cover

$
0
0

Radiator BEFORE

ALGOT Radiator cover_AFTER

Ikea items used:

  • EKBY LERBERG 11” shelf bracket (1)
  • ALGOT shelf 23” x 15” (2)
  • BRANÄS Basket
  • Ikea CD drawers (discontinued)

I recently moved into a cozy apartment in Brooklyn, which like most pre-war buildings in the city, has its share of heavy, antiquated radiators that were covered in aluminum paint. There was an especially unattractive one in the dining room, stretching from the corner of the room right up to the edge of the window. I found scores of charming radiator covers on both Pinterest and Ikea Hackers, but the problem of the window and the size of the radiator made it really difficult to adapt any of the solutions I’d seen.

Storage in an apartment can be a challenge, and after putting up a series of IKEA ALGOT shelving above the radiator, I decided to remove some of them to use for a wall system in the bedroom, and had a couple of the larger ALGOT shelves left over. They were leaning up against the wall, and as I wondered what to do with them, they suddenly reminded me of old-fashioned radiator covers with the holes for ventilation. The wheels started turning, and there it was – use the leftover shelves to cover the radiator! The ALGOT system is wonderful, and the shelves attach very nicely to the system brackets, but how to attach them to each other was another problem completely. This was done without any plans, so I basically put it together as I went along.

IKEA ALGOT system IKEA ALGOT system

IKEA ALGOT shelves

I had spare pieces of 1×2 wood and bought some wood joiners, which worked to attach the shelves to each without drilling into them. Using more scraps and picking up a few longer pieces of wood, I made a frame for the two shelves which were screwed together on the corners and in the center.

Wood joiners

Wood frame to hold the shelves together Wood frame to hold the shelves together

Just for extra security, I put some screws into the wood pieces from the front, and painted them white to match.

Screws from the front

The frame wasn’t going to be able to support a lot of weight, so I put up an Ikea EKBY LERBERG 11” shelf bracket, and bought a piece of 12” x 1” finished pine, long enough to extend the length of the radiator and up to the end of the window, where two L-shaped brackets connect to a vertical piece of the shelf. The perforated cover is about an inch or two away from the radiator and the top shelf extends over it by an inch, so it was easy to fasten it to the frame using two more L-shaped brackets. It’s enough support to keep the shelf sturdy and the perforated cover securely in place. A light coat of stain and some oil gives a nice finish to the wood.

EKBY LERBERG bracket with pine wood shelf

The cover is open on either end and perforations in the metal shelves, so there’s no problem with allowing the heat to escape into the room. A little IKEA CD filing unit with two drawers hold small items, with an IKEA basket to hold large bags of potting soil, and an old wood cabinet fits nicely below the shelf to keep plant food and sprays out of sight. So what was a shabby corner of the room that I tried to ignore has become a lovely plant center.

ALGOT Radiator Cover ALGOT Radiator Cover

Thank you IKEA!

~ by Jackie Lund

The post The ALGOT Radiator Cover appeared first on IKEA Hackers.

Lack Hifi Rack

$
0
0

IKEA Hifi Rack in use

Built with: 3x Lack tables, 8x Ekby Stödis bracket, 4x Rill casters, Fixa screws, (still to come: cable management with “fixa cable management set”.

1) Assemble two Lack tables.

2) Stack them and glue them together with a third table top as the base.

3) Place 10-20 kg weight on the construction and wait for the glue to cure.

4) Screw 8 Ekby Stödis brackets at the points where the table legs were glued to the next table top.

5) Turn the construction upside down.

6) Screw the 4 rills casters at each of the four corners.

7) Turn it in the right position again and it’s ready to use.

Remark: The legs of the third table are not needed.

IKEA Lack Hifi Rack

~ by Frank

The post Lack Hifi Rack appeared first on IKEA Hackers.

Easy to Clean Stuva Bench Litter Box

$
0
0

STUVA cat litter_1

I’ve been perusing your site for a good way to disguise my litter box but nothing quite fit what I wanted. I was wandering through IKEA and noticed the Stuva bench/cabinet. So starting with the Stuva bench and my existing semi-homemade litter box I got going.

Here’s what I used:

  • Stuva Bench
  • OPLEV door mat
  • Litter box
  • Pet door (Optional)
  • Motion activated light (Optional)
  • Activate charcoal deodorizer (Optional)

I traced the cat door on the side of the bench I wanted the cats to enter and used a dremel (a jigsaw would be much better) to cut the hole. The cat door was snug enough that it holds itself in place. Then I traced the opening on the drawer part of the Stuva.

You could definitely clean of the edge of the cuts but I opted to leave it since it’s not seen unless I’m cleaning the litter box and raw wood is the least gross thing you’ll see then.

STUVA cat litter_4

The OPLEV door mat fits almost perfectly in the bottom. I had to trim a little off. There’s enough room in the bench that the cats have a couple steps to clean the litter off their feet and the mat catches it. The litter box is a plastic storage box I picked up at Home Depot. I just used the dremel to cut a hole for the entrance. The high walls keep things tidy and they’re a lot cheaper than store bought litter boxes.

STUVA cat litter_3

STUVA cat litter_2

Not pictured is the motion activated light that’s stuck to the inside-top of the bench and the activated charcoal deodoriser. The drawer makes it really easy to clean and then tuck out of the way.

~ by Jordan

The post Easy to Clean Stuva Bench Litter Box appeared first on IKEA Hackers.


Space saving corner DJ/Music production unit

$
0
0

Space saving corner DJ/Music production unit

IKEA items used:

  • Kallax x 2
  • 6 x Legs
  • 1 x Corner shelf
  • 2 x Table tops
  • 1 x Shelf
  • 1 x Hook

The Kallax unit has been utilised a number of times in hacks for storing of 12” records so lends itself well, I built my stand upon this knowledge. I have a reasonable amount of equipment however I was keen not to allow the unit to overpower the room as this was to be built in my study which already had an IKEA hack to form a large office desk and storage. I was also very keen not to end up with just a big square (ugly(?)) box and wanted to maintain a “lightness” of the finished design. My build consisted of the following steps;

  • 2 x Kallax units built in the normal fashion following the direction supplied
  • 2 x table tops (size 600mm x 1200mm) were to fixed to the top of the Kallax units using 4 x legs on each – this gave a more open finish yet created a perfect height for the Amplifier and CD recorder to be neatly stored

Note I did consider using smaller table tops however I think this would have made the unit look too cumbersome, would have reduced work top area and the speakers would have looked out of place at the finish

  • 1 x Corner shelf (size ZxZ) was cut down to 600mm so that it neatly fit between the table tops and complete the operating surface – this was fixed into place with 4 x right angle brackets
  • 1 x Shelf (size 350mm x 550mm) and a further 4 x legs were used to create a raised portion of workspace for the laptop to rest
  • 1 x Hook was purchased for hanging the headphone onto, however did not look right therefore I have never fixed it in place and instead store the headphones next to the CD recorder

Space saving corner DJ/Music production unit

Space saving corner DJ/Music production unit

~ by Richard Kirby

The post Space saving corner DJ/Music production unit appeared first on IKEA Hackers.

Mid-century SÖDERHAMN

$
0
0

hacked chaise with sofa

IKEA Items used: SÖDERHAMN chaise

Wanting to match a chaise to our existing sofa, we purchased the SÖDERHAMN chaise, but not the upholstery covers.
There would be three parts to this hack:
a) replace the chrome legs with walnut legs,
b) use custom upholstery, and
c) modify the backrest so it would better match our sofa.

We purchased the walnut legs from an online retailer and applied three coats of tung oil ourselves.
We ordered upholstery covers from an online retailer choosing Silver Grey Brinken Herringbone fabric.

Finally, we modified the backrest:
1) We stripped off the dust cover and all of the foam.
2) We kept the plywood structure but built a box out of it using MDO. Although not shown in the photos, the backside of the box was closed using a piece of cardboard stapled to the framework to keep the overall weight down. Note in the photos that we added a taper to the box so it mimicked our sofa arm.

before upholstery

Soderhamn chaise3

3) We brought the box with 2 yards of fabric (ordered from the same online retailer mentioned previously) to our favorite upholsterer. He upholstered the box using our fabric, 1-inch foam only on the backrest side, batting covering the four vertical sides, and fox edging where needed.

Soderhamn back2

Soderhamn back1

4) We carved a plank of walnut with the same bevels on the edges. This plank was then coated with three coats of tung oil. An M-4 threaded insert was put into the center of the underside of the carved plank. An M-4 machine screw was inserted into this. We inset a keyhole hanger plate into the top of the box (see photo). With the M-4 machine screw perfectly adjusted, we slid the walnut plank over the top of the box until it caught the keyhole hanger plate and “locked” into place.

upholstered back

hardware detail
Sofa arm

5) With the new upholstery on, walnut legs on, and modified backrest attached, we were done!

Hacked chaise

~ by Alan Miller and Morgan Spatny

The post Mid-century SÖDERHAMN appeared first on IKEA Hackers.

IKEA ALGOT as pixel art frame

$
0
0

ikea algot pixel art - front

Whilst browsing in IKEA one day, it occurred to me that the Algot shelves with holes in might be re-purposed to create pixel art. So I decided to try that.

I decided on a Pacman theme, so I used the widest narrowest shelf which is 80x18cm, part number 802.185.85. I cut up some coloured card in to desired shapes and placed them inside. Initially I just used blu-tack, but this lead me to discover that the effect only works at all if the card is held right against the metal, which isn’t achievable with blu-tack. On my fridge I had some magnetic memo cards which I’d bought from IKEA years ago and never actually used to take memos. These are exactly the right size to cover all the holes and just strong enough to hold the card against the metal. I’ve no idea what the product name or part number for these is and as far as I can tell IKEA no longer sell them. If you recognise them, speak up in the comments. Unfortunately I didn’t have enough of those so had to find something else to use. After much searching I discovered Xcut A5 magnetic shims which are sold in arts and crafts stores for purposes I really don’t understand. A list of UK stockists can be found here.

ikea algot pixel art - back

I’m quite pleased with the result though it is rather more subtle than I was expecting. I’ve wondered about doing something that involves translucent material instead of the card and backlighting it. Along each of the long edges of the shelf is a sort of of gutter which I discovered the Ledberg LED strip fits in really well. It didn’t achieve anything of course because the card is totally covered by the magnetic sheets, but it’s something to think about. (I don’t have any photos of the LED strip in place, I’ve since put it somewhere I don’t want to pull it out from. If you look at the shelf you’ll immediately see how it’d fit in. I think I have part number 503.027.12) Using translucent material and positioning the shelf somewhere it gets naturally backlit might work too.

I’ve also thought about filing the holes with LEDS, though that’d cost quite a bit and I’m not really sure how to go about how to go about implementing that.

~ by Mike

The post IKEA ALGOT as pixel art frame appeared first on IKEA Hackers.

Easy Peasy Spice Drawer

$
0
0

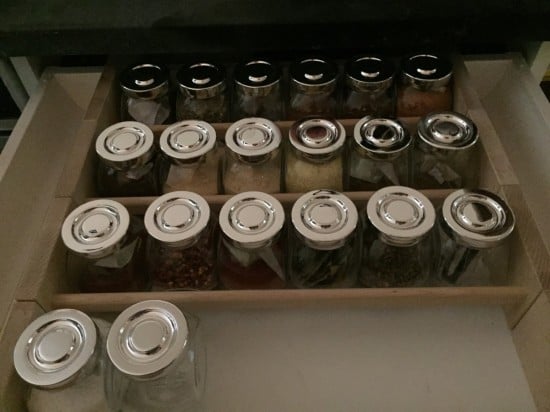
BEKVAM spice drawer with RAJTAN spice jars

IKEA items used:

  • (4) BEKVÄM ($3.99 each)
  • (5) RAJTAN ($3.99 for four)

(Total $36.00)

Tools needed:

  • Nail gun
  • Permanent marker
  • Nail brads, 1″
  • Measuring tape
  • Wood glue
  • Tape

Begin by removing your drawer from the cabinet and removing the drawer front. Set aside. Assembly the BEKVÄM shelves by attaching the middle dowel to the side pieces (discard the bottom portion) with the nail gun and wood glue.

BEKVAM spice rack

Next center the BEKVÄM racks in the middle of the drawer, be sure to measure the distance from one side of the drawer to the other to make sure they are even. Tape the BEKVÄM shelves to the drawer, making sure to tape the seams between the BEKVÄM shelves.

Making a spice drawer

Spice drawer DIY

Carefully flip the drawer upside down. Measuring from each side of the drawer mark a straight line the distance you had placed the row of BEKVÄM shelves.

nail down spice racks

Run a line of nails with the nail gun on the marker line. Next fill RAJTAN jars with your favorite spices (could even make for a craft drawer!). Attach the drawer front and insert the drawer, VOILA! Ready to use!

~ by Miranda Hall

The post Easy Peasy Spice Drawer appeared first on IKEA Hackers.

Nimbus Luminous

$
0
0

nimbus luminous - a cloud light

It’s a cloud. It’s pendant light. It is Nimbus Luminous!
I made this after my wife stared enviously at the cloud light in a dessert restaurant. =)
It is an easy, fun sized, and affordable project for a playroom.
Let’s get started!

Items:

  • Solleftea lantern x1
  • Hemma lamp x1
  • Old unused teddies x 2
  • Glue gun
  • Ledare LED 1000 lm x1 (white)
  • Osram LED 350lm x1 (warm)

1. Open and expand the Solleftea lantern (Ikea common sense) and set up the pendant light + LEDS.

sockets

Link both socket as above in a L-shape configuration. I used the socket mount as a holder for the extra long wires.

2. Dissection. Imagine yourself as Hannibal Lecter + Frankenstein.
Remove all the teddies’ innards and use it to create life.

Sacrificial teddies Dissection

3. Glue teddy’s innards to the lantern. Haphazardly as possible to give the cloud its unique identity.

Lantern with teddy's innards

Glue the cotton to the lantern using a glue gun. Be creative.

4. Now stuff the heart of the light into the innards-laden-lantern!

Attach HEMMA to the cloud light

5. Finally, hang this glorious pendant light.

DIY a cloud light

See the complete tutorial here.

~ by William Choo<

The post Nimbus Luminous appeared first on IKEA Hackers.

Viewing all 1550 articles
Browse latest View live


Latest Images