Quantcast
Channel: IKEA HACKS – IKEA Hackers
Viewing all 1545 articles
Browse latest View live

Natural wood coffee table hacked from 2 benches

$
0
0

We bought a SKOGSTA dinner table, two SKOGSTA benches for with table and also some SKOGSTA (bar) stools.

Back home, when everything was assembled the only thing missing was a matching coffee table. The old LACK table did not match with the new look.

And after a lot of searching we did not find any matching natural wood coffee table so my wife wanted to use two SKOGSTA benches next to each other.

I was a bit of meh that it was also not an ideal solution. So I decided to hack the two 120cm SKOGSTA benches into one coffee table.

This hack took me about 2 to 3 hours to make and I used 2 SKOGSTA benches. They costs €40 each. (Yes, it sounds cheap but the US price is around $80 each.)

Natural wood coffee table - IKEA SKOGSTA bench hack

What I like most is that we now have a matching coffee table for less than €100.

Since I’m not used to working with wood and this was my first real hack project it was a bit of a challenge and I made some beginner mistakes.

If you are going to “route”, do it in small steps. If you go too deep you will cut off pieces of wood.

Also you need to use the correct “miter angle” when cutting the 2 pieces for the short side of the table. Otherwise the “legs” will not stand correctly.

IKEA items used:
  • 2x SKOGSTA bench (120cm)
IKEA SKOGSTA bench
SKOGSTA bench | IKEA.com
Required tools:

How to merged 2 benches into 1 natural wood coffee table

First start by unboxing the first bench,

You can start by putting aside 4 legs because you don’t need them.

Then, you start to dismantle the under frame of the first bench. Continue on until you have only have the 2 top planks (originally, the seat) and the 2 long beams of the under frame.

IKEA SKOGSTA bench

Then, start unboxing the second bench and dismantle it partly. You only need to remove the 3 small beams. Keep one of them as a template for the miter and also for drilling the new holes.

IKEA SKOGSTA bench


Now take the 2 top planks (seats) from bench 1 and place them between the 2 top planks of bench 2.

Now you have to measure where the beam of the short side comes in and route the wood until it has the same level all through. (So the side beam can sit level, straddling the top planks.)

I did this also in the middle where the extra beam is for more support.

Natural wood coffee table - IKEA SKOGSTA bench hack

Then, measure how long the new side beam has to be and cut it to the correct size. Use the template for the correct angle to fit the legs.

After this you can use the template to drill out the hole. I will also advise drilling small pilot holes to prevent the wood from breaking or splitting.

Natural wood coffee table - IKEA SKOGSTA bench hack

You can use the scrap piece from 1 of the long beams and use it for the centre beam.

Lastly, I suggest using a decent spacer when measuring and assembling because I did not and the gaps are a bit off.

Natural wood coffee table - IKEA SKOGSTA bench hack

Also you should be able to use this guide to make a side table with 2 60cm SKOGSTA Benches.

~ by Johan

The post Natural wood coffee table hacked from 2 benches appeared first on IKEA Hackers.


Frame a fresh inspirational quote of the day, every day

$
0
0

I was listening to Dale Carnegie‘s “How to stop worrying and start living” and thought I needed to be reminded once in a while of his good advice.

But I did not want the wall to have a bunch of framed quotations.

So I made this daily inspirational quotes frame, and placed it near my coffee machine.

Every morning, I’ll get a dose of caffeine and one good advice to practice during that day. 

RIBBA was selected as I needed a nice frame for the display and have some space in the back for the components.

I have a bunch of quotations on my phone (that I add to once in a while) and it randomly picks one every 13th hour and displays it.

I can also force display a quotation to the screen if I like. As I did in this (gif) example.

changeable daily inspirational quotes frame

Here’s what I did for my daily inspirational quotes frame

IKEA items used:
  • RIBBA picture frame (13x18cm)
Other materials and tools:
  • Particle Photon
  • 640×384, 7.5inch E-Ink display HAT for Raspberry Pi (link)
  • Mobile power bank
  • 1 x switch
  • 1 x 2.2k resister (pull down resistor)
  • some wires
It was a lot of work and here is the short story of it:

First, I created the code for the particle photon and e-ink display via the lib GxEPD2_PP.

Then, created a firebase realtime database to store the quotations.

Next, created firebase functions to know when the display is awake (via a REST call from the photon) and push a new print to the display (via particle-api-js)

I created a mobile application (via expo) to update the database and push new print to the display.

Next, cut the RIBBA framing mat to fit the e-ink display.

cutting the RIBBA picture mat

I solder a switch with a pull down resistor to D3.

The last step was to hot glue the components to the back of the RIBBA frame.

How long and how much did it cost?

Too much – most people would say. But it was a lot of fun!

What do you like most about the hack?

The final look with the daily inspirational quotes frame and the font are stylish.

It updates and displays a new quote every 13 hours.

If I can’t wait (or wish to test the look of a new quote), I just turn on a switch at the back, open my mobile and start printing.  

What was the hardest part about this hack?

Coding the particle photon. I’m not so good at arduino code (prefer JavaScript).

What to pay special attention to?

It requires a lot of different skills to make it (most of it is coding).

Looking back, would you have done it differently?

Would like to show the author of each quote with some italic font. It’s still a possible feature, but I have other projects that needs attention.

And other thoughts/ comments that you have received about the hack

People think it takes too long to display. It takes ~45 sec. It does not matter to me. After the update it uses no power.

~ by Lasse Norfeldt

The post Frame a fresh inspirational quote of the day, every day appeared first on IKEA Hackers.

$5 thrifted dining table takes on the elliptical shape

$
0
0

I picked up an INGO dining table at a church sale for $5. So, I thought I’d have a shot at turning it into a coffee table for our small living room. We’d decided on an oval shape (elliptical to be precise) as we kept banging our shins on the square corners of our existing one. 

IKEA items used: 
Ingo dining table
INGO dining table | IKEA.com
Other materials and tools:

Elliptical coffee table how-to: 

The first step was deciding on an appropriate height and cutting the legs down.

Rather obvious, but worth mentioning that you should work out the height that works best for you. For instance, I had my partner sit on the sofa. Then, placed a cup down to what she thought was the best height and measured from there.

The following step was to cut the ellipse out of the table top. Pretty sure we drew ellipses in Grade six but couldn’t remember how to do it. A quick Google soon put me right.

It’s a bit tricky getting the eccentricity just right for the shape we wanted. Consequently, after 3 or 4 attempts (too long. too wide. too narrow) we found the perfect ellipse for our purpose.

elliptical coffee table

Of course, you can have any shape you want. At any rate, we found the ellipse to be perfect for in front of the sofa. It allows you room to slide into your seat and, above all, no more banging shins on sharp corners!

Once the top had been cut to size, the frame had to be cut down to accommodate it.

There are four pieces to cut. You can create the channel for the leg brace by cutting it with a table saw or even a handsaw. It’s doesn’t have to be pretty as it’s hidden and is only there to take the end of the leg brace.

We decided to add a simple shelf under the table. We used a pine board from the local DIY shop and four basic shelf pins.

Stain, varnish and paint as required, and presto! A bespoke elliptical coffee table!!

~ by Jim Elder


Related: Click here for more coffee table hacks.


The post $5 thrifted dining table takes on the elliptical shape appeared first on IKEA Hackers.

Make a Garden Obelisk in 3 easy steps

$
0
0

We have a plant — Hoya Carnosa Vine Wax Flower. It was standing in the bow window on first floor. It was a well shaded and very solid window area.

But …

When this plant is in bloom, it emits a very strong scent at night. I mean, the smell is really strong.

Florists surely know its smell: a heavy sugary-sweet scent. Which was a little too much for us, so we decided to deport it to the hall on second floor.


Related: Free standing garden trellis with bench seat


But then there was a problem. The plant had a huge pile of climbing branches. In its original spot, the branches were hanging on ropes tied to the strong curtain rails of the bow window.

On the second floor the windows are completely different and the curtain rails are quite flimsy.

When the plant was finally dragged up to the second floor, it became clear that the previous way of fixing it will not work. What we needed was a garden obelisk and plant stand.

IKEA item used:
  • FROSTA stool
Other materials:
DIY garden obelisk - materials

DIY Plant Stand and Garden Obelisk

I scratched my head and remembered that I had a large piece of jute rope from a previous project for the dinner table.

Then I saw the IKEA stool standing in the hall. And the structure of the future piece of plant stand with an obelisk for the plant to climb, popped into my mind.

To create the stand, the first thing was to take the IKEA Frostа stool and shortened its legs a bit.

garden obelisk - IKEA hack

For the obelisk, I used 4 bamboo sticks. Considering the weight of branches of the plant, I decided to not just fasten the bamboo sticks with ropes to the stool’s legs. Instead, I screwed the bamboo through a piece of metal strap to the legs. This completes the second step.

plant stand

Lastly, where the bamboo sticks meet, tie them together with the jute rope.

I also wound the legs of the stool with jute. But it’s merely a decoration and to cover up the metal strap.

And it was finished. A very easy DIY garden obelisk and plant stand. 

~ by Igor 


Related: Make a trellis for your balcony with the IKEA IVAR


The post Make a Garden Obelisk in 3 easy steps appeared first on IKEA Hackers.

Rental friendly outdoor storage bench and wall panel

$
0
0

I wanted to utilise a small awkward corner of the balcony for an outdoor storage bench and potting table.

Having always admired the look and functionality of the ÄPPLARÖ wall panel and storage bench combination, I was almost dissuaded when I learned the panel would require fixing to a wall and is not actually fixed to the storage bench itself.

Being in a rented apartment I did not want to drill holes in walls. Besides, it was to be positioned up against the balcony’s outer wall where it is not high enough to fix onto anyway.

What I really needed was a freestanding version. Using this hack will mean the panel will sacrifice about a third of its original intended height — however it was the perfect solution for my particular application (hopefully yours too).

applaro_finished

Just before we get started, I want you to take the following into consideration.

First things first

Firstly, I used flat washers when securing all the screws and bolts, namely in a bid to aid with the strength of construction.

While I recommend sticking to the hack as designed, for reasons of your own, e.g. aesthetic purposes or whatever, you might decide not to go down that route.

Personally I don’t think the washers look too out of place, especially if you opt for washers in a finish similar to the hook accessories that are included with the wall panel.

Secondly, I purposely designed this hack to use the storage bench lid to be ‘weight-bearing’ for the upper wall panel, again to aid with stability and rigidity.

Therefore, I would recommend to always put the lid back into it’s ‘closed’ position whenever possible to avoid placing unnecessary stress on the lower panel, especially if you intend on using the optional shelves and putting things on them like I do.

Finally, there are easier (if not simpler) options and alternatives to this hack, such as using some timber to create a frame to bolt the whole lot together as seen in another other similar hack. Or, maybe modify the storage bench lid so the upper wall panel butts up hard against the top edge of the storage bench. Either way, I just happen to like how this one turned out 🙂

With that said, lets get started.

You will need:

  • 1 x ÄPPLARÖ wall panel set (comprised of upper + lower wall panels & fixings)
  • 1 x ÄPPLARÖ outdoor storage bench
  • 6 x round head wood screws (~35mm)
  • 2 x round head threaded bolts and accompanying nuts (~45 to 50mm)
  • 10 x flat washers (~30mm dia.)
  • a drill (with bits to drill pilot and main holes)
  • an appropriate screwdriver
  • an appropriate spanner / adjustable wrench/ shifter etc

ÄPPLARÖ outdoor storage bench with freestanding wall panel – instructions

1. Assemble the ÄPPLARÖ outdoor storage bench, without its lid or floor. Or if you have an existing ÄPPLARÖ outdoor storage bench (like I did) remove the floor and the lid.

Assemble ÄPPLARÖ outdoor storage bench

Figure 1. Partially assembled storage bench (without lid or floor).

2. Lay the bench on its side lengthwise. Keep in mind that the side now lying on the ground will become the ‘front’ of the storage bench after this project is completed, and the side sticking up into the air will become the ‘back’.

Prepare the lower wall panel

3. Next, prepare the ÄPPLARÖ wall panel. It comes in two main parts – the lower part and upper part, plus the accompanying dowels to connect them together and some accessory hooks. You won’t need the dowels.

Take the lower wall panel part and place it on top of the storage bench, lining up the feet of the panel against the feet of the storage bench to ensure they are all squared up and flush.

ÄPPLARÖ wall panel

Figure 2. Lower wall panel part

align the legs

Figure 3. Aligning the feet.

4. With the bench and lower wall panel feet aligned, use an appropriate sized drill bit (smaller in diameter for the wood screws you will be using) to drill a pilot hole right through the wall panel foot and partially into the storage bench foot.

drill holes for washer and screws

Figure 4. Drilling the foot.

5. Take a flat washer and wood screw and fix the lower wall panel and storage bench together. Do not over tighten.

washer

Figure 5. Fixing the foot.

6. Now do the same for the other foot, and then the remaining upper corners of the storage bench. What you should end up with is the bottom half of the lower wall panel secured to the ‘back’ of the storage bench.

ÄPPLARÖ outdoor storage bench with freestanding wall panel

Figure 6. Completed lower half.

Prepare the upper wall panel

7. Next, we will be using the lid of the storage bench to create a necessary gap/ slot between the lower and upper halves of the wall panels and the lid itself.

8. Flip the storage bench (and it’s newly connected lower wall panel) onto it’s back.

ÄPPLARÖ outdoor storage bench

Figure 8. Storage and panel on its back. Please forgive the lack of contrast between the subject and the floor in this and the following pics.

9. Take the remaining (top) half of the ÄPPLARÖ wall panel and overlay on top of the lower wall panel. Then install the storage bench lid into its correct position. Next butt the top panel up flush against the lid.

ÄPPLARÖ outdoor storage bench

Figure 9a. Overlay the top wall panel on top of the lower wall panel.

ÄPPLARÖ outdoor storage bench

Figure 9b. Install lid and align top panel flush against it.

align the lid

Figure 9c. Close-up of top panel flush against the lid.

10. Using the existing pre-drilled hole in the upper wall panel, drill a hole right the way through the back of the lower panel. The hole diameter should be large enough to allow the ~45mm bolt to thread through without obstruction. Do the same for the other side of the wall panel. TIP: when performing this step, make sure you have something underneath to create some clearance – i.e. don’t drill a hole into your floor!

align the lid

Figure 10. Use the existing pre-drilled hole in the upper wall panel and drill a hole all the way through the lower wall panel.

Attaching the panels to outdoor storage bench

11. Remove the storage bench lid.

12. With flat washers for each side, bolt the the upper and lower wall panel sections together. TIP: when performing this step you might find this easier by flipping the storage bench onto one side.

secure with washer

Figure 12a. Bolt the top panel to the bottom panel (front view).

all done

Figure 12b. Bolt the top panel to the bottom panel (rear view).

13. Reposition onto its back. Then using an appropriate sized bit (smaller in diameter for the wood screws you will be using) drill a pilot hole right through the upper wall panel and partially through to the top corner of the lower wall panel. Hint: sounds a bit confusing so read this instruction twice, and use the pictures as an explanatory guide. Do this for both sides.

drill

Step 13a. Drill a pilot hole in the upper wall panel near the top corner of the lower wall panel. Repeat for the other side.

drill

Step 13b. Use a screw and washer to connect the upper wall panel to the lower panel. Repeat for the other side.

ÄPPLARÖ outdoor storage bench with freestanding wall panel

Step 13c. Once done, stand the entire thing into its correct upright position and it should look like this.

Freestanding wall panel done

14. Install (or reinstall) the floor of the storage bench.

ÄPPLARÖ outdoor storage bench

Figure 14. Reinstall the storage bench floor.

15. Back to the storage bench lid – if you’ve installed them already – remove two of the plastic guide lugs (one from each end) from the underside of the lid.

wall panel

Figure 15. Remove the front guide lugs from the lid (while leaving the back ones)

16. With the plastic guide lugs facing closest to the wall panel, insert / slot the lid firmly into place between the upper wall panel and the top lip of the storage bench. When inserted, the lid becomes a weight-bearing member for the upper wall panel. TIP: depending on your workmanship, it might initially be quite a tight fit. It’s wood, if necessary give it a good whack with the palm of your hand (or a rubber mallet).

insert the lid

Figure 16a. The lid’s lugs should be closest to the wall panel side of the bench.

check for fit

Figure 16b. A close-up of the lid positioned to slot in between the upper wall panel and the top lip of the bench.

check for fit

Figure 16c. A nice tight fit 🙂 ahhhhhhh…..

ÄPPLARÖ outdoor storage bench

Figure 16d. Congratulations – you are finished. Enjoy.

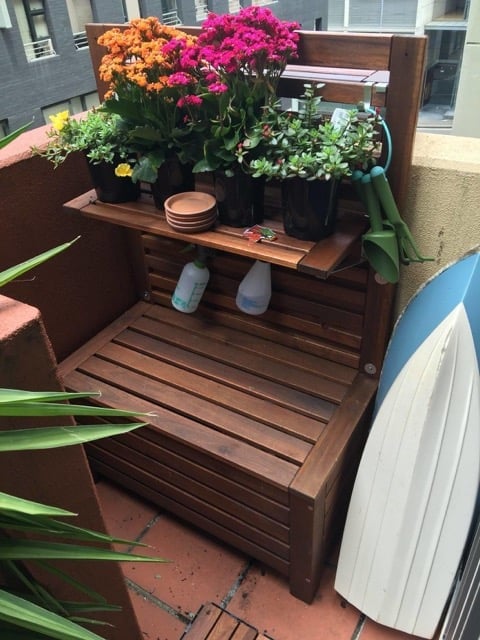
Here is my final result in actual use as an outdoor storage bench and potting table, complete with optional wall panel shelves (available separately).

ÄPPLARÖ outdoor storage bench
ÄPPLARÖ outdoor storage bench and potting table
ÄPPLARÖ outdoor storage bench with freestanding wall panel and potting table

~ by Franco

The post Rental friendly outdoor storage bench and wall panel appeared first on IKEA Hackers.

Funky washstand with drawer from IKEA cart

$
0
0

A neat little washstand hack that evolved from our remodeling the downstairs bathroom.

We quite fancied getting a wash basin instead of the traditional sink and vanity but couldn’t source a suitable washstand.

It just so happened that we had two BEKVÄM kitchen carts lying around unused. So, I put my thinking cap on and came up with this hack.

IKEA items used: 
  • BEKVÄM kitchen carts x 2
BEKVAM kitchen trolley
BEKVÄM kitchen cart | IKEA.com
Other materials and tools: 

BEKVÄM washstand instructions:

Each cart has two longer legs and two shorter ones with casters.

IKEA BEKVÄM

The height of the short legs turned out to be perfect so I bolted all four of them on to one of the carts. And kept the longer ones for a different project.

(Alternatively, if you don’t have 2 carts, you can cut the longer legs to length of the shorter ones)

The next step was to cut away and reinforce the upper shelf to accommodate the plumbing.

Quite simple after a bit of measuring and the removed bars were cut down to use as crosspieces.

After some thought, I decided to add a drawer. So I picked up a set of slides at the local DIY shop.

I used the front panel from the second cart as a drawer front and sourced a couple of small boxes from a dollar store to build the drawer.

IKEA BEKVÄM washstand hack

A thin sheet of plywood on the underside of the two boxes gives the drawer rigidity.

The space between is to make room for the sink drainpipe.

IKEA BEKVÄM washstand hack

Cut the hole for the sink, rip a piece from the other cart’s top for the backsplash, and you have a pretty decent washstand!

~ by Jim Elder


You may also be interested in these bathroom vanity hacks:


The post Funky washstand with drawer from IKEA cart appeared first on IKEA Hackers.

Hackers Help: Can I cut down PAX wardrobe?

$
0
0

I’ve done some work on the PAX Planner and got a nice wardrobe to go.

But.

There’s a window in there — right behind the top half of the middle unit — 100cm wide and starts 120 cm from the ground. 

Since I could live without the extra hanging space, but drawers are essential, could I just cut the unit in half horizontally?

So keep the set of drawers bit and cap it off with the original top panel and treat it like a chest of drawers?

Why not just put a chest of drawers in — I hear you ask. Well, the space is exactly 100cm and would you believe it, IKEA does not do a single solitary drawer combination of either 100 or 2 x 50cm! 

Will it all fall apart on me or whaddya reckon? 

~ by Jinx

***

Hi Jinx

That’s a nice plan for a PAX set-up. I’ve always wanted a corner unit too but didn’t have space for it.

We’ve covered the shortening of PAX wardrobes quite a bit here. To answer your question, yes, you can cut down the PAX wardrobe. No problem there.

cut down Pax wardrobe
PAX wardrobe cut for storage under the eaves

Your plan to cut the top half and cap it with the original top panel is workable.

Again, I would recommend reading up on this excellent Instructable so you can get sharp, clean cuts. Using the right blade and tools (table saw or circular saw) will greatly minimise splinters and the tearing off of the laminate layers.

Use iron on edge banding to cover up the exposed laminate cuts.

Let us know how it all worked out.

Happy hacking,

Jules


We recommend these Hackers Help questions for further reading:

The post Hackers Help: Can I cut down PAX wardrobe? appeared first on IKEA Hackers.

Tall TV stand – small budget hack for big TV

$
0
0

In one of the bedrooms we have an inexpensive IKEA RAST chest.  It also served as a rather tall TV stand. But the TV is big (old LG plasma), and it looked … not very nice on top of the RAST.

RAST chest of drawers - before

My wife has asked me to replace it with something nicer and bigger to accommodate a few books and all sorts of nonsense crap.

And, as you know, if a wife really wants something, it is better to do it and avoid much more problems … so I said OK and started to think it over.

Remembering the immortal phrase, “Saved means earned”,  I decided to build the needed furniture.

I wanted something simple and wooden, like Scandinavian style, as this bedroom is clapboard finished.

Then, I looked at the IKEA website and got upset. Because the price of any more or less decent TV stand with storage started from 10K Rub. And when I looked at other home furniture sites, it was even worse.

Remembering the immortal phrase “Saved means earned”,  I decided to build the needed furniture, since the interior allowed for it.

IKEA item used:
  • RAST chest of drawers x 2 
RAST chest of drawers

RAST chest of drawers | IKEA.com

Other materials:
  • 5 pieces of 40 x 40mm lumber
  • 3 furniture planks at 200 x 2000mm
  • 16 furniture screws with a flat head
  • 8 pieces nut with a flat head
  • 8 pieces tee blind nuts furniture T nut inserts for wood
  • Bag of furniture screeds for tightening the chests

Budget Tall TV stand – how I made it

So, I bought the second, exactly the same, RAST chest for 2500 Rub. (The cost of the first one was 1900 Rub, but it was a long time ago).

budget tall tv stand - IKEA RAST hack

After!

I also got 5 pieces of 40 x 40 lumber, 3 wood planks of 200 x 2000 mm, a pack of furniture screeds for fixing and tightening the RAST chest together, 16 furniture screws with a flat head Allen with the same nuts. 

budget tall tv stand - IKEA RAST hack

The first thing I did was to cut the lumber into the right lengths for the side units. I also cut some of the lumber for the 2 pairs of shelves brackets.

side units

After that, it was all a matter of joining the pieces together. I fastened the two RAST chest to each other.

screwing the units together

From inside the RAST chest, I screwed on the side units.

As the RAST side panels butts up and to make things flush, I added a wood plank on top of the entire length of the two chests.

budget tall tv stand - IKEA RAST hack

Next, would be to screw on the brackets and shelves.

budget tall tv stand - IKEA RAST hack

To prevent any tip over, you may also want to attach the unit to the wall.

~ by Igor

The post Tall TV stand – small budget hack for big TV appeared first on IKEA Hackers.


Cat walkway: How to make space for your furkids

$
0
0

We made a simple cat walkway out of LACK tables.

The view is meowellous from up here!

IKEA LACK tables are strong enough to support cats, even if they are mounted upside down. So to give our cats more room in our house, we mounted tables hanging from the ceiling.

Materials:
Materials

Want a Cat Walkway on the Ceiling? Here’s how

Firstly, I assembled the tables as intended in the IKEA instructions.

Lack side table assembly

Then, I screwed angle brackets on the legs of the table with at least two screws per leg. The bracket and the base of the feet should be flush so it can sit properly on the ceiling.

fastening bracket to legs

The angle brackets I used were far larger than necessary, but I had them lying around.

Repeat this step for as many LACK tables as you need for your cat walkway.

Since our ceiling is made of concrete, I had no problems mounting the angle brackets to it with plastic wall plugs and screws.

In our case, one plastic fixing per leg was more than sufficient to secure the table to the ceiling.

Metal braces

For get additional security, I connected adjacent tables with metal bars that I screwed to the upper (so now lower) part of the legs to distribute the load over more fixings.

After that, it was a matter of making it comfortable for my cats. We added cushions and pillows. Also some vinyl stickers on the LACK table tops to decorate them.

Cat walkway IKEA LACK hack

To get to the cat walkway, we have a set of cat steps on the wall for them.

The cats seem to love the extra elevated space they have to roam and watch us humans from up there.

~ by Tanja


You may also like these IKEA Hacks for cats


The post Cat walkway: How to make space for your furkids appeared first on IKEA Hackers.

Skinny rolling storage cart to fit between washer dryer

$
0
0

I participated in the Spring One Room Challenge and decided to tackle remodeling my laundry room

My laundry room is very small and I needed to add some extra storage but didn’t have much space to work with. 

In between my washer and dryer I had a whopping 11″ and when I saw that IKEA makes a shorter version of the HYLLIS Shelf I knew it was perfect for a rolling storage cart that slots right into the space. 

rolling storage cart for laundry room

It just needed a little hack to make it look pretty and add some utility.  With the addition of some casters, a wooden storage box and some corner brackets I was able to turn a simple IKEA HYLLIS shelf into an industrial rolling storage cart that is ideal for any tight space.  

IKEA items used: 
IKEA HYLLIS shelving unit

HYLLIS | IKEA.com

Other materials: 
Tools: 
  • Miter saw
  • Table saw
  • Drill
  • Drill bit
  • Brad nailer
  • Clamps
  • Tape measure
  • Pencil
  • Ear protection
  • Eye protection

Rolling storage cart hack instructions: 

Step 1 – Drill new holes for the shelves

Before you get started, throw away the directions that come with the shelf.  You’ll actually be building it upside down and drilling new holes for where the shelves need to be spaced. 

HYLLIS ikea hack

The bottom shelf is flush with the bottom of the four legs.  The top shelf is centered 3-3/16″ from the top of the legs and the middle shelf is centered between the other two shelves.  

drill new holes
Step 2 – Add Casters 

Since casters cannot be screwed into the bottom of the thin metal shelf you’ll need to add some 1/2″ thick wood.

Add wood for casters

I used Loctite glue and clamps to hold them in place until they dried.  Then glue and screw the casters to the wood.  

glue on the wood planks
Add wheels
Step 3 – Build the Storage Box 

I used a 1×10 board for the bottom and ripped it down to 9-1/16″ in width to fit the dimensions of the HYLLIS shelf.  I then used 1×6 boards for the front, back and sides of the box. 

storage box

These were attached using wood glue and brad nails.  I finished the box with stain and polyurethane.   You can find more detail on the finishes that I chose here.  

Step 4 – Install the Wood Storage Box 

Drop the wood box in place.  I Drilled holes through the legs into the wood (careful not to go all the way through).  Then use wood screws to tighten the legs to the box.  I also installed Simpson Strongtie corner brackets at the top of each of the corners of the box to even out the look. 

rolling storage cart for laundry room ikea hack

This is an abridged version. See the full tutorial for this IKEA HYLLIS rolling storage cart hack with more details and tips here.  

rolling storage cart for laundry room ikea hyllis hack

~ by Hannah Schlachter, Handmade Weekly  

The post Skinny rolling storage cart to fit between washer dryer appeared first on IKEA Hackers.

Your favorite shoe cabinet in a classy black texture: how-to

$
0
0

This HEMNES shoe cabinet was originally white, and is made with particle board.

It has that crappy vinyl surface. (Ok, I’m a snob. I don’t like vinyl). I purchased it for $60 CAD from Kijiji (online classifieds).

To turn it into a classy black shoe cabinet with a subtle texture, a hack was in order. Here’s a side by side comparison of the before and after.

classy textured black shoe cabinet
IKEA items used: 
Other materials and tools: 
  • Painter’s tape
  • Foam brushes
  • Stencil brush (I used a cheap one from Michael’s)
  • Stencil
  • Acrylic paint (I used basic artist’s acrylic paint from Michael’s, called Artist’s Loft). Any color (it’s getting painted over!)
  • Annie Sloan Chalk Paint (non-toxic, low VOC! Even food safe!)
  • Annie Sloan clear wax and black wax (or whichever colored wax you like)
  • 2 old dress socks, free of lint

White to black shoe cabinet instructions:

First, simply clean all surface area of the HEMNES shoe cabinet. (I used a multi-purpose cleaner!) Then, remove the drawers and the knobs.

IKEA HEMNES shoe cabinet

Use painter’s tape to set a border around the fronts. You can set it however thick you need it to be.

set border for area to be painted

The next thing is to plan out your stencil dimensions.

Usually a stencil has to be repeated over and over. On that account, you may want to measure your area and plan your border appropriately so that your stencil fits in there nicely.

Make sure you account for any “trim” on the border of the stencil, if necessary.

Start stencilling
Apply acrylic paint on stencil

Use the acrylic paint on the stencil, and make sure you give a bit of thickness to the paint. Nevertheless, don’t put too much paint on, or it will go messy when you take the stencil off.

You can maybe do a test of it on some cardboard to get the right texture.

Cat approves the color and texture

Wash your stencil, and repeat. (Make sure your acrylic paint is fully dry first, before doing next one. It will take roughly 2 or 3 hours if your paint is thick).

Continue painting over your stencil until your area inside your taped border is covered.

If you screw up your stencil, just wipe the acrylic paint off with paper towel. The surface doesn’t even have to be perfectly clean again to reapply.

You can also see in one of the photos that I actually have 2 shades of “white” paint. That’s just to show that it doesn’t really matter what color you go with for the acrylic.

Rinse. Repeat.
Stencil completed

Leaving the tape on, now you can apply the chalk paint once the acrylic is completely dry.

Paint over with chalk paint

I used the foam brush to dab the paint on, which helps bring out the texture of your stencil pattern. If you get a bit of “foam brush” texture, that’s ok too!

Once completely dry (chalk paint takes about 30 mins to dry, give or take, depending on humidity), remove the painter tape.

Reapply new painter tape over the edges of the stencil area so that you can paint the border. I used a foam brush again on the boarder, and you can make it smooth or have a bit of brush strokes, up to you.

Do some research if you want completely smooth, because once you apply the dark wax, any brush strokes will be enhanced.

paint over textured black shoe cabinet

Do touch-ups as necessary around the edges of your stencil area, after removing the painter’s tape. Use a dabbing motion, not brush strokes.

Finish with wax

Next, apply clear wax, then apply the black wax (or whichever shade of wax you chose).

I used one dress sock (inside out) for one wax, and the other for the second wax. Keep them separate so that you don’t get colored wax in your clear wax.

classy textured black shoe cabinet
textured black shoe cabinet

Lastly, apply whatever fancy knobs you wish! Make it YOURS!

~ by Melonie (Follow her on Instagram)


You may also like these shoe storage hacks


The post Your favorite shoe cabinet in a classy black texture: how-to appeared first on IKEA Hackers.

3 unique IKEA sculptures knock it out of the park

$
0
0

I’m an artist in Chicago and have been making sculpture with IKEA materials for about 10 years.

Usually the work has to do with early 20th century modernism, using references to the Bauhaus or Constructivism, but framed through a contemporary consumerist context.

In fact, my work was recently included in the “IKEA Hacked” exhibition at the IKEA Museum in Älmhult. So I got a chance to go there!

Here are a few IKEA projects I have worked on over the years. The most recent sculpture is the IKEA Skeleton. 

#1 IKEA Skeleton

I buy a lot of IKEA and end up with lots of leftover material. So I had the idea to see if I could make a skeleton with the parts I had. 

INGVAR_1 IKEA Sculpture

Well … hello?

The challenge is to use the IKEA product with as little alteration as possible. It would be a lot easier to sculpt a skeleton using common raw materials like wood or clay. But, I wanted to be constrained by what was available and I wanted the result to be recognisably IKEA.

The problem-solving process is what keeps me interested. I had so much fun making it that I started another one, which will be made of different parts.

My project is titled INGVAR_1, and it’s a life-size articulated skeleton made of 100% IKEA parts. I know this isn’t really the usual kind of hack on IKEA Hackers, because it’s a sculpture rather than a useful object.

INGVAR_1 IKEA Sculpture

But, you guys may be interested to see it.  It would be very difficult to list all the items that went into it, and instructions would be impossible. 

IKEA Sculpture by Jeff Carter

INGVAR is of course the name of the late founder of IKEA. I made this as a respectful commemoration.

#2 Motorized LACK tables
motorized LACK tables

This is from an exhibition called Catalog, which consists of 5 sculptures. I made the Catalog (Blue Tables) from LACK tables. Firstly, I cut and then, reassembled each table. In addition, each table has motorized legs that tilts the table gently up and down. The result is a wave-like motion. See more here.

#3 Cabinet for Walter Gropius
Gropius buildings

This is the first in a series of sculpture/furniture pieces that are based on the architecture of Walter Gropius, the founder of the Bauhaus. Specifically, I made IKEA models of all eight mid-century modern Gropius buildings that the City of Chicago demolished.

This piece is based on the 1953 Power Plant, assembled using three BESTÅ cabinet bases. Read more.

~ by Jeff Carter. See more of Jeff’s work here.


The post 3 unique IKEA sculptures knock it out of the park appeared first on IKEA Hackers.

Make a chic cane headboard in a matter of hours

$
0
0

I recently did a series of mini IKEA hacks. The first one is a cane headboard and it only takes a few hours to make.

cane headboard DIY IKEA hack

Below is a list of materials and a few brief steps. It is very easy and looks gorgeous in the bedroom.

Materials:
Tools:

DIY cane headboard

Step 1

When working with cane webbing it needs to be wet, so you can fold it.

webbing

Soak the entire webbing in water for at least 30 minutes.

If you don’t have a bathtub that is big enough, you can do one end at a time. After soaking, pat dry the cane with a towel so it is not too wet.

Step 2

Cut the cane webbing to fit the IVAR frame. Do ensure you have enough material to fold around the edges of the frame.

webbing DIY IKEA hack
Step 3

Use a staple gun to fasten the webbing onto the back of the frame. Pay special attention to the corners to get a neat tuck.

cane headboard DIY IKEA hack
Step 4

Hang up on your wall with screws.

cane headboard DIY IKEA hack

And admire your DIY cane headboard.

See the full tutorial on Caroline’s blog.

~ by Caroline


You may also like these hacks with rattan

#1 BILLY with cane wicker doors
billy wicker doors ikea hack

Kathryn has always loved cane furniture and missed out on the IKEA STOCKHOLM 2017 cabinet when it was released two years. Since then, she has been searching for a similarly affordable alternative without success. So went this BILLY arrived in her home, her second chance had come. See more of Kathryn’s cane furniture doors.

#2 Rattan doors for the EXPEDIT (or KALLAX)
rattan doors for expedit / kallax

This is an old hack of mine. I had an EXPEDIT TV shelving unit and wanted some BRANÄS drawers for it. However, for some of the cubbies a door was better suited, so I had to do a small hack. I hacked the rattan doors for the EXPEDIT but it will work for the KALLAX too. See more the EXPEDIT rattan doors.


The post Make a chic cane headboard in a matter of hours appeared first on IKEA Hackers.

Missed out on the Stockholm rattan cabinet? Make this!

$
0
0

My inspiration for this one, was the rattan cabinet from the IKEA Stockholm 2017 collection. I thought it would be ideal with a DIY project in the same style. And I wanted to make a cabinet that fitted with the ongoing trend of rattan, wooden furniture, bamboo, warm notes and craftsmanship.

rattan cabinet DIY - IKEA IVAR hack
IKEA items used:
  • IVAR cabinet
  • EDVALLA drop handle 
  • BURFJORD legs
Other materials:
materials

DIY rattan cabinet

First, I measured the cabinet doors and cut two pieces of my pre-woven cane to fit. Do leave a little extra room to work with. You can cut off the excess as one of the final steps.

The next thing to do is to soak the cane webbing in warm water, for about 40 minutes. I used my kitchen sink for this purpose. A bathtub may also do the trick.

While the cane webbing was soaking (this is to allow the fibres to soften) I assembled the IVAR cabinet and screwed the legs on. However, I left out the shelves and the cabinet doors from the assembly.

ikea ivar hack

After 40 minutes, remove the cane pieces from water and dry them off as best as you can with a towel.

Attach cane webbing to doors

Then, while it is still damp, I started attaching it to the cabinet doors. I started off on one side and slowly placed the brass studs from one side to the other.

Next, using a paint brush, I smoothed on glue on the front of the cabinet door. Then, I pressed the rest of the cane on top of the door front.

To complete it, I attached the cane with brass studs on the other side of the door too.

After that, all I had to do was to let the glue dry. I placed the two doors under a lot of heavy books, over night.

The final step is to attach the doors, now with a woven cane front, back on the IVAR frame. I drilled holes for the door handles, screwed them in and that’s it!

rattan cabinet DIY - IKEA IVAR hack

It took me about two days to make and I am pretty happy with the result.

See the full tutorial here.

If you’ve not seen it, do take a look at my other IKEA hack along the same style – it’s a cane headboard.

~ by Caroline Birk Bahrenscheer. Follow her @septemberedit

The post Missed out on the Stockholm rattan cabinet? Make this! appeared first on IKEA Hackers.

Strainer Things: Surprisingly good looking colander lights

$
0
0

Shira and Alon made a set of pendant lights from the IKEA GEMAK colander. Pretty unusual in a whimsy way. And since they are for the kitchen, seems appropriate the strainers found their place.

IKEA GEMAK colander lights - DIY
IKEA items used: 
  • GEMAK colanders x 4
  • FEJKA plastic plants (4 different kinds for variation. We didn’t use all the stems/leaves)
Other materials and tools: 
  • Light cord set (we assembled our own with parts we bought in a local lighting shop because we wanted a somewhat fancier ceiling cup thingie and cord. (We got black and white fabric ones.) But you can use the IKEA HEMMA light cord set instead. That will actually make this project much easier and faster because you’ll have a lot less to cut, assemble and wire.
  • A couple of plastic flowers we had at home (you can use the IKEA SMYCKA series for that as well)
Tools:
  • FIXA tools — screwdriver, drill, pliers etc. and anything that’ll help you slightly widen the hole the electric cable will go through
  • Cutter, scissors etc. (for wiring and so on)
  • Round file (for after you widen the hole)

How to make colander lights: 

So, basically the instructions are — insert a cord set through a colander, and hang it. Very simple! 

The nice thing about the colanders (except for the fact that they already look like pretty lamp shades) is that they already have holes. 

This makes the “inserting the cord set” part very easy. You just have to make sure everything fits.

So here are the steps:

1. Get the colanders. Decide which cord set you wish to attach it to and get that as well. Then, check the pieces of your cord set to see how big you need the hole to be. (It might have a piece that’ll fall through if it’s too big so be careful!) You should also think of the height of your future lamps and buy the cord set (or cable) accordingly. (haha cord joke).

before
Before – Getting the height right

2. Now, widen the hole with any available tool — a drill, a knife … The colanders are made of steel and enamel, so it’s easy to work with. The enamel might slightly peel off but if you hang your lamp from the ceiling no one will see it. 

IKEA GEMAK inside

3. It’s time to wire up and insert your cord set through the colander. If you have a ready made one, life’s easy — insert it on both ends, attach the wires and you’re done. If you decide to do your own wiring please make sure your use a grounding wire as well. 

wiring
Wiring it up

This is a pic of our old lamp and how the wires should connect, but it’s the same with the pendant one. Blue to blue (neutral wire, according to European color standard) red to red (the hot wire) and yellow-green grounding to a metal part in the lamp itself. 

wiring

Here’s how the HEMMA cord set connects:

wiring

Connect all the parts on the inner side of the colander as well.

IKEA GEMAK colander with bulb

Basically that’s it. There’s, of course, some screwing and unscrewing to do… just the basic lamp / pendant installation. 

Please see this website for super exact instructions on how to hang a ceiling light fixture! 

In this above pic you can also see the next (fun!) stage – decoration! 
But just a sec – let’s talk about bulbs.

IKEA GEMAK colander lights - DIY

4. Choose the bulbs. This is how the colander lights look with regular bulbs. We decided to go with FSL LED orang-y bulbs. This is just a matter of taste, obviously.

IKEA GEMAK colander lights - DIY

SO – now for the fun part. 

5. Decoration! The colander holes are also very useful for decoration, We (easily) ripped out the stems of the FEJKA plants and just stuck them wherever we wanted, no glue needed! (their ends are a bit more bulky then the rest and they fit perfectly into the holes).

We decorated the 4 lamps in the same style, with some variation.

Other useful information:

The hardest part about this hack was doing the electric wiring ourselves. It would have been MUCH easier to just go with a ready made one, but this allowed us to decide on their looks and length, which was critical.

Most importantly, if you don’t feel confident dealing with electricity, call someone who does! Alon had his share of experience with electricity and I probably wouldn’t have been able to do it without him (not ’cause it’s hard, just ’cause it’s a bit scary when you don’t know your way around it) 🙂

How long did it take? And cost?

It took 3 days of non-consecutive work. All in all the project cost (the NIS equivalent of) $123 ($55 for 4 sieves, $32 for the plastic plants, $36 for the parts for the light cords sets)

We really love how this lights up the room even when the lights are off 🙂
You can get creative with the decoration.

Magnets are a cool addition. (We added one for balance (the left side of lamp 3 (see pic) was slightly too high, so the magnet keeps it straight, but now that we thought of that, it opens up a whole new world of possibilities. 🙂

So, in conclusion.

Before (the lamps that were there when we moved in):

before

During:

during

After YEAY! Our colander lights are lit.

IKEA GEMAK colander lights - DIY

~ by Shira and Alon

The post Strainer Things: Surprisingly good looking colander lights appeared first on IKEA Hackers.


Popular IKEA coffee table takes on the world (map)

$
0
0

I had seen a glass-top table made on an advertising campaign (for a stationers) and thought a LACK coffee table was the perfect candidate. Plus I had seen a back-lit world map wall mounted in an office and thought it was a good first subject to put under the glass.

Here’s the finished result.

back-lit world map coffee table - IKEA LACK hack

And with lights!

back-lit world map coffee table - IKEA LACK hack
Back-lit world map on IKEA LACK coffee table
IKEA items used: 
  • LACK 60cm coffee table
Other materials and tools:
  • Stand Off Fixings 17X27 mm (£1.99 each, I used 6)
  • LED Outdoor Battery Fairy Lights (£9.59, 2 sets, explained later)
  • Custom glass table top, 6mm toughened glass, 900x550mm (to match the table top), 6 holes drilled. 
  • This cost £40 from a custom glass supplier.
  • Dowel rods, cut into 2cm lengths (a few £ from local DY store)
  • 1 sheet of 6mm MDF (£7)
  • Handful of screws and a couple of off-cuts of wood, plus some old paint we had from a recent home project.
Tools:
  • Table-top scroll saw (but hand held one would work fine. It’ll take a little longer)
  • Hot glue gun and glue
  • Drill and bits
  • Screwdrivers
  • Band saw (again hand saw will work fine)

Back-lit world map coffee table instructions:

The map and supports 

I found an outline world map on the web, and printed it to the proper scale, and taped the sheets together.

outline of map

Related: DIY world map on wall mounted IKEA TRONES shoe racks


Then, glued it to the MDF sheet and used my scroll saw to cut it out. A bit of sanding and all the continents and islands were ready for their paint job.

I had to obviously not use some of the smaller islands, and also combine some island ranges into one piece of mdf.

Still, islands like Ireland and Tasmania proved to be very small.

cut out of world map

For the supports for each piece of MDF I started to hand-saw 2cm lengths of dowel, but very quickly realised I would get a much better and quicker result by using my bandsaw.

bandsaw
Adapting the table

I knew IKEA tables had solid corners to support the legs, but thin top and bottom pieces sandwiching a card/paper honeycomb pattern.

I scored the underside of the table, then pried the bottom bit of hardboard away. Then, I had some assistance to remove the cardboard and leave a hollow base.


Related: Fun IKEA kids table hack with City Map of your choice


On the top side I marked the holes for the glass table top stand-offs (using the glass itself as a guide) then secured the stand-offs.

LACK coffee table with stand-offs

When I was deciding the placement of the stand-offs, I deliberately put them in the corners, so there is good purchase from the long screws, in to the corner blocks that support the legs.

For the two middle stand-offs, I glued some old scrap blocks in between the table top’s thin surfaces to give it more security.

Putting it all together

I laid out the world map on the table top, and drew around them. Then, marked where I wanted the dowels to site.

back-lit world map coffee table - IKEA LACK hack

I glued them in and once dry, I then marked the locations of the LEDs. I originally figured I’d need about 70 lights. But got carried away adding them and when I counted them up realised I had about 160!

sites to be lit
dowels for LED

Luckily I had ordered 2 sets of the 100 LEDs (thinking that I’d perhaps make another table after this one). I realised therefore that I could just wire them together to give me enough bulbs.

I drilled all the holes from the top, to give the cleanest finish. And then pushed the LEDs in from underneath and secured them with my hot glue gun.

back-lit world map coffee table - IKEA LACK hack

I made sure I kept testing the lights, as I did not want to get to the end to find them no longer working.

The final assembly was following the IKEA instructions to complete assembly of the legs and lower shelf, then gluing the (now painted) land masses to the dowels.

Finally, the glass was secured to the table using the chrome screw tops of the 6 stand offs. And that completes my back-lit world map coffee table.

Other useful information:

It took me a weekend’s work and less than £100.

What I like most is the back-lit world map looks stunning in a dim room.

back-lit world map coffee table - IKEA LACK hack

The hardest part about this hack was drilling the 170 odd holes for the LEDs.

What to pay special attention to?

Mounting the battery pack to ensure it can be “seen” by the remote control and that you can unclip the cover to change batteries.

Looking back, would you have done it differently?

1. The dowels were 2 cm long, too long in this case (too easy to see some of the bulbs underneath). I would halve this next time, as this was still plenty to clear the LED bulbs.

2. I’d work out the alignment of the land masses better and not use hot glue to secure them, simply because there isn’t the time/scope to re-adjust before the glue cools and goes hard enough to prevent fine adjustment.

3. I’d use fewer dowels, and even smaller (narrower) ones to avoid them being seen.

See the full tutorial on Instructables.

~ by Alan Hill

The post Popular IKEA coffee table takes on the world (map) appeared first on IKEA Hackers.

Dog cage cover that looks good and works even better

$
0
0

Peppermint Patty is part of our family. With that, her cage needs to be convenient in our living space and she enjoys having her own den handy. 

I looked to order a decorative cage but they were pricey and made of wood. And I wanted a metal cage like the one I already had.

I saw some dog cage covers online but nothing gave me the look I was going for so I was going to opt to build a table. 

Like so many things why build when there is IKEA.

I found this affordable table with metal legs and knew I could jazz it up. I found the lattice pieces on clearance at Menards.com for $15 each. 

dog cage cover - ikea table hack
Dog cage cover using an IKEA table
Materials:
  • IKEA TÄRENDÖ Table, Black 
  • Dog Cage
  • Extra Strength Magnets
  • ZipSnip Tool or saw to cut lattice to size
  • 4 panels – 32″ x 4′ Roman Vinyl Privacy Lattice Panel
lattice panel
Source: Menards.com

Instructions for decorative dog cage cover

The table from IKEA is perfect since it has metal magnetic legs.

IKEA TARENDO table
TÄRENDÖ table | IKEA.com

First, build the table according to the IKEA instructions.

Measure each side of the table. You’ll want to cut the lattice panels to this size. 

I wanted the panel’s straight edge to be at the bottom, so I cut the top of the lattice pieces.

dog cage cover - ikea table hack
Back of dog cage cover

Then, I measured from the center of the panel, so the main design is included on each panel.  

Next, I cut 3 pieces of the lattice so they fit on the outside of the table. You want the pieces cut so they can connect to the table with the magnets.

Apply magnets to one side only of the lattice with hot glue or crazy glue. One lattice side will want to be placed on the interior side of the table. This will allow the table to have an exposed metal top rail to place the door lattice cover piece when you want to be able to open the dog cage door.  

cage cover open
Magnets to hold the cover piece for the door

Not only will this add some delight to your home but it is always handy to have another flat surface table around too! 

How long did this hack take? And costs?

I cut the lattice pieces with a ZipSnip because I really wanted to complete this project on my own without help.  The whole project (not including the cage which I already had) cost me about 100 dollars. Once I started it took me about 4-5 hours.  Using the ZipSnip I had to stop and recharge so that added to my time. 

dog cage cover - ikea table hack

I have gotten some really great compliments from my friends and family.  Peppermint Patty didn’t skip a beat using this new cage so I would call it a success.

See the full tutorial here.

~ by Becky

The post Dog cage cover that looks good and works even better appeared first on IKEA Hackers.

IKEA SCHOTTIS hacks and quick fixes that make it better

$
0
0

We just love the IKEA SCHOTTIS pleated shade. Best thing about it, it costs only $3.99.

Besides, it looks good and does the job, whether as a permanent or temporary fix.

IKEA SCHOTTIS blinds

The blinds are really easy to attach to your window frame. No drilling needed. All you need to do is cut the shade to the length you need. Peel and stick. Easy peasy. Here’s an installation video, if you need instructions.

IKEA SCHOTTIS, oh blind me!

Don’t be fooled by its price tag. It can look pretty dang awesome. Just feast your eyes on it, installed in these homes.

Convinced yet?

IKEA SCHOTTIS blinds fixes

Now, there are a few quick fixes if you do run into problems with it. Here are two of the most common:

#1 Double sided tape won’t stick

You’re supposed to stick the double sided tape on the top edge of the shade onto the intended surface. But at times it just doesn’t stick well (like on my orange peel wall) or it will peel off after some time. My quick fix is to use a tension rod (which I got from Daiso).

What I did was to fold the top edge of the shade and staple it down to form a loop, large enough to fit the rod. The staples do not look great but it’s not very noticeable from far. I’m fine with it as it took me less than 2 minutes to get it over with, so it will have to do for now.

Then, I inserted the rod and wound it to the right tension for my window opening. And it’s been up for over a year, with no problems.

If you want a neater finish, use hot glue or sew a stitch across.

#2 Clips won’t hold up the pleats

The plastic clips that keep the blinds open in the desired position are quite feeble. At first, I used them but they kept coming off especially after a strong gust of wind. So, I resort to cute binder clips to keep them in place.

What other issues have you encountered using this stick-on shade?

Customised SCHOTTIS shade

Now, if you don’t want to hang it from top to bottom, that’s also possible to turn them into custom SCHOTTIS privacy blinds.

custom blinds

But that’s not all you can do with it. Let’s take it out of its comfort zone, shall we? Here are a few things you can hack with the IKEA SCHOTTIS blinds.

As party decor

#1 2D Pom Poms
2D pom poms from ikea blinds
Source

April of White Grey House trimmed the shades for her window. Rather than throw the discarded material, she turned them into pom poms. And it’s so simple. She joined both ends together with the double sided tape which came with the SCHOTTIS.

Then, hot glued the centre bits together to form a pom pom. Threaded a string through to hang it up.

And that’s how you get a basic pom pom. You can paint, dye or add other ornaments to jazz it up. See tutorial here.

#2 Fan-cy decor
fan decor
Source

Carousell user Neramani fancied up the plain IKEA blinds for Chinese New Year. “I just used a large clothes peg in the centre and used the Velcro strips already included in the SCHOTTIS blinds pack to Velcro both ends to each other. And added a pale gold ribbon that matched my other decor.”

To hide stuff

#1 Cover up open shelves
KALLAX cover up

The KALLAX is awesome and stores a motherlode of stuff. But come on, it’s hard to keep it looking pretty and organised and co-ordinated. That’s where the SCHOTTIS shade comes in and gives us an easy cover up for the KALLAX. See the tutorial.

#2 Above wardrobes
IKEA SCHOTTIS blinds as wardrobe cover

If you use the top of your wardrobes to store “stuff”, the SCHOTTIS shade is an easy way to cover up the top and give your eyes some rest. Reddit user, HugePilchard suggests that you “buy enough SCHOTTIS blinds to go the entire length of the wardrobes and stick them to the ceiling.”

For photography

#1 To diffuse light
light diffuser ikea hack

Source

Hang it up between the light source and model / object and voilà! light diffuser.

#2 As a softbox
softbox

Make a photography softbox out of an IKEA DRONA box, SCHOTTIS shade, foil and a light bulb. See the full tutorial here.

How have you used the SCHOTTIS shade? Share your ideas with us.

The post IKEA SCHOTTIS hacks and quick fixes that make it better appeared first on IKEA Hackers.

Antenna Holder hacked from IKEA curtain rod

$
0
0

It’s the “ANTENNHÅLLARE” aka antenna holder

I run an ADS-B receiver to track airplanes and feed data to sites such as Flightradar24. It’s nothing more than a hobby, plus I really like airplanes! Since antennas don’t work that well in the living room I decided to place one outside to improve my range.

Since my landlord doesn’t allow me to put things on the roof I decided to install an antenna on the balcony instead, which required a 3 meter-or-so post to mount it on.

After debating with other hobbyists about what kind of pole to get, I eventually decided on the RÄCKA. It is a cheap, clean looking solution that would fit my needs.

While I do admit that this antenna holder hack is ridiculously easy (it’s just a pole with some clamps!) I haven’t really found any existing solutions on the internet that make use of IKEA items.

IKEA items used: 
racka curtain rod
Other materials and tools:
  • Airnav ADS-B antenna (but any will do)
  • 2x mini U-bolt clamps that were included with the antenna
  • 2x regular U-bolt clamps that I had left over from a previous diy project
  • A few unnecessary zipties
  • Scotch tape
  • IKEA Hollow Wrench Key (part #120202)

Antenna holder hack instructions:

1. Clamp antenna to the far end of the RÄCKA using a wrench.

antenna holder for outdoor antenna

Related: IKEA strainer wi-fi antenna


2. Clamp the RÄCKA to any existing post (in my case, the balcony) and tighten up the bolts until the RÄCKA has no more movement.

clamps

3. Extend the RÄCKA to the required height and apply tape to prevent it from sliding back down under its own weight.

curtain rod

4. Optionally, apply zipties to keep the antenna’s cable neat.

5. Route the antenna’s cable to your device of choice. In my case, I chucked it into an open window where a Raspberry Pi is sitting in the windowsill.

antenna holder for outdoor antenna
How long and how much did it cost?

Excluding the €55 antenna I only spent about 10 euros on the RÄCKA and the clamps. I spent maybe 30 minutes constructing everything plus an additional 15 minutes fine-tuning the antenna’s position.

What do you like most about the hack?

It was quick and easy. Not only that it also increased my antenna’s reception by 200%, I am now receiving 140 airplanes throughout the entirety of The Netherlands and Belgium.

tracking airplanes
What was the hardest part about this antenna holder hack?

Transporting a 2 meter pole back home using only public transport! Installing the antenna would be easier with 2 people due to the unwieldy size.

What to pay special attention to?

Make sure the clamps are really tight. Last thing you want is the whole contraption dropping off the balcony. Also I attached the clamps to the balcony first before lowering the pole into them. This saved me from having to screw in the bolts while at the same time trying to not drop everything down below. I also tied the hollow wrench key to my hand with string so I wouldn’t accidentally drop it.

Looking back, would you have done it differently?

I would have added a fifth clamp to replace the scotch tape in the middle of the RÄCKA. I’m unsure if the tape will withstand the weather over time.

And other thoughts/ comments that you have received about the hack

I’ve heard some concerns about the pole getting hit by lightning strikes, but since there were already existing dishes around the roof from neighbors I figured I’d be safe enough. It’s not the highest point in the area by far. Still, if I ever get really unruly weather I might as well just retract the RÄCKA temporarily.

~ by Martijn

The post Antenna Holder hacked from IKEA curtain rod appeared first on IKEA Hackers.

Ceiling lights for a small room? A classic to the rescue

$
0
0

I’ve seen quite a few very nice ceiling lights made from the TERTIAL work lamp, such as:

This TERTIAL chandelier

IKEA TERTIAL Ceiling Lights

A Dear Ingo Modern Chandelier

IKEA TERTIAL Ceiling Lights

And this Dear Ingo Inspired Chandelier

IKEA TERTIAL Ceiling Lights

I made an alternative version with 6 lamps for a smaller room.

Materials:
Tertial work lamp

TERTIAL | IKEA.com

IKEA TERTIAL Ceiling Lights Construction:

If required, shorten the ADILS leg with a hacksaw. (I reduced it to 50 cm, which is an absolute minimum).

Drill a hole of about 8mm at the lower end (cable entry) and drill through the leg at the top (for hanging).

Tertial lamp arrangement

Remove the rotating part of the SNUDDA and mount the ADILS leg in the centre.

Clamping the TERTIAL

Screw on the TERTIAL table-clamps, a little off the edge of the SNUDDA disc.

Cut off the switches of the lamps and strip the wire.

Connect the wires with a connector. I’ve put three lamps on one connector. Then, I slid the wires coming from the connectors through the ADILS leg and joined them near the ceiling.

Stablising the ceiling lights

When I fitting the lamp to the ceiling I noticed that all the lamps were swinging to one side. They were bunching together, so I needed to stabilise the lamps to prevent them from swinging and turning.

Conveniently there is a small hole in the table-clamp and a slit in the pin that fits in the clamp. You can fasten the lamp by just drilling a screw through the hole and the slit, but it works better when you put in a thick rubber band (I guess it will also work with a small cork, a piece of wood, some silicone or glue) and fix it with a screw and metal ring.

I fitted the lamp to an eye screw on the ceiling with a nut and bolt going through the ADILS leg.

Attaching the wires
Covering the cables

As I wanted to cover up the electricals near the ceiling, I happened to stumble upon a food processor part that I didn’t need anymore and had the exact diameter.

I held it in place with ordinary hairbands. Another option was to use a plastic pot of some sort and drill a hole in the bottom with the diameter of the ADILS leg.

IKEA TERTIAL Ceiling Lights

The ceiling lights are fitted with RYET LED-lamps of 1000 lumen which is really bright.

Good luck on your build!

~ by David L.

The post Ceiling lights for a small room? A classic to the rescue appeared first on IKEA Hackers.

Viewing all 1545 articles
Browse latest View live